May 27, 2018
Thanks ...
After working on this card, I now have new respect for the challenges that this art form presents and for the artisans who make it look so effortless.
Mixed-media? No problem--you can just paint over a part you don't like. Card making requires more planning and if you make a mistake sometimes you just have to start over.
But practice makes perfect, right? So I plan to do just that and purchased the June Card Kit from Simon Says Stamp. It features a lovely stamp set called Beautiful Flowers and I have used it for this card.
The kit came with three dots (red, yellow, blue) of an artist-grade watercolor paint from Daniel Smith and this was the only paint I used to tint this stamping.
Using the science of complimentary colors becomes critical in this scenario because you must tone down the primary pigments for the colors to look more natural.
The border was made with kraft paper using the new Tim Holtz 3D embossing folder called Botanical (also included in the kit) and machine-stitching provided some accent.
Otherwise, it's a bit of a plain jane but I didn't think it needed anything else since the flower image is such a show stopper. Thanks to this new stamp set, I now have some sentiment stamps that I was sorely lacking which will help me with my new quest in card-making.
May 24, 2018
My Sweetheart
Inspired by a song (this week's Monday challenge at SSS), here's a tag that celebrates the turn of the last century when everyone was waltzing to a popular tune called "Let Me Call You Sweetheart."
The background reminds me of a vintage tin ceiling tile. It was made using bronze metallic cardstock and the new Sizzix 3D texture fade (Tim Holtz) called Botanical.
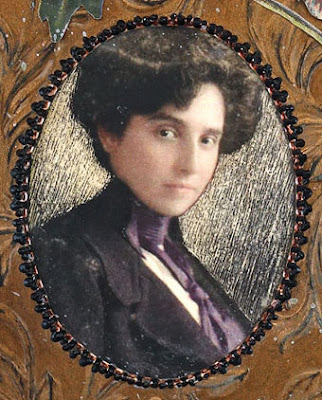
The portrait is an image transfer using this photo. Because the original background was dark, I used the tip of an Exacto knife to scratch in lines to lighten it and create better definition.
The frame border was made with dots of 3D fabric paint called Scribbles.
The flowers and perfume label (Tim Holtz) were thinned-out and then fussy-cut to create a more delicate appearance.
I pasted a ribbon along the right hand side using fabric glue (works great and doesn't soak through) and my strip of text is from the Idea-ology Clippings Stickers collection.
And for anyone out there who's not familiar with the song that inspired me here's a link--take a listen!
May 17, 2018
Choose Joy
After playing with numerous stencils to create this journal page, it became apparent that I must get them better organized. I've ordered some clear vinyl sleeves and plan to place them all in a 3-ring binder.
This way, I'll know what I've got and use them more often as they really are a "joy" to work with.
Stencil It is this week's theme at Simon's Monday Challenge Blog and except for the red stamped script, washi tape and minor line work, everything you see on the page was made with a stencil (some store-bought, some hand made).
After applying the stencils, I gave the page a light coat of gesso then began to bring out the lines in the large lotus flower with a Pitt pen.
The next view shows additional line work and the beginning of value adjustments to put back some color. The nice thing about stencils is you can line them up with the original printing to finesse them as needed.
I added additional stencils of tiny leaves and the large text, some washi tape and a bit more line work to balance out the page.
Here are some close-ups you might enjoy--the last one shows how I used a stencil to mask the original printing and went over it with a text stamp.
Subscribe to:
Posts (Atom)


