/* */ Beulah Bee: Tim's 12 tags
Showing posts with label Tim's 12 tags. Show all posts

June 06, 2015

Tea Zen


The day I discovered the Irish Breakfast variety and learned to add a spot of cream to it, was the day I fell in love with tea. Mind you, I still take in my two or three cups of Joe every morning but there's something about an afternoon tea break that's every bit as satisfying.

So here's my tribute to favorite beverages inspired by this month's 12 Tags of 2015 by Tim Holtz.

The stripes on the bottom-half were created with a hand-made stamp and acrylic paint.

The top half was stamped with an image from Stampers Anonymous called Math Border using Ranger's cobalt archival ink.

The paper bits were cut from Tim's new paper release called Correspondence.

The tiny teacup is another Tim Holtz stamp from a set called Tiny Things that was cut from paper along with a teapot (maker unknown) and tinted with Distress inks.

I used Picket Fence Distress stain to lighten-up several areas and created shadows with a colored pencil.

I added a bit of burlap ribbon for accent along with some Remant Rubs text and used a white Gelly Roll pen to bring out highlights on the flower in the foreground.

I tried to create a sense of depth by using larger images in the foreground along with light and dark colors (value) and diagonal stripes. This bit of "fooling the eye" is a challenge I really enjoy. Along with my favorite hot beverages, of course!

May 04, 2015

Devil or Angel?


My entry for Tim's May tag features a snapshot from the Idea-ology Photobooth strips along with pieces from the vellum Expedition ephemera pack, a metal number brad and the School House stencil.

I thought I'd share a few tidbits regarding my distress techniques rather than provide a step-out since Tim's got that covered.

Click to Enlarge

I distressed the photo by peeling off the back so it would be thin enough to scrunch then flattened it out, pasted the backing back on and inked the edges.

A liberal amount of water was used with red brick and iced spruce to tint the texture paste and background. Naturally, the tag warped a bit so I flattened it out with some heavy books overnight.

There's adhesive-backed metallic mesh behind the photo and I used text rub-on's for the question marks. I also wanted the hole reinforcement on the tag to show so I cut my background papers around it.


I used a typewriter for the text on the shield. To insert it into the machine, I used washi tape to temporarily fix it to a larger piece of paper.

I distressed the shield with sand paper and tinted the edges with colored pencils.

I removed the tabs from the number brad then flattened it out with a rubber mallet. I darkened the numbers a bit with a fine permanent marker.


To tone down the color of the arrow which was originally a very bright orange-red, I used a colored pencil in a complementary color, blue-green (which is opposite orange on the color wheel).

This is a good trick to become familiar with when going for a distressed look because adding a color's complement is a proven way to tone down the original hue by reducing it's intensity.

To paste the arrow, I marked off where it would be then scraped away the stenciled letters underneath so it would lay flat on the background.


Well, I think that's everything and once again, I enjoyed the challenge of this month's tag.  Tim sure did pull out all the stops this month and I hope you are inspired to create something too!

April 05, 2015

Under Cherries


I was blessed with some really good fortune last month as I won a gift certificate from Ellen Hutson which I used to order Tim's new Flower Garden stamp set (it was love at first site).

My luck improved even more when Tim used this stamp set for the April Tag of 2015 and I'm so happy that I have one to use!

I stamped what I think is a cherry or apple blossom on some watercolor canvas that was cut out and pasted to a background made with Tim's Kraft Resist paper. 

I altered the paper background using paint and stamps.

My hand-lettered text was made with a gel pen and comes from this Haiku poem (translated by Asataro Miyamori):

Under cherry-flowers,
None are utter strangers.


Click to Enlarge
I have to say a word about Ellen Hutson because this was my first experience ordering from their site.

I really like their fast shipping policy. They strive to fill your order and ship it within one business day after you place it.

They use USPS Priority Mail so you get it in three days and it comes in a nice sturdy box so nothing gets smashed.

Thanks Ellen (for the gift) and thanks Tim (for what may be my all-time most favorite stamp set ever).

March 08, 2015

Explore Life


Tim's March tag for 2015 is a lesson in masking and using embossing powders with texture paste. I have three tags in the trash that just didn't pan out but believe me, I tried. My failures may be related to not having the right mediums so I just had to do things differently.

I don't usually step-out my techniques but, in this case, I thought it would be useful to demonstrate my process (click on the images for a larger view).

I began by pasting a paper from Tim's Crowded Attic paper stash onto a manila tag. They are images of vintage stamp pads and one of my all time favorites.

Sometimes it's hard to visualize where best to place a stamp so I made an imprint on some acetate that I used to try out different arrangements.

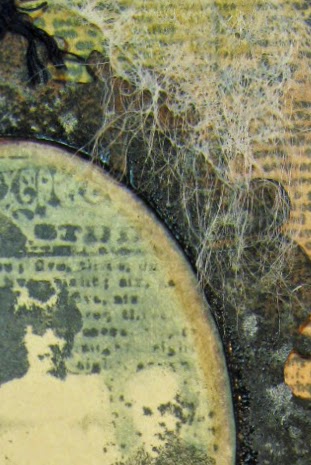
I stamped the image using Perfect Medium and clear embossing powder because I wanted to create a resist.


Then I applied a coat of Seedless Grapes Distress Stain and let it dry followed by a second coat of Vintage Photo stain.

As you can see, the embossed image resisted the stains perfectly!


To remove the embossing, I used a hot craft iron and absorbent paper (newsprint is best). The iron re-melts the embossing and the paper absorbs it. Make sure to pull the paper off immediately after you heat the image otherwise it will cool and the paper will stick.


Tim calls this next technique "stamp-to-stamp." I wanted to fill-in the bird so I stamped a library stamp onto the bird stamp then re-stamped the bird onto my tag (whew!).

Hopefully, the photo will help to explain what I mean.


No rocket science for the next step which was simply a matter of sponging paint through Tim's Burlap stencil.

I went over some of the stenciled areas with Black Soot Distress Ink to provide a variation of color.


Tim always says, "it's in the details" so my final touches include a Remant Rub over homemade tape, a touch of Peacock Feathers on the raven's body, a gel pen for the black dots, a black colored pencil to outline one edge of the bird and a white gel pen to bring out a few highlights.

I admit I didn't follow along very well this month but I really like Tim's composition and the idea of using a large bold stamp along with the stencils. I think part of the appeal of his tag is the strong contrast of lights and darks which I tried to aim for.

The monthly tags always make me push my boundaries and try new things which must be the reason I enjoy it so much.


Here's a link to more information on the emboss resist technique from one of Tim's tutorials that explains it perfectly.

And here's a video from Tim that demonstrates the stamp-to-stamp technique (skip to the 6:45 minute mark to by-pass the embossing folder info). I kind of wish I had watched this demo before starting my tag. I would have done things differently but will definitely try this technique again.

Stamp credits: Stamper's Anonymous Scratched Raven and Library

February 09, 2015

Best Day Ever


All the paper bits for this tag came from Tim's Crowded Attic paper stash. His February tag features a collage theme so I cut and distressed the background like he demonstrated.

For embellishments, I used Crackle Accents on the frame edge, an Ephemera Pack label, Remant Rubs, a small Arrow Adornment, a Number Brad, washi tape and some gingham ribbon.

Here's a tip about the Ephemera Pack label: They are made with vellum and are semi-transparent but I painted the backside with white acrylic to alter its appearance.

I also used a touch of gold paint on the arrow and brad and filled in the number with red.

Best day ever? For me it's this Saturday when my husband and I will celebrate our 34th wedding anniversary.

Happy Valentine's Day!

January 04, 2015

Take Aim


Here is my January tag inspired by Tim's 12 Tags of 2015. This month, it's a play on words and I chose mine from the pages of a book. The background is his new tissue paper and I modified one of his index labels to make a bull's eye.

I really like using Tim's tissue paper: It's tough but thin so it's great for pasting, it stands up to abuse and I like that it's barely transparent. But initially, I found it a bit challenging to tint (especially with dye inks) under certain circumstances.

Click to Enlarge
So I'd like to share a new technique I worked out which you may also wish to try. The tissue colors on this tag are distress stains applied to the back of the paper. Since the paper is transparent, they show through and won't be disturbed when you paste or paint on the top side.
I'm so happy the tag tutorials will continue again this year, it's great to see everyone's creations and it makes me feel part of something really special. And, of course, I love making tags! 

December 18, 2014

Believe


Tim introduced a new product this month called "Frosted" during his December tag tutorial.  It looks interesting and I hope he demonstrates other uses for it in future posts.

I substituted old-fashioned drafting vellum for my background and text by using the Falling Snow stencil (Simon Says Stamp) and a section from Tim's Christmas Words stamp along with some embossing ink and powder to create a similar effect.

The reindeer was embellished with Perfect Pearls and you may recognize the leaves from Tim's Wallflower paper stash. The number 25 is an Idea-ology Plaquette.

I'd like to share an embossing technique seen on the leaves as it comes in handy when you want fine details and better control.

Click to Enlarge
I used a gel pen to draw in the areas I wanted to emboss. In this case, it was the veins on the leaves.

The ink stays wet long enough to apply embossing powder. I used various pen colors and clear powder in this example.

November 07, 2014

Remember Paris


Inspired by Tim's November tag, I created this one using some of his techniques and also everything but the kitchen sink.

Oh wait! I did use the sink to wash off some ink at one point...

Click to Enlarge
It all started when I hand-cut a flower shape from corrugated cardboard, filled it in with paste medium and after it dried, added an image transfer on top which was then covered with clear crackle paint.

Ink pens, acrylic paint, oil pastels, and colored pencils were used to add color along with some splatters of gold embossing. The letters were hand-cut and then distressed with paint and crackle.

Tim's tag reminded me of inlaid parquetry and I was inspired to experiment!

October 08, 2014

Nevermore...


Here's my contribution for the link-up to Tim's October tag. I used the standard techniques: stamping, masking, embossing and inking, and Tim's Lost and Found stamp set, which is kind of "edgy" and suitable for this occasion. The raven is one of my own, hand-carved stamps.

The frame was made with texture paste and a homemade stencil but an error in stamp alignment forced me to do a cut and paste instead of applying the texture directly on the tag. Oh well!

However, I did make a useful discovery that I'd like to share.

I rubbed a dryer sheet over the paper prior to embossing (it's supposed to keep the powder from sticking where it shouldn't).

I ripped a corner off the sheet and discovered that the loose fibers make a rather authentic looking cobweb.

Nothing beats a typewriter for creating text, so I rolled the tag into the platen and was sure I felt Mr. Poe looking over my shoulder as I typed the word nevermore...

September 07, 2014

If Only...


I don't know what possessed me to purchase a face stamp (this one's by LaBlanche) because I've found them rather limited in use. But seeing Tim's September tag and the others who've posted links, has given me some new ideas.

I also admit that alcohol inks intimidate me so mine have gathered dust but it was good to get them out again for this project.  I do love the glossy paper because it takes ink so well, stamped images are super crisp and it may be a "must have" for any success with alcohol inks on paper.

I tried Tim's background technique, to no avail, so I just dripped the colors right from the bottle onto a tag cut from glossy paper. Then I randomly stamped off-white paint through some homemade and store-bought stencils and went over it with distress inks after the paint had dried. Some light stamping with script, borders cut from washi tape and a bit of Dymo tape text finished it off.

August 03, 2014

Mariquinha

The image of this lovely lady, Mariquinha Junqueira, was found here and was my inspiration for creating a tag to link-up to the Tim Holtz blog.

His monthly tag for August has challenged participants to create something that showcases our own personal muse and reminds us that each of our artistic voices is unique and we must embrace it.

He also shared some great techniques including a personal favorite which is taking advantage of the resist quality of his tissue tape to retain white space.


My technique was similar to his--I used tissue tape, distress stains and Tim's burlap stencil with texture medium. The house (LaBlanche) was stamped on to deli paper which also has a resist quality. A bit of colored pencil was used to create a shadow under Mariquinha's dress to ground her to the page (keeps the image from looking like she's floating).

I love finding images that inspire me and then trying to place them in a composition using stamps and other collage elements. I created this tag for the pure joy of it and give thanks to Tim for a great suggestion and for time well spent.

July 04, 2014

Sea Spell


I had so much fun making this tag! Inspired by Tim's tag for July, I can't believe how many products I used to complete it. I dusted off crackle paint, glitter, and embossing powders that haven't been used since Christmas. The background was splattered and spritzed and wiped-off so many times I lost count. I knew getting it right would be a challenge so I coated the tag with gesso beforehand.

It was also the perfect time to use some sea-themed papers that I picked up several year's ago and never used. The sea horse and sand dollars came from a release by Graphic 45 called Botanicabella. The shells and greenery are Calambour decoupage paper bought at a craft fair.

Instead of using a shrink plastic background, I used the Falling Snow stencil by Simon Says Stamp and embossing powder to create a resist. The sandy area is a variety of embossing powders sprinkled onto tissue paper then cut out and pasted to the tag.


There's a bit of clear rock candy Distress glitter over a few shells and leaf edges and I completed the tag with a quote by Jacques Cousteau that was printed and aged with inks.

Tim suggested that if you can't go to the beach then let your creativity take you there. Maybe that's the biggest reason this tag was so appealing to me. I've been land-locked all my life and yet my astrological sign is Cancer the Crab. Every time I've visited the ocean I have had such a connection! Maybe some day I'll make it there again and be part of it's wonder, forever.

June 03, 2014

Waterfall

Click to Enlarge

I can certainly relate to the sentiment on this month's 12 Tags of 2014 by Tim Holtz which is, "out of limitations comes creativity." Perhaps that's another way of saying, "necessity is the mother of invention." All I know is I seldom have the products to make an identical tag so I have to improvise and that often gives birth to a whole new level of creativity.


I did use watercolor paper, his bubble stencil and distress inks for the background and enjoyed this relief printing technique.

The butterflies were made using a handmade stamp on book paper and sewing machine stitching provided the accents.

I know I'll use this technique again with other stencils and I think the key is to use good, smooth, heavy watercolor paper.


May 02, 2014

Calling Card


The month of May brings a mosaic-type layout for Tim's 12 Tags of 2014 and here is my interpretation. I don't have much in the way of "cool trinkets" but I do have the Wallpaper stash and it's full of goodies that can be fussy-cut which I used here.


The bottle-cap frame I used for Timothy's portrait was found on the street during a recent stroll around the neighborhood. It was already rusted and flattened-out and I was lucky to find it just in time for this month's tag.

Tim's tutorials are the very best and this month's demonstration was so informative. I'm amazed by all the gadgets that can be used in paper crafting and I look forward to seeing the ShadowPress equipment put to use by others participating in this month's link-up.

April 04, 2014

Shabby Chic a la Morocco

I love a good challenge and Tim's tag for April was just that. Not using a die cutter means working the hard way but it forces me to think outside the box and makes for more original artwork. I always try to incorporate whatever technique he highlights but make a point to put my own spin on it.


This tag went through many transformations (thank goodness for gesso, the great cover-up) and I'd be hard pressed to say exactly how it was made. But the ingredients were corrugated cardstock, a modified stencil (courtesy of Lowes), an Exacto knife, various tissue tapes, acrylic paint, Distress inks, sand paper and a fine-tipped marker. My flower was made using a technique from Clare Buswell and the leaves were cut from watercolor paper.


I really enjoy Tim's monthly feature and had so much fun working on this tag. I am grateful for his inspiration as well as the opportunity to link up and I always look forward to seeing what others will make. Thanks for stopping by!

March 02, 2014

Royals


Is it just me or, are some of what seems like the easiest of Tim's monthly tags deceptively difficult? It took four tries to get a similar effect but it was great practice just the same. I'd either get a stamped impression that was too dark or too light or when I rubbed, it would smear too much.

I followed each and every one of his steps except I pounced ink through the stencil instead of using a spritzer, I didn't use a metal word band and my twine is a gold ribbon cut in strips and pasted on. I used stamps (PaperArtsy and Prima) with a similar format as the feather and the nest, my stencil was hand-made.

The text came from lyrics in a song called Royals by Ella Marija Lani Yelich-O'Connor aka Lorde who's from New Zealand. This song has received a lot of play time here so that's why I thought of it.

As always, I'm really looking forward to this month's link-ups and aren't we lucky that Tim provides such great tutorials (and products) and a forum for sharing our work! If you've never participated, I encourage you to try--it's really great fun.

February 02, 2014

Heart Candy Love


Just a simple tag inspired by Tim Holtz using his Kraft Resist Paper Stash for a background, a paper punched strip and some hearts, embellished with sewing machine stitching, white Scribbles and a black fine-tip marker.

The love script is a store-bought stamp, the postage stamp frame was hand-cut. To get a chalkboard effect, I mixed white and clear embossing powders together after stamping with white pigment ink and used a white charcoal pencil to cloud the background.

To see more detail, click to enlarge...

January 03, 2014

Take Time

I made this to commemorate the first Tim Holtz tag of 2014, where he reminds us to take time to do something creative.

While I lack all the nifty die-cutting equipment and assorted goodies, I did receive a collection of miniature Tim Holtz stamps for Christmas that I was happy to use on this tag.

The background is from the French Industrial Paper Stash that I enhanced with Distress inks, a bit of colored pencil, and rub-on text.

Taking time to create is how I escape from daily stress and all the problems in our world that I feel powerless to fix.

I am so grateful to have this time and wish it for all those who seek it.

December 13, 2013

Compliments of the Season


tag, Christmas

The best part of making cards and tags at Christmas--you can never have too much glitter!

This tag was made by pasting gold-printed mulberry paper (Black Ink brand) on a manila tag, color was added with Distress inks, it was mounted on pinkish-red card stock and glitter was placed around the border.

The poinsettia was made by printing a page of leaves on vellum which were cut out after painting the back side. The leaf edges were embellished with glitter and diamond bling was used for the center.

The greeting (an image from Graphics Fairy) was pasted on card stock and it also received some glitter. A simple red bow became the topper.

I think the best feature of this tag is the gold-printed mulberry paper. I never tried using it with Distress inks but I applied it gently (the paper is soft and thin) and it helped break up all that gold and gave it an antique-like quality.

My inspiration came from the Tim Holtz December tag and Simon Says Stamp Monday blog challenge, which was tissue paper.