/* */ Beulah Bee: washi tape
Showing posts with label washi tape. Show all posts

May 30, 2023

Big Bugs

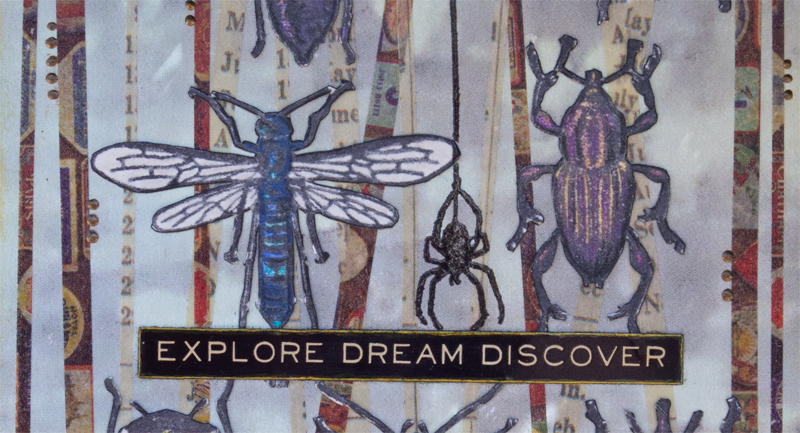
I was put to the task of making a birthday card for my 13 year-old nephew. Not easy since most of my stamps/supplies are on the girly side. With all the "What is a Woman" stuff in the news recently, it seems funny to be even writing this. Sure hope no one's offended.

I did have a stamp set by Tim Holtz called Entomology that I haven't used much (purchased mainly for the script text included in the set) and thought, "boys like bugs!" So that was the starting point for this card.

The bugs were stamped, tinted and hand-cut then mounted on scrapbook paper. Strips of washi tape were applied along with a text sticker and a few dots, here and there, of copper Scribbles.

Well, I hope he likes it, I've not spent time with any boys this age and times are, as they say, a changing.

As always, I hope this post finds you well and happy and I appreciate your visit.

Until next time, take care.

February 24, 2023

Sweet Prize

Today I'm sharing a tag inspired by, of all things, a new craft mat! (Which can only be said by one seriously bonafide and confirmed craft-nerd who, perhaps, should get a life?)

I started with a piece of scrapbook paper (Epiphany by Prima) for the background then layered scraps of Idea-ology Tissue Wrap, washi tape and stenciled tissue paper along with a hand-cut vintage image.

It was tinted with Distress inks and stenciled texture paste (Dot Fade by Tim Holtz). The text is a Clipping Sticker.

My trusty 10+ year-old Ranger Inkssentials craft mat was getting harder to clean and I didn't realize just how shabby it had become until I got a new one.

I keep it mounted on an inexpensive canvas panel with double-sided Scotch tape on the inside edges and strips of packaging tape around the outside edges. The back side of the panel is coated with gel medium to protect it from wetness.

This one is 9" x 12" and I use it most often but also have a larger one (14" x 18") mounted in the same way when I need a bigger work surface.

As always, I hope this post finds you well and happy and I appreciate your visit.

Until next time, take care.

February 13, 2023

Kansas

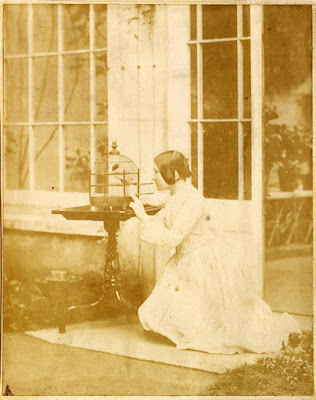
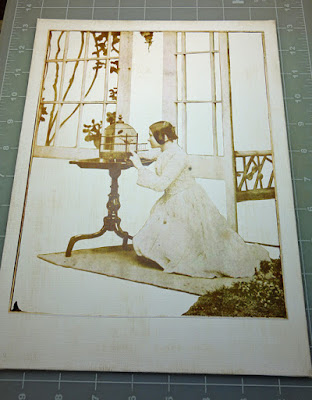
Most times, my inspiration for tag-making starts with a vintage photo that speaks to me somehow. I'm never sure where I'll end up but usually that voice gives me an idea on how to proceed. This one said, "Dorothy, you're not in Kansas anymore."

It began as a vintage postcard that I trimmed and pasted to give it the standard tag dimensions. Then I applied an image transfer of the photo (technique here) and used thin washes of acrylic paint for color.

I knocked-back a portion of the postmark where it covered the dress with transparent white, used glitter on the corsage and shoes and added the appropriate text cut from a book page.

Most tags look better with a border, this one is washi-tape. Since it was too wide, I taped it to my cutting mat, used an X-Acto knife to cut smaller strips and (as is always the case) it was still sticky enough to be reapplied to the tag.

I'm linking up to Simon's Monday challenge, "Frame It."

As always, I hope this post finds you well and happy and I appreciate your visit.

Until next time, take care.

October 31, 2021

Remind Me

Happy Halloween, everyone. No carved pumpkins or kids collecting candy at my house this year but my spirit remains "creepy" just the same.

Sharing a tag made of collage bits and stamping (mostly Tim Holtz) and this link to a short essay that I found particularly inspiring today.

As always, I hope this post finds you well and happy and I appreciate your visit.

Until next time, take care.

November 26, 2019

12 Tags for Christmas 2019 - Pine Grosbeak


The idea for this third Christmas tag for 2019 was a happy accident that I followed through on with a few deviations in between.  Let me explain.

I die-cut the holly (Tim Holtz Mixed Media Christmas) from a book page and placed it on top of some paper scraps. One of them was an enlarged half-tone image from a vintage book and I thought the various dots peaking through looked cool so I decided to use it.

The bird was cut from a vintage book. It was originally black and white and I added color with red ink and collaged over the branches. I've never seen this bird myself but they live in colder climates. Imagine coming across one foraging in the snow! I love birds :-)

I created an oval with dimensional paint drops (Scribbles) and painted over the outside section to create the vignette.

I distressed it with sanding, added the washi tape and a Remnant Rub and then made it an official Christmas tag by embellishing it with platinum Stickles.


I'm linking to Simon's "Tape It Up" Monday challenge.

Here's a link to Christmas tags from previous years if you'd like to see more (or use the link in the label section below).

May 12, 2019

Happy Mother's Day

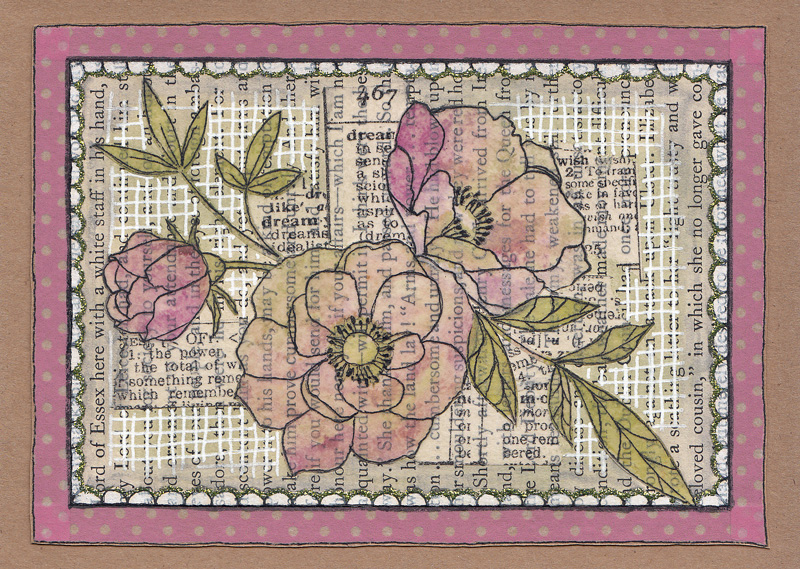
This is the card I made for my Mom this year. I am so grateful to have her still (she's a nonagenarian) and these days, our roles are reversed somewhat but more than a mom, she's my truest friend.

That's washi tape around the outside (pink polka dots), the scalloped border was hand-drawn and embellished with white paint and glitter glue.

The stamped pieces (Simon's Delicate Flower set) were cut from transparent paper that I tinted with inks and pasted onto book paper along with some more washi.


I used white and black gel pens to make lines in the background, on the borders and to further emphasize the line quality on the flowers.

I'm linking to the Monday challenge at Simon, the theme is "Add Something Metallic" and I think my glitter glue may qualify.

If you are a Mom, I hope your day is as special as you are!

September 29, 2018

Simply Discover


You'd think working in monochrome would be easy--yes? I have found it to be easier said than done.

And so, for this week's linkup to Simon's Monday challenge, I took the easy way out and went with a black and white theme.

It started with a background paper (Paper Studio B/W Abstract), layered under a page trimmed for the base from Prima called Epiphany.

The luna moth was printed from some clip art then cut-out and pasted and embellished with gray paint and black and white pens (Sakura gelly rolls and Pitt big brushes).

There's a little washi tape, some Remnant Rubs, and a stamp from a set by Tim Holtz called Stamp Collector.

One of my favorite tools used for the black shading around the moth is a Derwent Sketching pencil--Dark Wash 8B.

August 14, 2018

Happy


Splatters and Sprinkles is the theme this week at Simon's Monday Challenge Blog. The paper I used for this greeting card (Modascrap Fly & Scrap) already had splatters which is good because I am somewhat (very) splatter-phobic.

I married it with a snail (Un Escagrot by Carabelle) cut-out and tinted to match the foreground and some washi tape.

The sentiment came from Simon (Beautiful Flowers) and the keyboard stamping is by Tim Holtz (Documented).

August 11, 2018

It's Tape


This is made with tape--washi/design tape, whatever you want to call it, placed in strips or torn into pieces and, where there were windows, covered over with tissue paper.

What could possibly have inspired me to do this?! It started with a photo found on the net (thanks, Vintage Everyday).


After printing, I began to cut away sections and then set it away for awhile, not sure where to go with it but I knew collage would be a part of it.


Then along came a prompt from Simon's Monday Challenge Blog where this week's theme was to add some tape to whatever you make.

Okay, so I went a bit overboard but it was an interesting personal challenge and if I ever use this technique again in a more serious way, I did learn how to best manage the properties of the tape (slick surfaces, sealing, etc.).

I won't share them with you as I doubt anyone would ever do something as crazy as this.

July 08, 2018

Beautiful


A recent purchase (Beautiful Flowers stamp set by Simon Says Stamp) has captured my interest more than most these days. The main flower grouping is really fun to experiment with and the detail is exceptional.

This time, I've stamped the image onto old book paper using brown ink. After it was fussy-cut, I mounted it on a background made with papers from the Wallflower Paper Stash and trimmed it with washi tape.

I filled in the embossed text with white Perfect Pearls and also dabbed it on the flower centers and some of the stamen.

June 07, 2018

Bright & Beautiful


This week I learned that "all things bright and beautiful" is the first line of a poem/hymn written in 1848 by Mrs. Cecil Alexander whose published work was called Hymns for Little Children.

I've also spent the week converting wood stamps to cling mount and testing them (a project not for the faint of heart).

So to take a break and to link up with Simon's Monday challenge, I used various stamped "test" remnants along with an old book page, a vintage photo and some washi tape to create a collaged journal page.


I also had to try a technique I discovered this week where you stamp with Distress Oxide ink and then smear it just a bit with a blending tool. The page border was created this way and I have Stacy Hutchinson (via Tim Holtz) to thank for sharing this tip.


Stamp credits: Inkadinkado, Tim Holtz, Penny Black

February 13, 2018

Heartfelt Friendship


A Valentine's Day tag? Sure! Why not? I'll be sending this to my dear friend, Thelma, who got me started in paper crafting and always makes her Valentine's Day cards special with a commemorative postmark from Loveland.


I'm linking this to a special Simon Says Stamp blog post, Send a Card to a Friend Day (for a chance to win a $100 gift card--whoo-hoo!).

Supplies used: Authentique Classique "Pretty" paper, tinted paper doilies, washi tape, Scribbles, a white Gelly Roll pen and Idea-ology design tape (Chatter).

January 25, 2018

Find Away

I like challenge blogs and my favorite is the Simon Says Stamp's Monday Challenge Blog. And I really, really like challenge blogs when the theme is to create a tag or something with a tag attached.

As I am rather fond of the format :) for this week's Tag It challenge, I used both suggestions and made a tag with tags.


Tim's tiny stamps, washi, tissue wrap, remnant rubs, found relatives and fabric bits were used to create my, dare I say? unconventional masterpiece. No matter what you might think of this tag--you gotta love that faucet (so much detail in such a tiny stamp)!

September 10, 2017

Beyond Measure


Mother Nature is reminding us, once again, how important family and friends are and that we must watch out for one another especially during the hard times.


The tag was made with Sideshow stamp, Chatter design tape, Distress Oxide inks, and Correspondence paper stash.

I'm linking to the Monday challenge blog at Simon Says Stamp where they are celebrating Stamptember and this week's theme is Stamp It.

August 25, 2017

Labels


This is an artist trading card (ATC) and it's the size of a standard playing card. It was made (along with three others) for this week's theme at Simon's Monday Challenge Blog.

I'd never made an ATC before but it's not much different than a tag size-wise and I like working small. Mine became a series rather naturally as a result of using a group photo fussy-cut from a book.

Below is a view of the four of them together but you'll have to open the light-box view (just click on the photo) to get the full effect.


Here's what the original photo looked like before I began to assemble the collages. The children (students) were all lined up in front of their rather impressive school building.


It was my intention to use materials/design elements that best reflect my current style: The fussy-cut figures, Distress Ink stains, stamped tissue paper, Remnant Rubs (Gilded Accents), postage stamps, polka dots (washi tape) and machine stitching.

The children's manner of dress (some without shoes), the mix of age groups and their expressions (perhaps being photographed for the very first time?) are all very endearing and illustrate perfectly why I like working with vintage photos so very much.


March 05, 2017

Ponder

pon·der


pändər/

verb


think about (something) carefully, especially before making a decision or reaching a conclusion.


Stressful times and too many responsibilities have made me keenly aware of how, under these circumstances, I lose my patience and control and can be down-right mean to others.

I took a desperately needed day off yesterday to ponder my situation and produced a journal page that was very therapeutic. I can't change my ways overnight but plan to make a real effort to manage this. 

Click for larger, lightbox view

I enlarged a photo from the collection I inherited from my great aunt Esther (that's her on the right) and cut out the background. The image on the left was found on the net. I tore it into strips, pasted it down then tinted it with colored pencils. I finger painted the background of the page, added some stamped masking and washi tapes and journaled around the border.

It felt really good to have this time to play and I can't wait to get back to the quiet and solitude of my studio. It's a luxury I cherish more than I ever realized.

July 02, 2016

Condo


I've had trouble creating lately. I've shown up for the work but the results just weren't satisfactory. Hopefully, I've learned from my mistakes and the worst is over. It really has thrown me for a loop and even the purchase of a few new supplies didn't help!

So a thank-you is due to Maura Hibbits, who developed a tic-tac-toe board for this week's Monday challenge blog at Simon Says Stamp. Her clever idea allowed me to finally complete something and I opted to go all-in, using every element.


My tag is a layer of washi tape, corrugated cardboard stenciled with paste, birds stamped on fabric, sprayed and stained with blue and green distress inks and a light wash of gesso, some sequins, gold threaded ribbon and gel pen doodled dots.

I imagine it looks like an abstract bird condominium, hence the title of my blog post.

March 03, 2016

The Red Chair


The journal page I share today was prompted by Simon's Monday challenge, Take a Leap Into the Unknown, and it was all that and more!

I took several photos of each stage so my post is longer than usual but I hope you'll enjoy seeing the process. As always, you can click on the individual photos to see a larger version.

I found this lady's image on the net and know nothing about her but wanted to give her a bigger presence because she is so captivating.

I took a leap and cropped out the frame, reversed the image, then printed the photo in a larger size than I normally work with so she'd fill up the page.


I applied polymer gel medium over my trimmed laser-printed photo, placed it on the page and once dry, began the process of rubbing off the paper to transfer the image.


I penciled-in a scene then went over the lines with a black paint pen.


The next photo shows how I used various stamps with black archival ink to create a pattern for the walls, an orchid for the window sill, and a face and frame for the picture on the wall. I also filled in her dress using black and gray paint then took a leap and decided to add bits of tissue paper to her skirt to give it more interest.


Then I took another leap and decided to use oil pastel crayons to tint the window because I knew they would be easy to smear and help create the look of vintage glass.

I used chalk pastels to tint the wallpaper and brown acrylic paint on the wall base and floor. The orchid was tinted with colored pencils because the design is so small a paintbrush wouldn't be practical.

The wall base looked too plain so I stamped a row of images using brown archival ink. My last color decision was the chair and yes, I took a leap, and painted it with bright red acrylic.


I wasn't too happy with the lady's skirt so I dug out some black tissue paper which I added in strips and then finally opted to trim the skirt with washi tape.


Here's one more look at the final outcome (so you don't have to scroll to the top) and in case you're wondering, my journal is the large format Dylusions by Ranger (each page measures approx. 8" x 11").


To learn more about my image transfer technique, click here for a post that further explains the method I use along with some tips. Maybe you'll take a leap too?