/* */ Beulah Bee: colored pencils
Showing posts with label colored pencils. Show all posts

February 06, 2020

A Glimpse of Heaven

glimpse /ɡlim(p)s/  -  (noun)  a momentary or partial view

I'm drawn to vintage portraits with unusual or intense expressions. This image is a good example of what I mean and it's what prompted me to use it.

After some fussy-cutting and sanding, it was pasted to a tag covered with an old German bible page partially tinted with gesso, inks and colored pencils.

The flowers were cut from scrapbook papers and the text is a Clippings Sticker (Tim Holtz). I use these stickers a lot, their curation is very good and always seem to prompt a creative angle/story I might not have considered.


I stamped the symbol in the sky with grey archival ink and enhanced the values with a black fine-line pen.

I'm linking to the "Flower Frenzy" challenge on Simon's Monday blog.

As always, I hope this post finds you well and happy and I appreciate your visit.

Until next time, take care. 

October 09, 2019

Purple Martin


Autumn is Simon's Monday challenge this week and was the inspiration for this greeting card. I dug out an older (but favorite) paper stash by Tim Holtz called Wallflower and the bird (a Purple Martin), leaves and feathers were cut from it.

The background paper is this year's Halloween release from Tim called Abandoned. Run, don't walk to purchase (before it's all gone) if you like dark-colored, jewel-toned distress-looking paper.

I couldn't resist adding the book text. It accidentally showed up on my desk while working and it just seemed like karma to add it. I expect to use the card as a kind of "get well" greeting to provide words of encouragement.

The border was made with Copper Scribbles and Olive Branch Nuvo Crystal Drops.


To prevent warping, I pasted the various cut-out bits using tiny drops of a quick dry adhesive only where needed (on the floppy bits, etc.).

I also tinted the leaves ever so lightly with colored pencils and a bit of ink to alter their original neutral appearance.

October 01, 2019

Happy Birthday Thelma


Thelma (my good friend who got me started stamping) has a BIG milestone birthday coming up and this is the card I made for her.

Nothing ground-breaking to talk about technique-wise but I would like to mention the flower garland because it was hand-drawn by me after a few simple lessons from the queen of coloring books--Johanna Basford. She has a new book coming out this month that teaches her drawing methods.

I gave the garland some color with my Polychromos then cut it out and pasted it onto scrapbook paper.


The cardstock I mounted it on couldn't be a standard card size so I found some really great instructions here for how to make an envelope in ONE MINUTE. Really!

Then I decorated the envelope using inspiration from Kristina Werner and realize I need more interesting postage stamps for the next time I do this. (No pics for privacy reasons.)

I wonder if the post office would mind if I used a real stamp along with some fake ones like these? I'll have to try it and then let you know.

May 22, 2019

Miss Trudy


I'd sure like to know the story behind this lovely little girl but for now, I'm calling her Miss Trudy. She's a Tim Holtz Paper Doll and I stained her clothing with the ink from gel pens (scratching the darker areas a bit to lighten and texturize).

The background was stenciled (Tim Holtz Dot Fade) and I stamp embossed the border using a vintage rubber stamp (1996) by Hero Arts called Violet Border. I am featuring this stamp as part of the company's 45th anniversary Show & Tell celebration for a chance to win their monthly kits.


I am so glad I dusted it off and set about putting it to work as I'd forgotten just how useful this stamp can be!

My tag was colored with Distress Oxides, some gel pen ink and a bit of colored pencil. The bench was made out of washi tape.

I had a lot of fun with it so it's no coincidence that I chose this particular Remnant Rub for the text!


I'm linking up to the Hero Arts Show & Tell Celebration and also to Simon's Monday challenge because this week's theme is Use Stencils.

May 04, 2019

Beautiful to Me


Let's just say you don't see these greeting card techniques everyday so I thought they might be worthy of a share. I made this card for my stamping sister, Thelma, using the new bottle of glitter that she had gifted me.

I stamped my images (Simon's new Delicate Flowers set) on purple cardstock, outlined the edges with Nuvo Glitter Drops, used bleach with a paint brush to lighten the colored paper, tinted the space with colored pencils (orange and green), and finishing up with a big ol' fussy-cut.


I mounted my cut-out on some Prima cardstock (Ephipany), used black Scribbles to bring out the stamens, and edged the card with thin dark grey paper and more Glitter Drops.

I've used Nuvo Crystal Drops before but this was a first for the glitter drops and I must say they are very useful for a number of reasons. First, the are very easy to apply--the fine tip and soft-sided bottle allow for good precision. Second, this stuff is tough! Even after using the bleach, rubbing in the tints, and cutting right next to it, the glitter never came off the paper. It reminds me of Glossy Accents with glitter in it.

May 02, 2019

Duplicate

Craft nerd (and big fan of tags) that I am, when I heard the Monday challenge at Simon this week was "Tag It" I jumped right in. I grabbed a scrap of Tim Holtz paper (Memoranda) and a couple of his stamps and boom--a tag was born!


After stamping, I machine stitched, drew lines, tinted with markers and colored pencils, added some tissue tape, ephemera (the cigar ring and buttons), and even a touch of Glossy Accents.

No plan, no rules, just spontaneous play and when my head is in this kind of zone I am happiest. Thank-you, Simon!

November 19, 2018

12 Tags for Christmas 2018 - No. 2


May I present Tag No. 2 for this Christmas which I really enjoyed working on in a carefree manner with little or no planning.

I'm happy with the result and it was a good reminder that, too often, I overthink what I make and it gets in the way of fun.


After stamping the bird and text (Penny Black Festive Season) on a virgin manila tag, I used a stencil to trace the tree trunk and branches using a mechanical pencil with fine lead (which made it easier to get into the tiny spots).


Then I went over the pencil lines with a Uni Ball Vision Rollerball pen (Fine Black). I like this pen very much because it never clogs and the ink is waterproof. As you can see, I filled in the tree trunks and branches with additional line work in a loose and sketchy manner.


The background was painted in with watered down blue acrylic and I used colored pencils on the cardinal, berries, and Christmas text.

An oval frame (Tim Holtz Industrious Sticker) was placed around the text and some snow on the branches and other white embellishments were made with paint.


I'm linking this tag to the Penny Black Creative Christmas Challenge and to Simon's Monday Challenge Blog because this week's theme is "Let It Snow."

To see more of my Christmas tags you can click on the label at the bottom of this post or use the link I've placed in the sidebar.

September 09, 2018

One of a Kind


Have you ever wondered what it would look like to stamp several Tiny Things* with archival ink on hot press watercolor paper cut in the shape of a tag then filled in with colored pencils in rainbow fashion?

Me, too! I'm linking to Simon, the Monday challenge is "Stamp on it."

*Stamps by Tim Holtz (except for ant).

July 04, 2018

April 20, 2018

Lemony Snicket

doo·dle ˈ/ do͞odl /
verb: 
scribble absentmindedly "he was only doodling in the margin"
noun: 
a rough drawing made absentmindedly

There's not much doodling here. It's a stretch for linking to Simon's Monday Challenge Blog this week but perhaps it counts that the first step I took was to make a border of circles around the tag.


The chair was stamped (Claudine Hellmuth) and then I drew the table. The globe and the hot air balloon were stamped (Tim Holtz Tiny Things); the books, shelves, windows, wall and floor were drawn.

I would argue that drawing and doodling are not the same. But if you consider the definition, I guess this was absentminded in the sense that I have no idea where the idea came from but once I decided to add the books, I thought the quote by Lemony Snicket was a good fit.

October 22, 2017

Shoshin


A journal page to share today made with a technique that I'll definitely try again--a combination of Distress Oxide inks using a Gelli Plate, stencils with white paint and creating negative space with colored pencils.

I embellished my background with an image transfer of a shodo (Japanese calligraphy) for the word shoshin which means "beginner's mind" along with my own handwriting to further explain the concept.

The oxides provide a worthwhile alternative to acrylics when working with the Gelli because of the slow dry time.

Using white paint with stencils while the ink was still wet provided variegations and more subtle shades than just pure white.

I carved out some negative shapes here and there and darkened a few areas with colored pencils for further variety.

October 19, 2017

Best in Show


Most collage artists have a habit of collecting images that might be useful for a future project. I like to collect people and the image I used here was found and saved to my stash six years ago.

I thought the spotted theme clever but had no way of knowing when I'd use it--until now.

This week's theme at Simon's Monday Challenge Blog is "Man's Best Friend" and became the perfect opportunity to use it.

The background is a page from the Tim Holtz Etcetera paper stash, an 8" x 8" collection of papers that are sized just right for tags.

I added polka dots using Tim's Dots & Floral stamp set, the label is from one of his Ephemera collections and most of the tinting was done with colored pencils.

August 12, 2017

B. terrestris


Coloring. That's what my husband calls it when I'm working in my craft room. Today his description is very accurate.

I took a vintage image (Graphics Fairy), transferred it to kraft-colored card stock with gel medium (an image transfer) then used colored pencils and distress inks to give it some color.


For me, the biggest challenge when working on kraft-colored paper is making sure I have enough value changes (lights and darks). In this case, the addition of white on some of the long grasses helped.

July 24, 2017

Philately


Simon's Monday challenge this week is "You've Got the Edge."

And what has a more distinctive edge than a postage stamp?

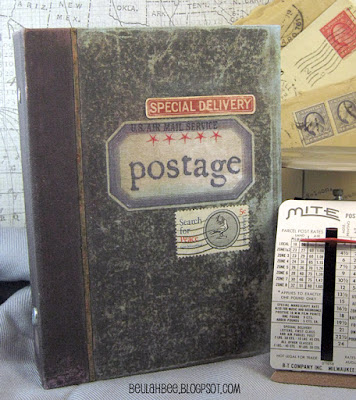
Philatelists (people who collect stamps) use magnifying glasses and special gauges (like the one pictured below) to count the number of perforations for correct classification.


So, for my spotlight this week, I decided to make a postage stamp album using an Idea-ology Worn Binder (Notebook) and filled it with pages of postage stamps. See if you can spot the real ones!


The binder was stained with Distress, stamped (Correspondence and Legacy Lower Case), taped (Journey and Aristocrat) and collaged using a real postage stamp and ephemera (Snippets).

A wide variety of products were used to make the stamps including stamp punches (Uchi's Design Stamp Embossing Punch), rubber stamps (Tiny Things), paper stash (Dapper, Correspondence), Ranger archival inks, Versafine pigment ink, Prismacolor pencils, off-white acrylic paint and micro-fine pens (Sakura).

I printed a border on multiple sheets of off-white paper made to fit the binder to give the appearance of vintage postage stamp album pages. I used my trusty old Smith Corona typewriter to document my collection (adding a fair-share of tongue-in-cheek in the process).


Some of the stamp shapes were made from real postage that I covered with off-white paint--it's amazing how tough the paper is. Did you know that to remove the vintage gummed postage from an envelope you only have to soak it in water and it comes right off? Once dry, it's ready to mount in your album (or artwork?) with no harm done.

My stamps were mounted on dark gray construction paper to mimic the mounting squares (which highlight the perforated edges) in real stamp albums. I used a glue stick for all my pasting.

I have extra blank pages and expect to add to my collection in the future especially when I have interesting left-over snippets from other projects. It's a bit like journaling but on really tiny paper. So fun!!
----------------------------------------------------------------------------------


Please join us for this week's challenge!

If you upload your creation to the Simon Says Stamp Monday Challenge Blog you'll have a chance to win a $50 voucher at the Simon Says Stamp store!


Here's a list of most of the products I used for this challenge: