/* */ Beulah Bee: postage stamp
Showing posts with label postage stamp. Show all posts

December 11, 2017

12 Tags for Christmas 2017 - Time of Wonder


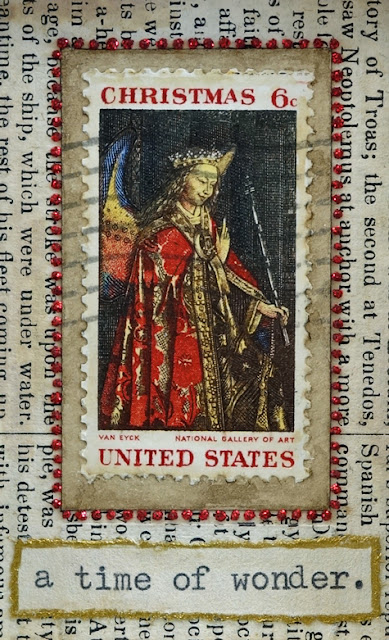
Back in the day, Christmas postage stamps were printed using an elaborate process without benefit of the digital equipment we take for granted today.

And, sadly, a beautiful series of stamps commemorating great religious works of art is not something I'd expect the post office to take on in this day and age.

Thankfully, we have postage stamp collectors (philatelists) who preserve this vintage art form like my Great Aunt Esther who saved the one I've used for the tag I share with you today.


It was mounted in a little box I made that was lined with old book paper and sits on top of Tim Holtz Ephemera and a page from his Tidings paper stash.

The holly, pine branches and calendar page were cut out of that same Ephemera collection. It's mounted on a red satin ribbon and embellished with Rock Candy Stickles and Glossy Accents.


I used Folk Art gold metallic paint (good stuff) to trim the tag, box and text edges. For the text, I originally chose a Clippings Sticker but botched it up so I made a new one using another relic from the past, a typewriter.

Well, as this is tag number eleven (and also my favorite), I've only got one more to go to complete the set. It will be an homage to Tim Holtz if there ever was one and I hope you'll tune in!

August 25, 2017

Labels


This is an artist trading card (ATC) and it's the size of a standard playing card. It was made (along with three others) for this week's theme at Simon's Monday Challenge Blog.

I'd never made an ATC before but it's not much different than a tag size-wise and I like working small. Mine became a series rather naturally as a result of using a group photo fussy-cut from a book.

Below is a view of the four of them together but you'll have to open the light-box view (just click on the photo) to get the full effect.


Here's what the original photo looked like before I began to assemble the collages. The children (students) were all lined up in front of their rather impressive school building.


It was my intention to use materials/design elements that best reflect my current style: The fussy-cut figures, Distress Ink stains, stamped tissue paper, Remnant Rubs (Gilded Accents), postage stamps, polka dots (washi tape) and machine stitching.

The children's manner of dress (some without shoes), the mix of age groups and their expressions (perhaps being photographed for the very first time?) are all very endearing and illustrate perfectly why I like working with vintage photos so very much.


July 24, 2017

Philately


Simon's Monday challenge this week is "You've Got the Edge."

And what has a more distinctive edge than a postage stamp?

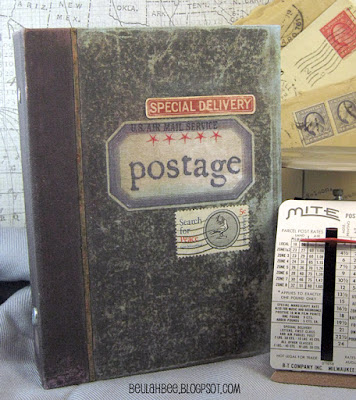
Philatelists (people who collect stamps) use magnifying glasses and special gauges (like the one pictured below) to count the number of perforations for correct classification.


So, for my spotlight this week, I decided to make a postage stamp album using an Idea-ology Worn Binder (Notebook) and filled it with pages of postage stamps. See if you can spot the real ones!


The binder was stained with Distress, stamped (Correspondence and Legacy Lower Case), taped (Journey and Aristocrat) and collaged using a real postage stamp and ephemera (Snippets).

A wide variety of products were used to make the stamps including stamp punches (Uchi's Design Stamp Embossing Punch), rubber stamps (Tiny Things), paper stash (Dapper, Correspondence), Ranger archival inks, Versafine pigment ink, Prismacolor pencils, off-white acrylic paint and micro-fine pens (Sakura).

I printed a border on multiple sheets of off-white paper made to fit the binder to give the appearance of vintage postage stamp album pages. I used my trusty old Smith Corona typewriter to document my collection (adding a fair-share of tongue-in-cheek in the process).


Some of the stamp shapes were made from real postage that I covered with off-white paint--it's amazing how tough the paper is. Did you know that to remove the vintage gummed postage from an envelope you only have to soak it in water and it comes right off? Once dry, it's ready to mount in your album (or artwork?) with no harm done.

My stamps were mounted on dark gray construction paper to mimic the mounting squares (which highlight the perforated edges) in real stamp albums. I used a glue stick for all my pasting.

I have extra blank pages and expect to add to my collection in the future especially when I have interesting left-over snippets from other projects. It's a bit like journaling but on really tiny paper. So fun!!
----------------------------------------------------------------------------------


Please join us for this week's challenge!

If you upload your creation to the Simon Says Stamp Monday Challenge Blog you'll have a chance to win a $50 voucher at the Simon Says Stamp store!


Here's a list of most of the products I used for this challenge:


September 24, 2016

Not Alcibiades


Dotty is making an appearance once again--this time, she's a bit smaller and the setting a bit more somber. The dark (perhaps dastardly) mansion is courtesy of Tim's new Mini Halloween #5 set made larger by multiple stampings on tissue paper.


The autumnal leaves were cut from a G45 paper collection called Botanicabella and the distinguished gentleman (José de San Martin) graces an Argentinian postage stamp circa 1935.

Perhaps the most interesting part of this tag is the background made with torn squares of tiny book text pasted in random fashion. It was a tad time-consuming to prepare but I love the look and plan to set some time aside to make more of it to use in the future.

April 11, 2016

No Trouble


I'm a Guest Designer for April at the Simon Says Stamp Monday Challenge Blog and if this is your first visit here--hello and welcome!


This week's challenge is Rain and/or Flowers and I'm super excited to feature one of the new Tim Holtz stamps for 2016 called Sideshow. 

According to Tim's blog (CHA 2016 Stampers Anonymous Sneak Peak), he discovered some mixed-media art, fell in love with the designs and purchased them to turn into stamps.

I too, fell in love and knew this set was a "must-have." This is my first time using them and since the man with umbrella/raindrops is perfect for this challenge, I had no trouble completing it!

I stamped the image on a dark blue page from Tim's new paper stash called Dapper using ColorBox Frost White pigment ink and Ranger's super-fine white embossing powder.

I used Ranger's Red Geranium archival ink to stamp text in different directions along the left hand side to fill-in the background.

I pasted on vintage postage stamps using Perfect Paper Adhesive (great product), stamped some numbers (which also came with the set) using Ranger's Cobalt archival ink and used Gelly Roll Souffle pens to emphasize and add color to the lines and text on the paper.

The pens work well for adding accents because they write on most surfaces (even acrylic paint/mediums) and provide a nice, dimensional quality.

I felt the man was a little too bright so I dimmed down the white embossing by applying a transparent layer of color using Old Paper ink from a Distress marker mixed with PPA which can also be used as a medium.

The ink helped with my values and also brought out an interesting texture in the embossing that was a side-benefit I hadn't planned on.

I look forward to using this stamp set for other projects--the design and style just invite creativity and I think they will prove to be very versatile. And I'm happy to have a stamp that's a little different from the standard fare!

----------------------------------------------------------------------------------

I really hope you'll join us for this week's challenge.

I want to see what inspires you!

And when you upload your creation to the Simon Says Stamp Monday Challenge Blog you'll have a chance to win a $50 voucher at the Simon Says Stamp store!


Here is a list of the products I used this week which can be purchased at Simon Says Stamp: