/* */ Beulah Bee: tissue paper
Showing posts with label tissue paper. Show all posts

October 10, 2017

Field Notes


Tinted mostly with water-soluble oil pastels, an image transfer, some stamped images, Tissue Wrap and Quote Chips came together on a support made from an old textbook cover. I've got step-out photos if you'd like to see the particulars.

(Click on the photos for a larger, lightbox view.)


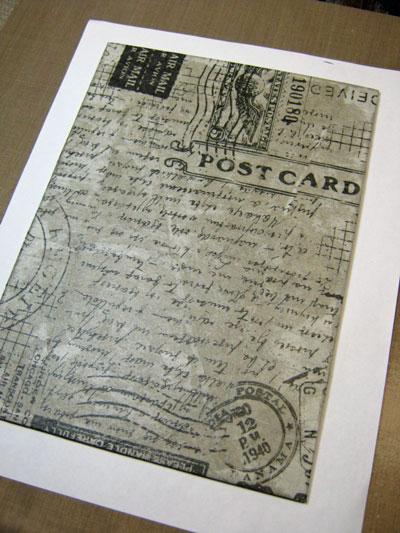
I stripped the cover of a textbook which left me with a sturdy gray board that I covered with Tim Holtz Postale Tissue Wrap using Modge Podge.


I edited an image (coincidently, also a book cover) and then transferred it to the board using Golden Polymer Medium (Gloss). You can read about my technique in this post.


I used dilute gesso to obscure the background details and this also provided a good surface for applying color.


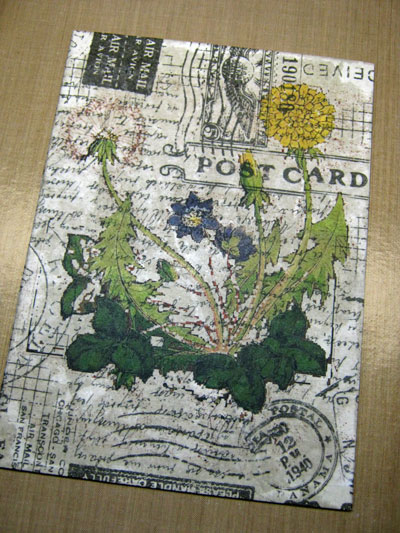
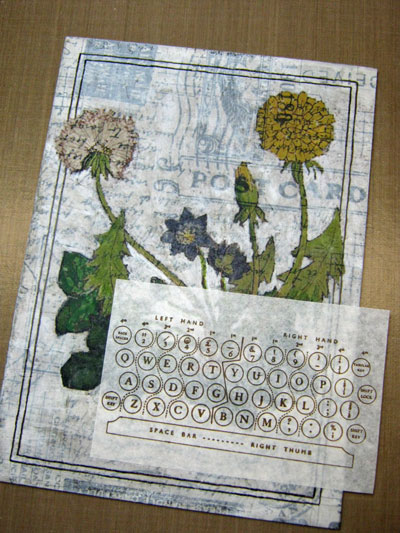
I stamped the keyboard image (Tim Holtz) on tissue paper using archival ink, tore the edges and pasted it on my support. I added a border detail/frame using a dark brown Pitt Artist Pen. They are made with india ink and waterproof with almost all mediums.


The Quote Chips (Tim Holtz Idea-ology) were delaminated because I wanted the text but not the thickness. They were later stained and distressed to blend in with the background.


The snail (Carabelle Studio) was also stamped on paper, which I tinted then cut-out and pasted on.


Most of the coloring was done with water-soluble oil pastels. I like that they are transparent, easily blended with your fingers and can be diluted and spread with a water brush for thinner coverage.


I made this to link-up with Simon's Monday Challenge Blog, this week's theme is to make anything except a card. This may be out of the box for some but if the challenge was just the opposite, I'd expect to struggle a bit as I haven't made a card in quite some time.

September 04, 2017

Deacon Blues


A two-page (large Dylusions) journal page to share with you today, made on a badly needed day off appropriately called Labor Day (a national holiday here in the States).

While working, I listened to a band I haven't tuned into for many years, these songs of my youth, my oldies but goodies; they are called Steely Dan.

Click on Photo for Larger, Lightbox View

The page was made with paper scraps and stamped tissue paper, some Paper Dolls, and a cut-out from the Wallflower paper stash.


This is the day of the expanding man
That shape is my shade
There where I used to stand
It seems like only yesterday
I gazed through the glass
At ramblers, wild gamblers
That's all in the past

Rest in peace, Walter Becker, this journal page is for you.

August 25, 2017

Labels


This is an artist trading card (ATC) and it's the size of a standard playing card. It was made (along with three others) for this week's theme at Simon's Monday Challenge Blog.

I'd never made an ATC before but it's not much different than a tag size-wise and I like working small. Mine became a series rather naturally as a result of using a group photo fussy-cut from a book.

Below is a view of the four of them together but you'll have to open the light-box view (just click on the photo) to get the full effect.


Here's what the original photo looked like before I began to assemble the collages. The children (students) were all lined up in front of their rather impressive school building.


It was my intention to use materials/design elements that best reflect my current style: The fussy-cut figures, Distress Ink stains, stamped tissue paper, Remnant Rubs (Gilded Accents), postage stamps, polka dots (washi tape) and machine stitching.

The children's manner of dress (some without shoes), the mix of age groups and their expressions (perhaps being photographed for the very first time?) are all very endearing and illustrate perfectly why I like working with vintage photos so very much.


July 31, 2017

Dinner Party


The Monday challenge over at Simon Says Stamp is Food and/or Drink and I thought I'd do something with Idea-ology Silverware.


Well, one place setting led to another and the result was a dinner party in an altered Idea-ology Vignette Box filed with silverware, an ornate plate and a salvaged doll with adornments.

Click to Enlarge Photo

All of this covered in tissue paper stamped with tiny text and black dots plus two altered vintage light bulbs (not to be confused with ice cream cones). The large text is an altered quote chip and the roulette wheel is an Idea-ology Collector Layer.


The outside of the box was "pickled" with a white stain. The crown and scepter were tinted with alcohol ink. Red paper was used in the back of the box. Clear crackle medium and walnut ink helped to age some of the surfaces.


My tiny little box will find it's way to a shelf in my studio and remind me that, in art (and also in cooking), all the things we make are as unique as we are. Bon appétit!

-----------------------------------------------------------------------------------

It's been a real privilege to participate as a guest designer this month. I am so proud to be a part of a community that fosters so much creativity and joy.


Why don't you join us for this week's challenge?

If you upload your creation to the Simon Says Stamp Monday Challenge Blog you'll have a chance to win a $50 voucher at the Simon Says Stamp store!


Here are links to the supplies I used for this project:


April 05, 2017

Blue Butterflies


Ready?


Rainbow stripes drawn with watercolor brushes (Dollar Store)
then covered with light gesso wash.


Butterflies stamped on deli paper with sepia archival ink and cut out.


Butterflies pasted to page using glue stick.


Butterfly wings filled-in with blue watercolor brush
and outlined with black gelly roll pen.

Butterfly outlines traced onto Postale tissue wrap and cut out.


Tissue wrap pasted around butterflies using fluid medium.


Blossom stencil and white paint used to fill-in around the page.


Blossoms tinted in random areas with Distress ink.

I'm linking this journal page to Simon's Monday challenge blog.

Who knew rainbows could be so inspiring?! 

December 06, 2016

12 Tags for Christmas - July


Last year, I was able to stick with the same techniques Tim used for my Christmas versions of his monthly tags. This year, not so much. For many of them, he favored using word die-cuts quite a bit and it's difficult to find an appropriate substitute.

So here's what I did instead for this year's July tag (a remix of watercolor resist and layered words).


A book page, Tissue Tape and an oval cut from tissue paper (which was sealed with acrylic medium) were pasted on a tag. The edges were brushed with white paint then I stained the surface with Distress inks and the previous elements resisted the tint.

My angel is a stamp from Inkadinkado (Christmas Silhouettes) which I cut out and embellished with a white Gelly Roll pen, Liquid Pearls and Stickles. A Christmastime Remnant Rub provided the sentiment.

My little angel still seemed a bit plain (especially for Christmas) so I covered her with lots of Clear Rock Candy Distress Stickles. You just can't beat this old favorite for adding the perfect amount of vintage sparkle!

November 30, 2016

12 Tags for Christmas - May


Tim's remix for May was a Tissue Tape resist and Tattered Florals--here's how I spun a Christmas version.

Since the florals die-cut is on my wish list (are you listening, Santa?), I modified this element by using a scrapbook paper cut-out of poinsettias instead.

There's plenty of tissue tape, though, and also Plain Tissue Wrap stamped with red archival ink using the Dots and Florals stamp.


I used the Dot Fade stencil which, out of the package, has a modern, high-tech appearance but by applying texture paste randomly and then using gold paint for highlights, I was able to create a vintage look that coincides with the Christmastime remnant rub.