/* */ Beulah Bee: Stickles
Showing posts with label Stickles. Show all posts

December 05, 2021

Christmas Tag No. 3 for 2021

I chose a simple design for this tag to emphasize all the detail in the tree. It was fussy-cut from Stamperia's Christmas Patchwork paper and then embellished with Stickles and Glossy Accents. The background paper is a faded, vintage, handwritten note and the text is a Remnant Rub.

This is my last link up to Simon's Monday challenge which is "Sparkle Mode." I could use my glitter glues every day of the week and a challenge like this one is certainly a favorite!

As always, I hope this post finds you well and happy and I appreciate your visit.

Until next time, take care.

Christmas Tag No. 2 for 2021

A background paper by Stamperia (Christmas Patchwork), a stamped then fussy-cut poinsettia (Penny Black Christmas Star), Glossy Accents to cover the tile letters and lots and lots of Stickles makes this my third entry this week for Simon's Monday challenge which is "Sparkle Mode." 


As always, I hope this post finds you well and happy and I appreciate your visit.

Until next time, take care.

December 04, 2021

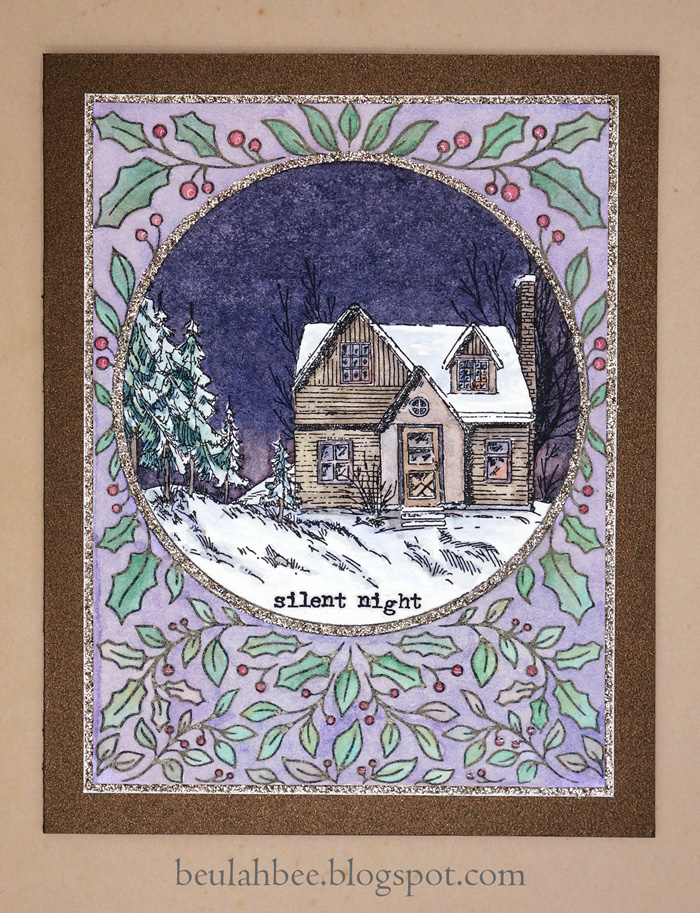
Silent Night

Greeting Card

Here's another try at a two stamp combo--this time it's a night-time version (see previous post for a look at my first try).

I lightened up the foreground stamping by using gray ink. I guess the next thing to try with this stamp might be a "no-line" watercolor version.

You might be curious to know that the dark sky was made by mixing ultramarine blue and orange lake and I lightened the tint at the horizon line to create the illusion of depth.

Greeting Card

As long as you have a tiny brush handy, painting small watercolor scenes like this one are fast, easy and very satisfying!

I mounted my stamping on bronze metallic cardstock and used champagne-colored Stickles so I'm linking up to Simon's "Sparkle Mode" challenge this week since I made something glittery.

As always, I hope this post finds you well and happy and I appreciate your visit.

Until next time, take care.

Stamp sources: Pink Fresh Happy Holidays Circle Frame, Studio Light Christmas Scenery

December 01, 2021

Peace

Greeting Tag

Two stamps, one piece of watercolor paper and paint, topped off with glitter glue, glossy accents and a Remnant Rub and I've just made another card for Christmas.

Greeting Card

I might make another one but I'd stamp the holly border much lighter or knock it back with paint because I feel it competes too much with the scenery focal point.

I'm linking up to Simon's "Sparkle Mode" challenge this week which is to make something glittery.

As always, I hope this post finds you well and happy and I appreciate your visit.

Until next time, take care.

Stamp sources: Pink Fresh Happy Holidays Circle Frame, Studio Light Christmas Scenery

November 11, 2021

Christmas Tag No. 1 for 2021


Making Christmas tags by following along with Tim Holtz blog posts way back when was such great fun and I've continued to embrace the tag format ever since.

Nowdays, I use my holiday tags to decorate gifts and today I'm sharing the first one of, hopefully, twelve for this year. (See previous seasons here).

I punched postage-stamp shapes from a heat-embossed stamped image (Penny Black Tree of Holly) and pasted rows of them to create a background.


The poinsettia was stamped (Penny Black Christmas Star), tinted with Distress inks, cut-out and mounted to the surface. I added some fine, black lines for detail and used gold Stickles to trim the flower edges along with my last bottle of Rock Candy Distress Stickles (an absolute favorite product, sadly discontinued).


I stamped then fussy-cut the text (Penny Black Festive Season) and trimmed the tag with Nuvo Glitter Drops, sketchy pen ink and a ribbon topper.

As always, I hope this post finds you well and happy and I appreciate your visit.

Until next time, take care.

September 05, 2021

Glimmersmitz

greeting card

A head start on Christmas cards? Maybe. But a call to create with "glimmer and sparkle" at the Simon Monday challenge was really the push for making this one. What's Christmas without some shiny bits--am I right?

I used Pink ombré paper (Martha Stewart) covered with Tissue Wrap (Holtz) trimmed to fit around Poinsetta Pieces die-cuts (Holtz) that were cut from a bronze metallic envelope.

Copper Liquid Pearls, some Stickles, and white Scribbles provided the glitz. I heat embossed the white text and outlined one side of the letters with an extra-fine black marker to create a 3D effect.

greeting card

As always, I hope this post finds you well and happy and I appreciate your visit.

Until next time, take care.
August 15, 2021

Glitter Gone Wild


Gitter gone wild is the name of this post for obvious reasons--I used it to embellish this birthday card for my niece. (If you click on the photo to view it in the light box feature you'll see the glitter in more detail.)

I began by stamping (Simon's Delicate Flowers and a Martha Stewart butterfly) on watercolor paper with clear embossing ink and UTEE. Remember this stuff? UTEE stands for ultra thick embossing powder and I guess it fell out of favor because I seldom see anyone using it anymore.

After applying watercolors for tint, I ironed off the embossing. When you do, the weight of the iron spreads the embossing out and you end up with slightly thicker lines that also act as a resist. If you'd like to know more about this technique here's a link to a popular post for the particulars.

I thought I needed more contrast so I outlined the images with a fine-tip black marker. Still not happy, I dug out my glitter (Stickles) and the extra color and sparkle seemed to do the trick.

I used a stencil (Simon's Tiny Dots) with white texture paste, a Simon die-cut for the sentiment and machine-stitched it to the card base using white thread.

Simon Says use heat embossing this week so I'm linking up to the Monday challenge.

As always, I hope this post finds you well and happy and I appreciate your visit.

Until next time, take care.

January 27, 2021

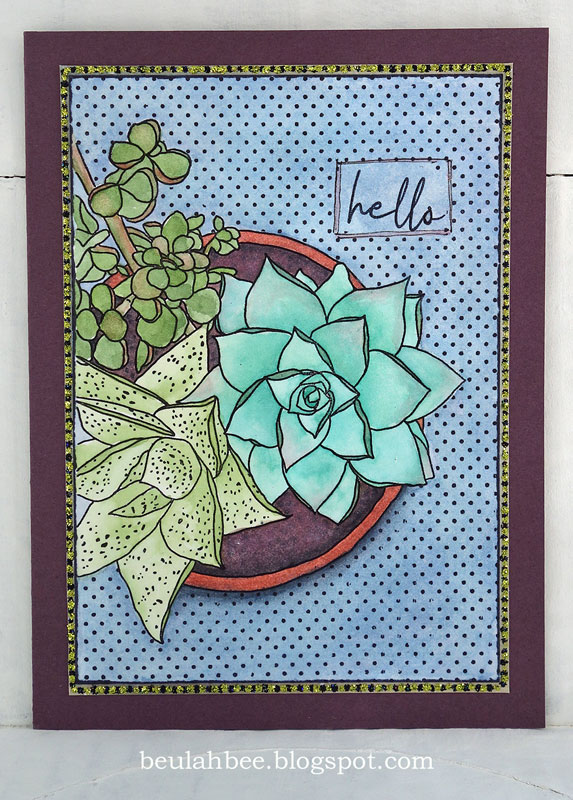
Hello

Mondo Succulent Pot
 

Not sure what to make of this greeting card--I like it but I know it's not for everyone (it's not very conventional).

I used a newly purchased stamp by Ellen Hutson called Mondo Succulent Pot. I've had my eye on it ever since it was released (2019) and after using it the first time, I know it will be quite versatile. I'm glad I got it and expect to use it a lot.

It was watercolored but I didn't like the blue background (too plain) so I stamped over it with polka dots (Tim Holtz). I framed it with a layer of paper then that little voice inside my head said use some Stickles and now it has yellow-green and black dots of bling.

If you're new to watercolor, a large stamp like this is ideal. I'm not a fan of "no-line" techniques and with a hand-drawn stamp like this one, the lines are what make it so charming.

One criticism about the stamped text: The set comes with the word "Hello" but honestly, the way it was made/written it looks more like "Hells" (here's a link to the vendor if you are curious). So I scratched out the center of the letter "o" because I thought it would help. Maybe I'll find a better remedy when I use it again. Maybe it's just me?

As always, I hope this post finds you well and happy and I appreciate your visit.

Until next time, take care.

December 15, 2020

Happy Holidays


A greeting card to share today representing a milestone for me as it's my first creation since relocating my crafting space. Abandoning my old studio after almost 15 years was traumatic and because I had to downsize, I cleaned up and donated a lot of extra material. My new space is doable but I'm struggling to remember where I put stuff--I guess the easiest fix for that is to just starting making again!

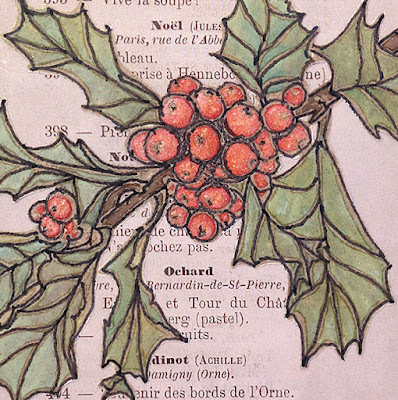
For this card, I distressed the edges of printed papers and used some hand-stitching and Stickles on the border. The stamp is from Ellen Hutson (Mondo Holly by Julie Ebersole) which was altered quite a bit.

First I heat embossed it, then tinted it with Distress inks, ironed off the embossing, redrew the lines with a fine line marker, fussy-cut it and added Distress Rock Candy Stickles to the berries.

Happy Holidays, close-up

Happy Holidays, side-view

I plan to continue blogging about my creations (even though many bloggers have left the pack) because it serves as a kind of diary and good reference tool. Now that my numerous family projects/obligations are winding down, I have more time to create and will be able to post more regularly again. I also post snapshots of my blog entries on Instagram @123beulahbee for those who like to click-and-run ☺.

As always, I hope this post finds you well and happy and I appreciate your visit.

Until next time, take care.

December 25, 2019

12 Tags for Christmas 2019 - Peace Love Joy


Wishing all of you peace, love and joy this Christmas!

Tag 10 for Christmas 2019 is book paper covered with tissue, pasted with die-cut pieces and tinted/embellished with ink, paint and glitter.

Click to Enlarge

The black and red tinting was created using ink pens and a waterbrush. I draw the ink lines and before they dry, I use the brush to spread/blur the color.

The die-cut pieces (Tim Holtz Poinsettia) came from Thelma's Christmas card.


The best feature here is the area inside the poinsettia where I applied Rock Candy Distress Stickles. Remember this stuff? It's a product that's been discontinued and one I wish they'd bring back!

December 20, 2019

12 Tags for Christmas 2019 - All is Calm


I am smitten with this very early photograph of three sisters by Carl Gustav Oehme taken in 1845. Back then Christmas celebrations were nothing like the customs of today but, around this time in America, Christmas trees and cards were beginning to appear.

I trimmed and tinted the photo, combined it with some Tim Holtz Christmas ephemera and embellished it with Stickles.

This is tag #9 in my ongoing quest for 12 for 2019.

December 18, 2019

12 Tags for Christmas 2019 - Believe in the Magic


So, all it takes is a prompt from Simon's Monday challenge and I'm off! This week's theme is "Cityscape" (add some buildings) and that was the inspiration for tag number eight.

The building image (Carabelle Studio Dans la Rue) was stamped on old book paper, tinted with inks and colored pencils then embellished with dimensional dots painted and glittered to look like Christmas string lights.


The little miss was cut from a Found Relative (Tim Holtz) and the kitty looks just like Howie, my cat, who turned 18 this month. It's Christmas everyday for this little guy who I spoil beyond belief!

December 08, 2019

12 Tags for Christmas 2019 - Christmastide


We've had a really rainy weekend here in the desert which made for a good time to get cozy in the craft room and make another Christmas tag.

I was channeling a vintage vibe with this one and used a page from an old German bible along with some fussy-cut paper from Graphic 45.


It was embellished with glitter glue, Glossy Accents and machine stitching and I used my typewriter for the text. I needed something to fill-in the bottom area and used a Stamp Collector stamp (Tim Holtz).

There's time to link yet again to Simon's Monday challenge for this week's "Let's Sparkle" theme.

December 07, 2019

12 Tags for Christmas 2019 - Happiness & Cheer


This one is made of a black cardstock background covered with poinsettia die-cuts (Tim Holtz) and embellished with tints and glitter glues.

This was truly a learning experience: It's hard to cut thin papers with intricate dies (you can't get the design out without tearing it) so, thanks to Google, I learned about using dryer sheets or waxed paper which helped a lot.

Also, it was the first time making my own glitter glue. I needed red but didn't have anything but the loose stuff and an empty Stickles container (you must save these--they are SO useful).

The mix was approx. 3/4 glitter to 1/4 fluid medium and I have to say it worked well.


This was a fun tag to make because I went kind of glitter-crazy and it's perfect for linking up to Simon's Monday challenge this week which is "Let's Sparkle."

December 02, 2019

12 Tags for Christmas 2019 - Be Good


Underneath the many layers of tints, texture paste and crackle medium is a mixed media die-cut (Tim Holtz) fashioned from brown card stock.

The frame is a Spellbinders die-cut covered with dimensional paint (Scribbles) which was also used on the large text (an image transfer).

Inside the frame is a Photobooth image (Tim Holtz), I used dots of Scribbles and Stickles (glitter glue) for bling and a strip of washi tape to balance out the intentional off-center placement of frame and text.


It will be easy to link-up with Simon's Monday challenge this week as I work through more of my holiday tags. The theme is "Let's Sparkle" and I've never made a Christmas tag EVER without using glitter--it just wouldn't be Christmas without it!

November 26, 2019

12 Tags for Christmas 2019 - Pine Grosbeak


The idea for this third Christmas tag for 2019 was a happy accident that I followed through on with a few deviations in between.  Let me explain.

I die-cut the holly (Tim Holtz Mixed Media Christmas) from a book page and placed it on top of some paper scraps. One of them was an enlarged half-tone image from a vintage book and I thought the various dots peaking through looked cool so I decided to use it.

The bird was cut from a vintage book. It was originally black and white and I added color with red ink and collaged over the branches. I've never seen this bird myself but they live in colder climates. Imagine coming across one foraging in the snow! I love birds :-)

I created an oval with dimensional paint drops (Scribbles) and painted over the outside section to create the vignette.

I distressed it with sanding, added the washi tape and a Remnant Rub and then made it an official Christmas tag by embellishing it with platinum Stickles.


I'm linking to Simon's "Tape It Up" Monday challenge.

Here's a link to Christmas tags from previous years if you'd like to see more (or use the link in the label section below).

November 24, 2019

12 Tags for Christmas 2019 - Twinkle


Making Christmas tag number two was a bit like decorating a cake! And since I used vintage buttons, I'm linking this one to Simon's Recycle challenge this week.


I began with a tag shape cut from some Tim Holtz Halloween paper (Abandoned) then I inked snowflake stencils with Versamark and embossed the shapes with clear powder.


The next step was to use a resist technique where you paint (or in this case, gesso'd) over the embossing and let it dry only slightly before wiping the paint off the embossed areas. Don't expect perfection with this technique--it's really meant for a distressed look.


My great Aunt Esther snipped many a button from her frocks over the years and I inherited quite a collection. I keep the little white buttons in one box and have another, bigger box with colored buttons in larger sizes. I gathered up an assortment and pasted them on.


I lightly tinted the background with Faded Jeans Distress Oxide and frosted the cake tag with glitter glues and dimensional paint (Scribbles and Stickles).


I always feel my tags need some kind of border. Since I used buttons, I reinforced the sewing theme by machine-stitching a mini zig-zag with green thread.

Stayed tuned for more tags--I appear to be on a roll--ha! Hope it lasts :-)

If you want to see my tags from Christmas pasts, here's a link.

November 21, 2019

12 Tags for Christmas 2019 - Father Christmas


My first Christmas tag of the year features a vintage image of Santa mounted on kraft card stock and embossed with gold polka dots.

This close-up shows the glitter I applied on the banner, around the oval and on the tree branches.


I'm linking this post to Simon this week because the theme is "Recycle" and I've included some photos to explain.


The tag was made from the back of an empty drawing paper pad (I save all quality cardboard just for this purpose).


I pasted my laser-printed image onto some packaging material before cutting it out. The material had a slick surface so to make sure I got a good bond using my glue stick, I sanded the surface before applying the image.


And finally, I like to use scraps of craft foam sheets when I want to lift an image from the surface to create some dimension. I just cut it to size and use some glue.

Look for more Christmas tags in the days and weeks to come (it's only 34 days away) and if you'd like to see more tags from previous years, here's a link.

November 12, 2019

Caring Hearts


A first for me--mass production of Christmas cards (25 to be exact)--what an experience!!

In the process, I learned what an A2 card size is (an 8-1/2" x 11" page cut in-half) and how to make my own envelopes. Woo-hoo!

I kept things simple by using animal images from a winter holiday paper pack and embellished them with dimensional paint and glitter glue.

All for a good cause as I'm forwarding them to the Caring Hearts Card Drive where they will be distributed to nursing home residents around the country.

The deadline was this Friday so I finished just in time!

September 25, 2019

Fortune Cookies


What have I been up to lately? Making Asian-inspired paper-folded Christmas box ornaments that can hold a treat--of course!

It was the project idea I came up with after being invited to a guest spot on the The Funky Junkie Boutique blog. The challenge is "Treats Not Tricks" and here's the description:
  • Choose a theme and make something that will hold a treat for someone.  It could be a Halloween treat bag, a Valentine's candy box, a birthday card for a special person that holds a treat (could be a gift card "treat" or a bite of chocolate), anything that can hold a treat.
To make my box ornaments, I found some patterns here and used the Oriental Garden paper collection by Stamperia and lots of different glitter glues for decoration.

I used tracing paper and a scoring tool to transfer the patterns and quick-dry adhesive to hold them together after folding.

They looked rather plain in the beginning, but the real fun comes when you get out the glitter glue to decorate them. Nothing says Christmas like a little bling ☺!

Ornaments before decorating - click to enlarge


For gift-giving, I can tuck a treat inside or perhaps a note with a special wish or promise (kind of like a fortune cookie). Here are a couple examples of how the boxes open.


I look forward to seeing everyone's projects and encourage you enter the challenge--you might win a guest spot like I did and it's been a lot a fun. Thanks for stopping by!