/* */ Beulah Bee: embossing
Showing posts with label embossing. Show all posts

May 22, 2019

Miss Trudy


I'd sure like to know the story behind this lovely little girl but for now, I'm calling her Miss Trudy. She's a Tim Holtz Paper Doll and I stained her clothing with the ink from gel pens (scratching the darker areas a bit to lighten and texturize).

The background was stenciled (Tim Holtz Dot Fade) and I stamp embossed the border using a vintage rubber stamp (1996) by Hero Arts called Violet Border. I am featuring this stamp as part of the company's 45th anniversary Show & Tell celebration for a chance to win their monthly kits.


I am so glad I dusted it off and set about putting it to work as I'd forgotten just how useful this stamp can be!

My tag was colored with Distress Oxides, some gel pen ink and a bit of colored pencil. The bench was made out of washi tape.

I had a lot of fun with it so it's no coincidence that I chose this particular Remnant Rub for the text!


I'm linking up to the Hero Arts Show & Tell Celebration and also to Simon's Monday challenge because this week's theme is Use Stencils.

December 18, 2018

12 Tags for Christmas 2018 - No. 10 & 11


I'm still looking back to Christmas tags from the past and I've saved some of my very favorite tags for when we get closer to Christmas. This is one of them.

The background is made from mulberry papers and the tree was hand-cut out of kraft paper that had been randomly stamped and embossed to create texture. I added the tinsel using glitter glue and a white gel pen.

The text was cut from a recycled store-bought Christmas card and illustrates just how far I will go when it comes to fussy-cutting. Crazy I know but I loved the style of the lettering and I was several years away from owning a die-cut machine.  Since the text was wider than the tag, I just let it bow out when I attached it to the bottom of the tag.


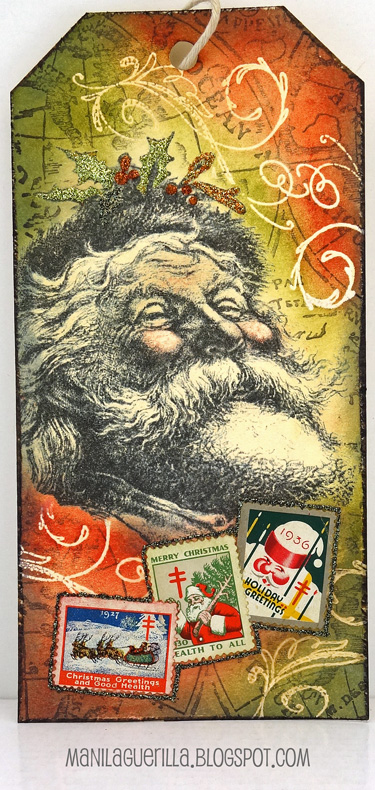
This one's a favorite because of the Thomas Nast Santa (an image transfer). It's an early example of learning how to blend Distress inks, how to emboss (the white scrolls) and how to use masks when stamping.

If you don't recognize the kind of stamps I used at the bottom of the tag they are called Christmas Seals. I inherited a small collection from my Great Aunt Esther, they're a terrific embellishment--I must remember to use them more often!

November 23, 2018

12 Tags for Christmas 2018 - No. 3


I've used another Penny Black stamp called Tree of Holly for this tag and I'm linking to their Creative Christmas Challenge and also to Simon's Monday Challenge for the "Let It Snow" theme.

I used embossing ink and silver powder for stamping then filled in the tree with the juiciest, most powerful purple in my arsenal of crafting supplies--Seedless Preserves Distress Stain.

I filled in the holly and berries with paint and glitter, added more bling to the border and placed a Christmas Remnant Rub from a few years back along the bottom.

The snow was made with texture paste and a stencil by Simon Says Stamp called Falling Snow.


To see more of my Christmas tags you can click on the label at the bottom of this post or use the link I've placed in the sidebar.

July 08, 2018

Beautiful


A recent purchase (Beautiful Flowers stamp set by Simon Says Stamp) has captured my interest more than most these days. The main flower grouping is really fun to experiment with and the detail is exceptional.

This time, I've stamped the image onto old book paper using brown ink. After it was fussy-cut, I mounted it on a background made with papers from the Wallflower Paper Stash and trimmed it with washi tape.

I filled in the embossed text with white Perfect Pearls and also dabbed it on the flower centers and some of the stamen.

June 22, 2018

Lina Cavalieri

Click on photo for larger, lightbox view

Someday I should start saving all my tag experiments gone bad so that you can see how this format is really meant to be my chance to try new things and to learn from my mistakes.

Occasionally, I get it right (in my mind, anyway) and those are the tags I blog about. This one, in particular, is a good example of what I'm talking about.


I wanted to try a variation of this Tim Holtz technique using a new stamp called Beautiful Flowers by Simon Says Stamp. It's a process of embossing, painting in the areas with acrylics, and then wiping the lines clean.

The paint I used was initially transparent so variations in flower color are due to the background (an image transfer over a book page) showing through. I applied another layer of a more opaque color on the flowers near the top to achieve more uniformity.

It was easy to lift paint off the embossed areas even after the paint was dry and I'll definitely try this technique again.


I thought the play of text and page margin under the face would be interesting but it was too severe so I applied a strip of Tim Holtz Tissue Wrap along the edge to soften the contrast.

To balance out the bottom I added text with texture paste and a homemade stencil. The paste was white. I've learned from experience that it's almost impossible to tint the paste black before you apply it because the best you can expect is maybe a dark gray.


So I took a teeny-tiny paintbrush dipped in black ink and painted the texture paste after it had dried. I've never tried tinting the paste with ink instead of paint so maybe I'll give that a go on a future tag. I also wonder if there's a black texture medium that you can buy?

April 23, 2018

Marigold


I've made a greeting card to thank the hostess for a party my husband and I were invited to over the weekend.

It's nothing out of the ordinary but I used a few less common techniques that I thought would be fun to share.

The main ingredients are the Flower Garden stamp set, a page from the Etcetera paper stash, some Tissue Tape, and a Dot Fade stencil (Tim Holtz).


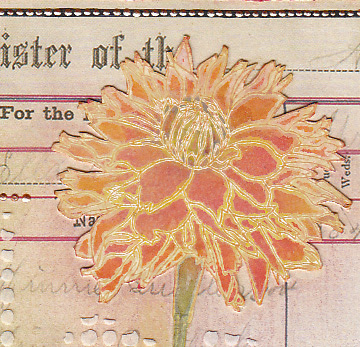
I stamped then embossed the flower, tinted it with Distress inks then used super-cheap kid's construction paper as blotting paper and a hot craft iron to remove the embossing. Newsprint also works great for this technique. To learn more about this process, see this post.


I know there are a set of die-cuts available for this stamp set but mine was cut-out by hand using an Exacto knife and self-healing cutting mat.


Here's a tip you might find useful: Cut as close to the image as you can but don't worry about the irregular edges. Then go back and make the tiny cuts later and you'll find it a lot less intimidating.


And finally I'll share a tip I've blogged about in the past (see this post) that helps you decide where to crop your scrapbook paper when designing a layout.

This template is nothing more than a sheet of transparency that I made lines on with a permanent marker. I put masking tape around the edges to mask the background. I lay this template over my paper and move it around until I find a spot that I like and mark the corners with a pencil dot to guide my cutting lines.

This week's theme at Simon's Monday Challenge Blog is "Flower Power" so I'm linking up. I haven't made a card in ever so long and it was such a pleasure that I plan to make some more for this week's challenge (I have lots of flower stamps 😉).

July 10, 2017

An Original


It's week number two for me in the Designer Spotlight at Simon Says Stamp's Monday Challenge Blog. So exciting!


The theme is Distress It so I gave an inexpensive 4-inch chip brush some vintage style. Here's the before and after:


I clear embossed the handle using the Stampers Anonymous French Collage stamp then applied a heavy coat of Peacock Feathers Distress stain. Once dry, I ironed off the embossing and used Vintage Photo stain in random places.

I tinted the bristles by soaking them in a really strong solution of blue-green watercolor paint. After it dried, I brushed the tips through dark brown acrylic paint.

I covered the ferrule with a strip from the Aristocrat design tape collection (Idea-ology), used copper embossing powder in the bottom section and tinted the rest of the shiny parts with Ranger's Mushroom alcohol ink. I trimmed out the top with tiny dots made with copper-colored paint.

The edges of Tim's Baroque frame were embossed with copper powder and the other areas tinted with Mushroom alcohol ink. The gent inside came from Idea-ology's Dapper stash (it's part of a cigar box label). The four is an Idea-ology Number Brad.

I topped my brush with scrap jewelry pieces attached with string (tinted with Distress ink) and an Idea-ology Quote Chip that was altered with sanding, tinting and copper embossing.

----------------------------------------------------------------------------------

Please join us for this week's challenge!

If you upload your creation to the Simon Says Stamp Monday Challenge Blog you'll have a chance to win a $50 voucher at the Simon Says Stamp store!


Here's a list of some the products I used for this challenge:


October 05, 2016

Triplets


Identical triplets are extremely rare and so, I suppose, are purple tree trunks. But who cares--anything goes on Halloween, right?

I stamped and embossed the trees (Inkadinkado) to create a resist for the Distress ink sky then ironed off the embossing (see my tutorial here). The moon was made with a mask. The text was stamped (Tim's Mini Halloween #5).

I wanted the house (also Mini Halloween) flipped from right to left so I stamped it on Plain Tissue Wrap, turned it over, painted the backside off-white, cut it out and pasted the painted side down. You lose some of the crisp image with this method but I think the softer, lighter look works here.

I needed something in the foreground so more tissue wrap was used, this time stamped with a crackle image in brown archival ink and tinted with distress.

I cropped Tim's Gothic Gate thinlet die to fit my tag (and support the composition) then darkened the gray paper with black Distress.


The triplets were laser-printed in a very small size, cut-out and pasted down. Do they remind you of that hallway scene in the movie The Shining? I guess that's the look I was going for. Anyhow, some shadows were added and I decided to mount the tag on black paper and add some dots of Stickles around the edge.

I'm linking this to Simon's Monday Challenge blog where this week's theme is Halloween.

September 29, 2016

Wicked Dare.


The older I get, the less enthusiastic I am about celebrating Halloween but I've made an exception this year because of the purchase of a seasonal stamp set I just couldn't resist.

He had me at the house (used here).

I'm referring to the Tim Holtz Mini Halloween Set #5 used on this tag to create the background, skull, bottle label, and typewritten text.


I have to admit making spooky tags is pretty fun--it's a chance to use unusual color combos and the more distressed the better, right?

I like the effect I achieved on the bottles which might be due to the clean, crisp, blue-ish white colors contrasting with the muddy oranges and browns.

Click to Enlarge

If you're curious regarding technique, here's what I did:

A piece of scrapbook paper with various shades of orange, reds and yellows was cut and pasted to a manila tag then covered with stamped Plain Tissue Wrap.

An anchor for the bottles was made with a torn piece of Postale Tissue Wrap.

The bottles were stamped on old book paper, then embossed, cut-out, tinted and pasted to the tag.

There's only one way to use the skull stamp (IMHO)--black ink on white paper. It was also embossed and cut-out.

I used a Vial Label that was stamped with text from the set and cut out parts of the apothecary label stamp (also on Tissue Wrap) and pasted them to the large bottle.

The 45-cent piece Vellum Thift Shop Ephemera was distressed with some sanding and scoring and attached with tiny staples.


You may have noticed the crackle edges. This was done with Distress Clear Rock Candy Crackle Paint and I rubbed in some white creamy eye shadow (yes, it's true) to bring out the crackling.

I accidentally overheated the black embossing on the smaller bottles and they turned a lighter shade of gray so I used it to my advantage and tinted them further with a bit of blue.

To create an illusion of depth, I glazed the top portion of the tag with blue, brought out warmth at the bottom with some Wild Honey Distress and brushed in some inky shadows.

I am linking to Simon's Monday Challenge Blog where this week's theme is Powder Power.

Other Stamp Credits: Big Bottle-Inkadinkado, Small Bottles-PaperArtsy

September 26, 2016

Toxique

Everything about this creation is unconventional and you may not care for it. However, my experimentation here illustrates some unusual techniques that may be of interest so I've decided to share it.


I began by using watercolor on watercolor paper. I stamped on some Plain Tissue Wrap (the hand and face with circle/lines). I cut out some gear images from some Tissue Tape. I used a home-made circle stamp and filled one of them in with some dot-stamped tissue wrap.

I wondered what it would look like to draw white lines with a Gelly Roll pen throughout the background. Then I sharpened the circle edges and added some dots with my black and white pens.

But it wasn't big enough to be a tag so I mounted it on some grey cardstock with stitching.

Now what to do with the empty space on top? I stamped and then embossed some black dots and added the white ones with a gelly roll.

I brought out the whites of the lady's eyes with a Picket Fence Distress Marker.

I think it's interesting that you can't really tell what's tissue wrap or tape when you compare the look with the stamped circles (where the watercolor paper is completely exposed).

For collage work, the tissue wrap is really useful and I have a tip: There is a subtle difference between the front and back surfaces--one side is slightly smoother and stamping on that side seems to give me the best results.

I really don't know what to make of my subject matter except to say that maybe it reminds me to wash my hands to avoid germs? I think I'll link it to Simon's Monday challenge blog (this week's theme is embossing "powder power") just to remind them too :)

September 01, 2016

Encore


You'd think that I've been blogging long enough to know this--wait awhile before you make something final, don't be in such a hurry to share, make sure it's right first.

Earlier this week, I posted Natasha Returns but she should have stayed put and so I revisited her, made some modifications and brought her back for an encore.

I've recently started using die-cuts and thought I'd try an image transfer over the top but this just didn't look right so I modified this tag by pasting the image over the original transfer and now I am satisfied. Why didn't I do this in the first place?!

August 22, 2016

Natasha Returns


Meet Natasha. She has returned for another appearance on my blog (see previous post here). She's an image transfer laid on top of a background made from the bricks Mixed Media Thinlit by Tim Holtz.

There's also a scrap of his Tissue Wrap and the butterflies are a stamp from Prima. A bit of embossed polka dots (Tim's Dots & Florals stamp) and a stitched border that was painted and embellished with black Gelly Roll lines complete the look.


I've recently entered the world of die-cutting and I'm learning as I go. As if I didn't collect enough collage "scraps" already, I've got a feeling this new technique will add to my collection exponentially!

Here's what I know now: Tissue paper over die-cuts can work and look OK but I don't care for the appearance of the image transfer over them and won't do this again in the future.

April 11, 2016

No Trouble


I'm a Guest Designer for April at the Simon Says Stamp Monday Challenge Blog and if this is your first visit here--hello and welcome!


This week's challenge is Rain and/or Flowers and I'm super excited to feature one of the new Tim Holtz stamps for 2016 called Sideshow. 

According to Tim's blog (CHA 2016 Stampers Anonymous Sneak Peak), he discovered some mixed-media art, fell in love with the designs and purchased them to turn into stamps.

I too, fell in love and knew this set was a "must-have." This is my first time using them and since the man with umbrella/raindrops is perfect for this challenge, I had no trouble completing it!

I stamped the image on a dark blue page from Tim's new paper stash called Dapper using ColorBox Frost White pigment ink and Ranger's super-fine white embossing powder.

I used Ranger's Red Geranium archival ink to stamp text in different directions along the left hand side to fill-in the background.

I pasted on vintage postage stamps using Perfect Paper Adhesive (great product), stamped some numbers (which also came with the set) using Ranger's Cobalt archival ink and used Gelly Roll Souffle pens to emphasize and add color to the lines and text on the paper.

The pens work well for adding accents because they write on most surfaces (even acrylic paint/mediums) and provide a nice, dimensional quality.

I felt the man was a little too bright so I dimmed down the white embossing by applying a transparent layer of color using Old Paper ink from a Distress marker mixed with PPA which can also be used as a medium.

The ink helped with my values and also brought out an interesting texture in the embossing that was a side-benefit I hadn't planned on.

I look forward to using this stamp set for other projects--the design and style just invite creativity and I think they will prove to be very versatile. And I'm happy to have a stamp that's a little different from the standard fare!

----------------------------------------------------------------------------------

I really hope you'll join us for this week's challenge.

I want to see what inspires you!

And when you upload your creation to the Simon Says Stamp Monday Challenge Blog you'll have a chance to win a $50 voucher at the Simon Says Stamp store!


Here is a list of the products I used this week which can be purchased at Simon Says Stamp: