/* */ Beulah Bee: paste medium
Showing posts with label paste medium. Show all posts

May 04, 2016

May Remix


Let me introduce a tag made with all "Tim" products as inspired by this month's 12 Tags of 2016 (minus the tattered florals) where his remix features a Tissue Tape resist technique.

In the end, mine is more about enhancing the flower blossoms that are so much fun to paint. To quote Tim, "...stay true to your style throughout the creative process."  So I did and the sentiment was chosen to reinforce his statement.


The stamp is from the Flower Garden set, the bee is from Tiny Things. The Bubble stencil, Lace Trimmings (sewn on with gold metallic ribbon) and Small Talk stickers helped to embellish and I used the same tissue tape as Tim which is called Symphony.


And I used watercolor paper cut into the shape of a tag instead of one made with traditional manila cardstock.

Tim's tape is, without a doubt, my favorite kind because it's translucent, tough, and stays stuck! Just a little piece of it here and there in a composition can add just the right effect.

This month's tag made me appreciate it that much more.

April 25, 2016

Creativity


This is my last week as a guest designer for the Simon Says Stamp Monday Challenge Blog and it has been a wonderful experience.

This is such a great blogging community full of inspiration and information--I'm happy to be a part of it and grateful for the feedback I've received!


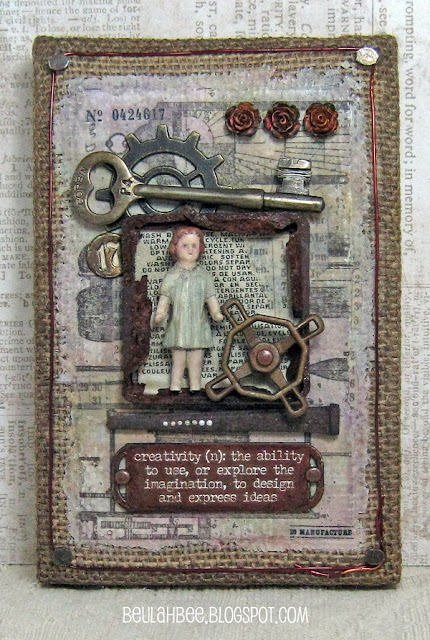
This week's challenge is to use a metallic element so I made an assemblage that would definitely set-off a metal detector!

I used found bits of really rusty metal (the square frame and large nail), a vintage key and lots of Idea-ology including a Quote BandNumber BradGadget Gear, and Faucet Knob.


A border for the Burlap Panel was made using tacks and copper wire (credit to Paula Cheney at oneluckyday.net for this idea).

The background technique is rather unconventional. After prepping the burlap with paste medium (to fill in and even out the surface), I transferred an image cut from the Destinations Paper Stash using polymer medium. The overage of paste medium around the edges was tinted to match the paper.


I've done image transfers with lots of Paper Stash and I suspect it would work with other brands as well. Here's a link to a recent tutorial which describes my technique in more detail.


I included a doll and roses because of the Quote Band. The Salvaged Doll is the artist, the faucet knob represents effort, the number stands for time, the key unlocks the idea, the gear stands for the process and the result is beauty represented by the three Heirloom Roses.


It's fun and easy to transform the doll from its original, stark-white appearance. I just covered her with off-white paint, used blue for the dress, brown for the hair and mixed-up a flesh tone for the face, arms and legs. Everything was coated with fine crackle medium and after it dried, I dropped in some Tea Dye Distress Stain to emphasize the cracks. A tiny drop of red ink went on her cheeks and a fine-tip black marker helped define the eyes and mouth (my photo doesn't do her justice).

I wanted to match the roses to the other pieces but didn't have rust-colored alcohol ink. Since mixing colors opposite each other on the color wheel makes mud, I thought to drop an assortment of colors I did have on top of the roses until I got the look I was after. Then I took the shine away with some fluid matt medium.


The Quote Band was also given a rusty look. I filled in the letters with white paint, wiped the background with a rust-colored ink (like StazOn) and used black paint to distress the edges. I used an antique gold metal paint on the Faucet Knob and glued on a few brads with Glossy Accents.

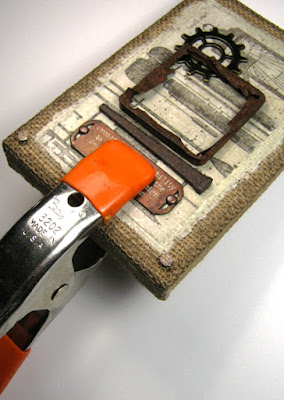
Speaking of glues, if you'd like to try making an assemblage but you're not sure how to anchor the elements I have some advice. Use nails, screws or wires when you can (no problem with the Burlap Panel since the backing is made of wood). When you can't, a good urethane-based glue (like Duncan's Liquid Fusion) and some clamping will secure just about anything. You can see my other assemblages here.


There are other details about this piece that I could mention but if you've already read through what just may be the longest post in the history of craft blogging, then I may have said too much already!

---------------------------------------------------------------------------------


Please join us for this week's challenge and when you upload your creation to the Simon Says Stamp Monday Challenge Blog you'll have a chance to win a $50 voucher at the Simon Says Stamp store!


Here's a list of the products I used for this challenge which can be ordered from Simon:


March 07, 2016

Simplicity


Tim's March tag inspired me to "remix" a layer of cardboard along with texture paste and paint splatters.


I used a stencil called Mini-Tatting by Rebekah Meier (TCW), Tim's Chit-Chat stickers and his new Ledger Script stamp (buried underneath the layers), along with some butterflies cut from Graphic 45 paper (Botanicabella).

Since the butterfly antennae are impossible to cut because they're so tiny I clipped a few strands from a black paintbrush and pasted them on instead.

January 13, 2016

Remix


Tim's doing a "Technique Remix" for the 12 Tags of 2016 and this month he features metal embossing and chalkboard stamping. What a combination!

So even though I really tried to use more metal (three tags are in the trash as I write this), the best I could do was pull off the chalkboard look. In spite of my failures it was great fun just to try.

I thought I'd share my discovery for making your own chalkboard paper. Either start with black paper or make your own with paint or black gesso then coat it with what's known as clear gesso.

It's meant to be used mostly for pastel artists who need "tooth" on their surface for the powdery pastels to cling to. It's basically clear acrylic medium with a bit of fine sand mixed in.


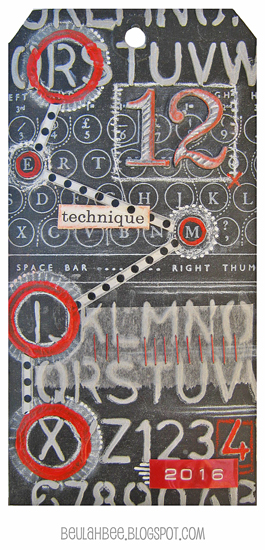
First I used Tim's Schoolhouse stencil on a black tag to apply texture paste that was tinted with gray paint. I let it dry, stamped with Tim's Type Keyboard using white pigment ink and clear embossed it.

Then I applied the clear gesso over everything so I could use a white charcoal pencil to give it that chalkboard look.

Remember the grungeboard die-cuts from Tim's early days? That's what I used for the big number 12. Painted with black and clear gesso, they were easy to tint with a red pastel pencil and more white charcoal to keep the chalkboard theme going.

Some circles stamped with red paint, a bit of washi (polka dots), tissue paper and two more design features from Tim's early beginnings--mini staples and Dymo tape (the red 2016) provided the final embellishments.


I may have drifted from this month's remix but embraced what I've learned from following Tim's tag tutorials for such a long time and am excited about this year's new twist. I think it will be great fun to revisit these oldies but goodies.

December 15, 2015

12 Tags for Christmas - September


Perhaps one of the most challenging Tim Holtz tags this year was the one for September mainly because it featured an embossed transparency and I don't own the necessary equipment. While that fact is still true, my Christmas spin does feature a transparency that was laid (bowed) over the top of a paper background embellished with texture paste using the Idea-ology Scribbles stencil.

Click to Enlarge
I attached a stamped image that was cut from vellum to the back of the transparency along with some metallic star confetti then stitched around the edges to secure it to the tag. It looks pretty cool in person (though hard to photograph) and gives the appearance that the angel is hovering over clouds.

A Christmas Remant Rub was attached to the front of the transparency and a bit of Broken China Distress was used to tint the edges of the paste.

December 02, 2015

12 Tags for Christmas - May


Adding texture with burlap and paste, learning how to tint photos with ink, then telling a story with ephemera and text--that's what Tim's tag for May was all about and it was one of my favorites this year.

My holiday version features a Found Relative photo (Occassions), Remnant Rub text, the Schoolhouse stencil and some Idea-ology vellum ephemera. The holly was stamped, cut-out and glitter-fied and I'll tell you about the happy-accident that became the frame.

The photo was thick as it had previously been mounted on heavy cardstock (an abandoned idea) and I didn't like how high it sat on the burlap. To fill in the gap, I applied a black line of 3-D Scribbles around the edge then used a toothpick to poke bumps in it (a lesser-known Distress technique ☺).

After it dried, I dotted red glitter glue over the top leaving spaces for the black to show through. (To see the detail, click the photo to enlarge it.)

I'm linking this tag to Simon's Monday blog challenge where this week's theme is Gentlemen. I can't think of a more "gentle man" than Santa!

November 30, 2015

12 Tags for Christmas - March


This is my holiday version of the March tag from the Tim Holtz 12 Tags of 2015 series where he demonstrated an excellent technique for using gold embossing powder over wet texture paste (and is the only common element here).

Limited in my Christmas stamp choices (remember process versus product), I tried to mask this Tim Holtz collage stamp on a scrapbook paper background which was tinted with Worn Lipstick Distress ink and an aqua Gelly Roll pen.

Can you tell I missed? The outline on the top and left edges of the stamp were filled in with black lines to remedy my poor masking skills.

If you wonder about my color choices I wanted to try using less traditional holiday colors. In hindsight, silver versus gold embossing might have looked better with this scheme.

Just a reminder, you can preview all my 12 Tags for Christmas by using the link on the sidebar.

November 08, 2015

Better


This Found Relative seems wise beyond her years and the hand-written text kept running through my head as I worked on this tag.

The background was stained with Tumbled Glass then collaged with fussy-cut Wallflower vellum and embellished with some texture (stencil by Crafter's Workshop) and crackle mediums and tinted with gel pens and oil pastels.

September 04, 2015

Remnants

rem·nant
/ˈremnənt/

noun

a small remaining quantity of something.

a piece of cloth or carpeting left when the greater part has been used or sold.

a surviving trace.


I only have remnants of brain matter left this month after working on my entry for Tim's September tag--it was a challenge!


To begin with, I'm alcohol-ink impaired so piles of glossy stamping paper later, I finally arrived at a background that might work.

I don't have transparent gloss texture paste so I used gloss gel medium with Tim's Scribbles stencil instead. I thought it would dry clear but I believe the thicker application prevented this. It's still somewhat transparent though and the pop of alcohol ink colors shine through but it's obviously not the same effect as Tim's.

Rather than highlight the texture with archival ink I used Vintage Photo Distress stain to darken the cracks and provide some contrast.

Click to Enlarge

There's no frosted paper in my studio so I took a laser printer transparency and sanded both sides to mimic this product. I guess it's close-enough but didn't curl as easy as his did.

Finishing touches included a Foliage charm, Remant Rubs (Words), ribbon scraps and Scribbles (3D fabric paint) dotted along the tag edges.

Tim's monthly tags always challenge me and this time, after allowing myself to fail (and learn), I thankfully pushed myself through.

I am grateful for the process and the end result!

June 17, 2015

Lady Huron

Liquitex light modeling paste, Distress clear rock candy crackle paint and shiny black Scribbles were the mediums used to link this tag to Simon's Monday blog challenge where this week's theme is cleverly named don't cut, just paste.

I haven't combined a paste layer with crackle medium before but it worked out well here because it created a uniformly flat surface for pasting on collage elements.

Let me explain.

First, I took a plain manila tag and covered it with several layers of victorian velvet Distress stain to get a rich, dark background.

Then I used a Prima damask stencil and modeling paste which absorbed some of the stain, tinting it to a lighter shade of pink.


Next came the crackle paint which I applied with a palette knife. It settled into the recessed areas of the damask at a perfect thickness for crackling and was enhanced by working in thinned-out white acrylic paint after it dried.

The banner was cut from scrapbook paper and distressed to match the photo. The black, dimensional dots applied to the photo and tag borders were applied using a 3D paint called Scribbles.

Why Lady Huron? She was named in honor of new music I listened to while making this tag. The CD, titled Strange Trails, by a group called Lord Huron was very inspirational and I had to give due credit!

May 13, 2015

Gingham


I'm not always open to whatever comes next except, maybe, when it comes to crafting. I'm the type that likes to make lists and always have a plan. But since surprises and happy (?) accidents are part of making art, I am learning to embrace them.

The photo I used is a Found Relative and since Fido seems to be anticipating something, Tim's Small Talk sticker seemed appropriate here.

Click to Enlarge
Mostly, this was an experiment with my Simon Says Stamp stencil called Gingham which I used in several layers to create a background with Distress inks.

After altering and pasting on the photo, I created a border with the stencil and texture paste that I tinted with black gesso.

The butterfly (left over from another project) has a layer of clear crackle and provides a touch of sparkle.

I'm linking to the Monday blog challenge at SSS where this week's theme features Simon brand products.

May 04, 2015

Devil or Angel?


My entry for Tim's May tag features a snapshot from the Idea-ology Photobooth strips along with pieces from the vellum Expedition ephemera pack, a metal number brad and the School House stencil.

I thought I'd share a few tidbits regarding my distress techniques rather than provide a step-out since Tim's got that covered.

Click to Enlarge

I distressed the photo by peeling off the back so it would be thin enough to scrunch then flattened it out, pasted the backing back on and inked the edges.

A liberal amount of water was used with red brick and iced spruce to tint the texture paste and background. Naturally, the tag warped a bit so I flattened it out with some heavy books overnight.

There's adhesive-backed metallic mesh behind the photo and I used text rub-on's for the question marks. I also wanted the hole reinforcement on the tag to show so I cut my background papers around it.


I used a typewriter for the text on the shield. To insert it into the machine, I used washi tape to temporarily fix it to a larger piece of paper.

I distressed the shield with sand paper and tinted the edges with colored pencils.

I removed the tabs from the number brad then flattened it out with a rubber mallet. I darkened the numbers a bit with a fine permanent marker.


To tone down the color of the arrow which was originally a very bright orange-red, I used a colored pencil in a complementary color, blue-green (which is opposite orange on the color wheel).

This is a good trick to become familiar with when going for a distressed look because adding a color's complement is a proven way to tone down the original hue by reducing it's intensity.

To paste the arrow, I marked off where it would be then scraped away the stenciled letters underneath so it would lay flat on the background.


Well, I think that's everything and once again, I enjoyed the challenge of this month's tag.  Tim sure did pull out all the stops this month and I hope you are inspired to create something too!