January 19, 2016
Forever Young
Using the lid from a vintage cigar box this piece, made for Tim's Idea-ology booth at CHA this year, features:
a Curio Knob, Vignette Boxes, Letterpress, Big Chat, Thrift Shop Ephemera, Apothecary and Corked Vials, an Ornate Plate, Hex Fasteners, Alpha Dice, Box Corners and the new Dapper paper.
And it all started with an idea to cut-up a group photo and put people inside bottles.
I used an Occasions Found Relative for this one that featured children dressed-up in their Easter best. You can also see the Dapper cigar box strips that worked perfectly to cover the front edge of the Vignette Box.
I'd also like to point out the apothecary labels that come with the new brown vials--they make the bottles look so authentic.
To place the children inside, I removed the backing from the photo, cut-out the individuals then curled them slightly so they would fit through the neck of the bottle. To anchor them in place I used a bit of Glossy Accents and the end of a long toothpick as an applicator.
The Alpha Dice makes it easy to spell-out a variety of words as there are multiples of the most common letters in each set.
But for me, the single-most important element in this piece was the blue background paper from Dapper. I had experimented with a variety of papers before choosing this one and the moment I placed it in the background the assemblage was instantly transformed. It's really a terrific collection and I can't wait to see how others might use it.
If you're interested, here's a link to all the projects I made for this year's event.
January 16, 2016
Moments
I'm sharing another CHA 2016 project made for the Tim Holtz Idea-ology Booth today and it features one of my favorite new products--the Decorative Dome.
I placed a tiny tree branch inside, draped with a bit of feathery crochet yarn and set a tiny butterfly cut from the Wallflower paper stash on top.
Next to it is one of the new wooden Alpha Dice cubes along with a Salvaged Doll that was tinted and distressed with crackle medium.
That frame in the background? Also a new product (called Baroque) and inside is a big blue bee from the Wallflower stash embellished with some Remnant Rubs.
All of that goodness was mounted inside one of his new Vignette Boxes and the edges were trimmed with cigar box strips from the new paper stash called Dapper.
Just below that is a new Vignette Panel which can be used as a lid for the boxes or, in this example, as a surface/support for the new Mini Pocket Watch and Charms. The topper is a painted Nature Adornment and the panel features insects from the Wallflower stash. The number strip along the bottom is from Dapper.
Everything was assembled on the inside of a vintage cigar box lid lined with walnut stained burlap and a large cut-out from Wallflower. A Mini Plaquette sits in the top right corner.
 |
I hope this post gives you a few ideas or inspiration for your next creation and here's a link to the rest of the pieces I made this year for CHA if you'd like to take a peak.
To see everything available in Tim's new release, go here. Also, I find it handy to use this page on his website to see all things Idea-ology in one place with good descriptions and also measurements.
January 13, 2016
Remix
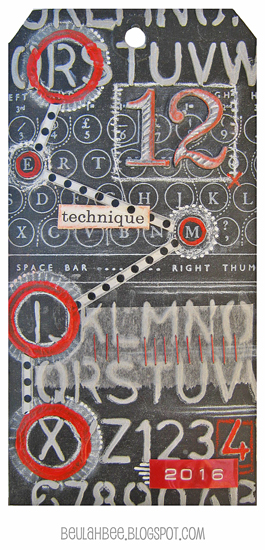
Tim's doing a "Technique Remix" for the 12 Tags of 2016 and this month he features metal embossing and chalkboard stamping. What a combination!
So even though I really tried to use more metal (three tags are in the trash as I write this), the best I could do was pull off the chalkboard look. In spite of my failures it was great fun just to try.
I thought I'd share my discovery for making your own chalkboard paper. Either start with black paper or make your own with paint or black gesso then coat it with what's known as clear gesso.
It's meant to be used mostly for pastel artists who need "tooth" on their surface for the powdery pastels to cling to. It's basically clear acrylic medium with a bit of fine sand mixed in.
First I used Tim's Schoolhouse stencil on a black tag to apply texture paste that was tinted with gray paint. I let it dry, stamped with Tim's Type Keyboard using white pigment ink and clear embossed it.
Then I applied the clear gesso over everything so I could use a white charcoal pencil to give it that chalkboard look.
Remember the grungeboard die-cuts from Tim's early days? That's what I used for the big number 12. Painted with black and clear gesso, they were easy to tint with a red pastel pencil and more white charcoal to keep the chalkboard theme going.
Some circles stamped with red paint, a bit of washi (polka dots), tissue paper and two more design features from Tim's early beginnings--mini staples and Dymo tape (the red 2016) provided the final embellishments.
I may have drifted from this month's remix but embraced what I've learned from following Tim's tag tutorials for such a long time and am excited about this year's new twist. I think it will be great fun to revisit these oldies but goodies.
Subscribe to:
Posts (Atom)


