/* */ Beulah Bee: Collage Paper
Showing posts with label Collage Paper. Show all posts

September 04, 2018

The Beekeeper's Daughter


I've made a Vignette Tray assemblage/collage to share with you today. I chose the smaller tray size and used whiting (a wood stain) and some light sanding to alter the surface. This technique is known as "pickling."

I used this finish on a CHA 2017 project and here's the link if you'd like to see another example.


A Found Relative was cut-out and placed between a sandwich of two Baseboard Frames and vintage book paper of a blue sky was attached to the back.

The background consists of the stained wood of the tray along with vintage book paper text.

The large white script was made using a home-made stencil and white paint on Plain Collage Paper.

By using the collage paper, I have lots more control over where it's placed and after pasting down it becomes almost invisible.


The tiny bee on top is an image transfer on the backside of a vintage button (I filled in the holes with paste medium).

The sunburst is also a transfer and the image came from a Trader Joe's flyer.

The gentlemen were cut from French Industrial paper stash and there's also a vintage postage stamp.


The flowers were cut from the Wallflower paper stash and that's an Idea-ology key dabbed with white paint and dark ink to distress it.

The honeycomb was made with a Tim Holtz Mixed Media thinlet.

This piece was a long-time in the making and there were several versions before I finalized it.

Funny thing, though--I ended up returning to my original idea. I guess I needed to try out all the possibilities before I could fully embrace the design.

August 17, 2018

My Blue Shoes


Another digital photo just begging to be altered (thanks again, Vintage Everyday) and, in this case, in a most unconventional fashion. But I truly celebrate these type of creations because they conform to no one and are purely me.

And it's been awhile since I've made a tag and they're very therapeutic!

July 27, 2018

Minnie Nolan's Boarding House


My grandmother had a habit of writing on photographs of family members. While maybe not great for the appearance, I do appreciate the documentation.

This photo was the kind that is printed on a postcard. It was identified as "Minnie Nolan's first boarding house in Kansas City."

I used the actual photo (rather than a copy) with its wrinkles, writing and a missing corner and applied a thin wash of off-white acrylic paint to block out the background.

It was mounted behind an Idea-ology Collage Frame dressed up with various pieces of Tim Holtz paper stash (the vines were cut from Wallflower).


The polka dots (Tim Holtz Dots & Floral) were stamped on his new Plain Collage Paper and layered over the upper left corner. I made dots around the oval with Scribbles (3D fabric paint) and distressed some metallic numbers to blend in with the overall color scheme.


I cut a piece of book board to cover the back and painted the edges. I trimmed the frame's border with lines of black and gold metallic inks.


The butterflies are some digital clipart that I printed on vellum and cut-out. The word "legacy" is a Remnant Rub.

I don't think Grandma Nell would mind what I did with her photo, it's better preserved now and her notes have been transferred to the back of the frame.

July 16, 2018

Tell Your Story


Hours have gone by with no end in sight. A work in progress just won't come together and I needed a break. So, I made a tag with random bits from previous pieces and I feel better now.

It's a lesson in remembering to let go of control, to trust your instincts and to embrace the process instead of the end result.

June 24, 2018

Penny Farthing


A journal page to share with you today made for Simon's Monday challenge--this week's theme is "Transport It." It was a chance to embrace my passion for collage and to try out a new addition to my craft stash--Idea-ology Plain Collage Paper (Tim Holtz).


Over the years, I have amassed a sizeable collection of images taken from old picture books (no worries--they were destined for the trash) and it was a pleasure to find the material I used for the background.

I also used an image from the net that was fussy cut and pasted over the top. The foreground paper is from Tim's French Industrial paper stash. The text is a Tim Holtz Clippings Sticker.

The Plain Collage Paper was used to stamp the typewriter keys (Tim Holtz Documented) and also the postage stamp (Hampton Art 2010).


Here's a close-up view and you can see how transparent this collage paper can be. I find it superior to other tissue papers I have used in the past and know I will get a lot of use out of it. There are also printed versions with flowers, birds, and script.

In case you are wondering, a penny farthing is a high-wheeled bike and I suspect the driver of the motorcycle with sidecar may have been the photographer.

That's the Hammersmith Bridge, London in 1900. The city skyline is Florence, Italy, and the postage stamp and the stamped script (Inkadinkado) are French. Now that's traveling!

April 11, 2018

Ada Again


I have modified a recent collage (see previous post, Ada 1916) by scraping off the photo of my great Aunt Ada and replacing the image with one I like better.

Because the original photograph was a bit thicker than the other collage papers I used, it was pretty easy to get underneath it and carefully peel/scrape it off.


Then I used this image as a transfer and created a mask of the hands and face. I used the mask to apply off-white paint on the background where the image was placed. Since image transfers are inherently transparent, this technique keeps the background from showing through.


The image transfer's darker undertones made it necessary to adjust values throughout the collage using transparent paint (glazing) and I also colored the collage paper flowers.

And finally, I felt the need to contain the composition by adding a border which was made using dots of Scribbles. I think the addition of the black accents helped to emphasize the other black elements in the collage.

April 08, 2018

Ada 1916


My great Aunt Esther wrote on the back of this photo, "Ada, June 1916." I suspect it is a photograph to commemorate her sister's graduation from high school as I have several copies and the year would be appropriate.

I used a wooden panel (10" x 10"), the new Idea-ology collage paper (Botanical), some Memoranda paper stash and an Idea-ology Collector Layer. All the paper bits were made thinner by rubbing the back side with water and I also used damask patterned tissue paper along with some light pink. The circle scroll design was an image transfer.

(Click on the photos to see a larger, lightbox view.)


The wooden support was gessoed, I pasted on a crinkled sheet of light pink tissue paper, added crackle medium, then rubbed on brown wax to bring out the cracks.


At this stage I was thinking I should have waited to crackle the board AFTER I arranged the collage but in the end it may have been the right approach even though most of the surface was covered up.

Here are some close-ups that show how I layered the collage paper.


Working with the collage paper I learned that, if you don't want the white of the tissue to show, it's important that the glue underneath covers the entire surface. In the photo above, the hand-written name has fewer missed areas of glue underneath than the section of tissue just above it.

My glue of choice for this piece was fluid matt medium. I like that you have a longer working time than a gel medium and that it moistens the paper slightly so it lays down easier. You can get all the bubbles out without using much pressure (which might tear a delicate paper).

February 02, 2018

Triumvirate

Hello and welcome to this stop in the
Creativation 2018 Tim Holtz Blog Hop and Give Away!

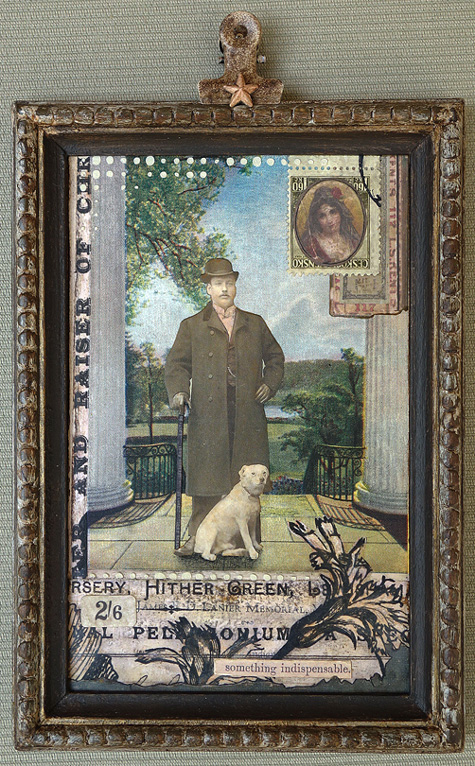
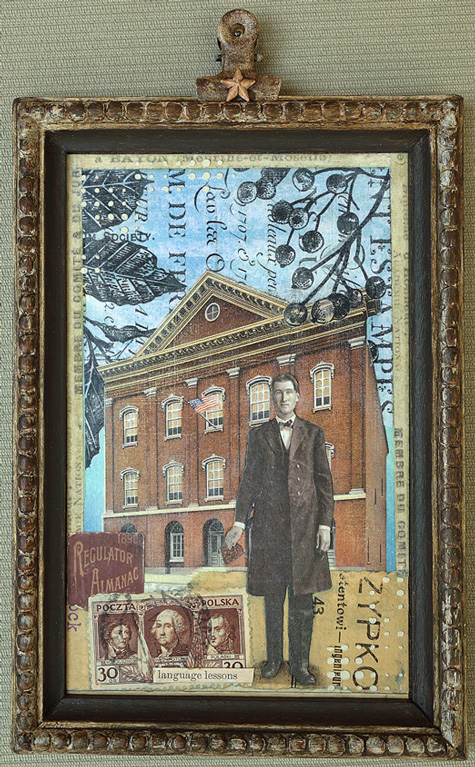
Here are three mini-framed panel collages made for the masculine side of the Idea-ology booth. They feature the new collage paper (Botanical), paper dolls, clippings stickers, design tape, paper stash, hinge clips, star adornments and ephemera.

The backgrounds are vintage postcards.

CHA 2018
CHA 2018

If you are interested in the construction details or want to see the other pieces I made for the show, I've posted about them here.

How grateful I am to be included in an event with so many talented and creative artists--all thanks to the wonderful world of Tim Holtz!


Blog Hop Road Map:

IDEA-OLOGY

SIZZIX

STAMPERS ANONYMOUS

*Give Away Details
There will be PRIZES, PRIZES, PRIZES to give away! Just leave a comment on the blog hop posts for a chance to win (the more blogs you comment on the better your chances). Comments must be posted by midnight PST on Tuesday, February 6. Winners will be announced on Wednesday, February 7 on Richele's blog.(californiaARTgirl.blogspot.com)