/* */ Beulah Bee: book paper
Showing posts with label book paper. Show all posts

May 11, 2016

Poemata.


Poemata. That's Latin for poems. This word, along with a British Museum seal (in red), appears in their Flickr photostream where they have scanned and made available to the public over 1 million images. The small ornate frame with the word and number Tomo III also came from the stream.

I can't remember where the butterfly (actually a Luna moth) came from but it's an image transfer (along with the words) and appears brown because the particle board surface of my support is that color.


The wreath (Prima Noble Darling) was stamped onto old book paper and cut out, the lace was "borrowed" from a card a friend of mine gave me and the border was made with Liquid Pearls (Ranger).


The background text (Tim Holtz Ledger Script) was stamped with Ranger archival ink (Potting Soil) and the support is actually one of Tim's 4" x 6" burlap panels sans the burlap. There's also a tiny strip of white mulberry paper on the left-hand side.

I like working small so this was a good size for me and you can pull out more stops on wood than you can a manila tag. Maybe I've found a new calling? We'll see.

April 18, 2016

No. 526713


I'm a Guest Designer for April at the Simon Says Stamp Monday Challenge Blog and if this is your first visit here--hello and welcome!


This week's challenge is to use a Butterfly and my idea for this tag started with one I found in my Wallflower Vellum paper stash.

I cut it out and cropped it to fit inside an Idea-ology Journaling Ticket stamped with some background text (Ledger Script) using archival ink (Ranger Potting Soil).


I built a box for it by scoring 1/4" from the edges of a rectangular piece of heavyweight cardstock then folding up the sides and securing the corners.


The box was lined with a vintage dictionary page and I attached the ticket using my sewing machine. A Small Talk sticker was tinted with Antique Linen Distress ink and placed on top. 

The stitching made me think of using a textile background so, after tinting the tag edges with Walnut Stain Distress ink, I cut a piece of fabric (Eclectic Elements) and stitched it to my tag.

In case you're wondering, sometimes I peel off the reinforcement paper around the tag's hole punch before adding background papers, etc., then reapply it (which is what I've done here).

After a few practice runs on some scrap fabric, I stamped the tiny butterflies on a string (Prima Noble Darling) using, of all things, ink from a Fude Ball pen. I needed a real juicy application to get a good image on the fabric and this pigment ink pen did the trick.


To create more visual interest, I intentionally offset the placement of my tag elements including the Lace Trimmings along the bottom edge of the box.

I stitched on a button (that matched the coloring of the vellum butterfly) as well as some string tinted with Black Soot Distress Ink to help draw the viewer's eye up and over the box and match the playfulness of the tiny butterflies.

----------------------------------------------------------------------------------


I do hope you'll join us for this week's challenge--
what kind of butterflies inspire you?

And don't forget when you upload your creation to the Simon Says Stamp Monday Challenge Blog you'll have a chance to win a $50 voucher at the Simon Says Stamp store!


Here's a list of the products I used for this challenge which can be ordered from Simon:


March 23, 2016

La Cucina


(Per Schiassi e Scarpelli)

My cooking skills have improved with practice over the years but in the early days of my marriage I felt like a child in the kitchen. My husband is Italian and no one cooks like his Mama!

The stamp used for this tag was found at a garage sale and seems very old (I think it may date back to the 1970's) and while I wasn't sure I'd ever use it, I was drawn to the image (perhaps because of my history?) and the price was right so I bought it.

With this week's theme of Food and/or Drink at Simon's Monday blog challenge I thought now would be a great time to use it.


I began with a page from an old cookbook which is now hard to see due to the many layers of distressing I used to make the walls look like old plaster. The floor, window and sign were hand-drawn, the bird was stamped and I placed a bit of washi along the sides of the window for trim.

Buon appetito!

March 17, 2016

Hold On


At the bottom center of this photo are the words "Bird's Nest" (click to enlarge) and it was pure coincidence. The star, cut from the index pages of a very, very old cookbook was made before I even thought of using a bird (Thrift-shop Ephemera) to carry it and even then, I didn't make the connection until it was pasted down.

The stamped background was made using Tim's Dots & Floral stamp set with red and grey archival ink then tinted with colored pencils after applying a light white wash. A bit of machine stitching, gelly roll dots, Chit-Chat stickers and washi were used to complete it.


I'm linking to this week's Monday blog challenge at Simon where, in honor of St. Patrick's Day, the prompt is Use Some Lucky Stars.

February 20, 2016

No. 141


What is collage if not upcycle/recycle? Using found bits of ephemera and images from books is common practice for me and so I'm linking this tag to the Monday blog challenge at Simon Says Stamp in honor of this week's theme.

It's another exercise in working through the long, narrow format of a tag and attempting to create a sense of space/depth in the composition. It started with the remainder of a Found Relative photo that I used in another piece.


Book pages, an image transfer, stamping, Tissue Wrap, Remnant Rubs, and a bit of washi tape were used to complete it along with various inks and paint.

All I can say is the best part was placing that tiny airplane in the sky.

Stamp credit: Tim Holtz Components - Flourish

January 11, 2016

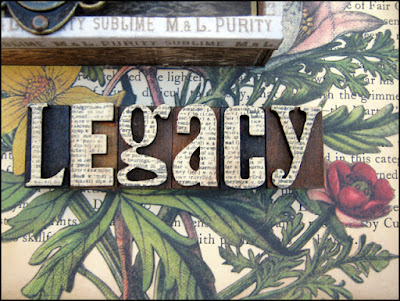
Legacy

Every book has a story and this one began when I pasted the pages together and cut-out its center.

Its final chapter ends with a stint in the Tim Holtz Idea-ology booth at the 2016 Craft and Hobby Association Convention in Anaheim, California (CHA).

Photo Courtesy Paula Cheney via Instagram

It features three of Tim's new Idea-ology products for this year--a Vignette Box,


some Gilded Accents Remnant Rubs and the Dapper Paper Stash (cigar box strips used along the box front edges).


I also used some old favorites like the Wallflower Paper Stash, a rather famous Found Relative, some Thrift Shop Ephemera and Letterpress.

My idea for stamping onto the letterpress faces came from some artwork by Paula Cheney that's featured on Tim's packaging for the new Framed Panel. If you haven't seen The Flamboyant Mr. Albert (and Paula's great tutorial) here's the link.


The vintage postage stamps are courtesy of my Great Aunt Esther who was a collector and left them to me. One is from Argentina and the other is Belgium.


It was a thrill to be asked to contribute artwork for Tim's booth display because (as so many of you know) working with his products just invites creativity. To see my other CHA projects, here's a link.

Photo Courtesy of Mario Rossi via Instagram

So that's the story with the following epilogue: This book will soon return to anonymity and never again be seen in such magical surroundings!

- The End -

October 27, 2015

Life Mind


This month I worked through a blog challenge presented by A Vintage Journey where participants were asked to incorporate Tim Holtz techniques, style and/or products into their art journals.

Using the large format Dylusions journal, my first page was completed a few weeks ago and features a stamp from Tim's Flower Garden stamp set. It coincides with an online course I just completed on the subject of Mindfulness.

For the second page, I used only Tim Holtz stamps and if you don't count the Remnant Rubs text and some paint, I stayed true to my goal. I'll admit that the subject matter might have been a bit more interesting if my stash were larger but it was great fun just working with what I had.

And so, I'm also linking this post to Simon's Monday blog challenge--this week's theme is Throwback where you make something from a previous challenge. I picked the first challenge from July, 2013 called A Little Stamping which is what gave me the idea to use only stamping on my journal page.

To see more detail as you browse my images you can click on them to open the larger, lightbox view.


Journal Page No. 1


Journal Page No. 2


September 10, 2015

Escape


A bonus from mucking-out the craft room last month was discovering long-forgotten goodies like the wooden birdcage die-cut (from Kaisercraft) that I used on this tag.

And since this week's theme at Simon's Monday blog challenge is stamp and punch/die-cut what better time to use it?

A background was made with old book paper, paint and stamping then I tinted and stamped the birdcage and used an image transfer for the text. Yes, that's a bit of washi tape for the shadow and I used a black Fudi-ball pen to ink the edges.

Click to Enlarge

I have yet to invest in die-cutting equipment and only have a few, very small paper punches so I was happy to find this birdcage in my stash--otherwise, I'd have to sit this one out!

Stamp credit: Kaisercraft Dictionary Meanings

July 31, 2015

Cecil


Cecil's death this month made us more aware of lions on the brink of extinction so perhaps some good will come from this senseless killing.

I've made this tag to honor him and hope you'll visit Lion Aid's facebook page if you'd like more information on what can be done to save them.

I began with a page from a very old cookbook (copyright 1887) pasted to the front of a manila tag.

The paper is so old it crumbles so a layer of acrylic medium was used to stabilize it.

An image transfer of Cecil was applied and features his distinctive black mane (which was his trademark).

I stamped the wing/crown image (Tim Holtz) on a scrap of tissue paper then embellished it with gel pens and colored pencils.

There's a strip of washi tape behind the Industrious sticker frame and a glaze of paint and Graphitint pencils added background color.


I'm linking to Simon's Monday blog challenge where this week's theme is no ordinary paper.

April 17, 2015

Freestyle


I have finally tried out the last of the six flowers you get in the Tim Holtz Flower Garden stamp set. I think it's another Peony and it's been altered somewhat (more about this later).

Click to Enlarge
I call this tag Freestyle because that was the attitude I had while making it. I had no plan--I just starting doing stuff.

A bigger bottle would've been better (to keep the proportions right) but it was the only one I had and, anyway, a bigger bottle might mean a bigger tag and then where would it end?

I rather like the overall appearance though and discovered some interesting techniques that are sure to be useful in another project.

I thought I'd share exactly what I did so fasten your seat belts, it's going to be a bumpy ride!

  1. I covered the tag with a page from an old dictionary.
  2. I stamped the bottle, flower and stem with black archival ink keeping ink off one of the large petals near the base to make the flower smaller.
  3. I used colored pencils to create a rainbow-effect in the background.
  4. I used off-white to paint over the text inside the flower petals with a tiny brush.
  5. I stenciled some large script on a piece of deli-paper with black paint.
  6. I laid the deli-paper over the tag, traced the outline of the bottle and flower, cut it out, then pasted the remainder on the tag (leaving the bottle, etc., exposed).
  7. I used a harlequin stamp and archival ink on the background by using the cut-out scraps from my deli paper as a mask.
  8. I softened the edges of the impression with a bit of hand-sanitizer (which works great as an archival ink eraser on non-porous surfaces).
  9. I tinted the flower with dye ink and a water brush and added a light wash of white to the bottle and stem.
  10. I used black and white gel pens to make dots for accent. The black ones didn't dry so I used clear embossing power on them to speed things up and keep them permanent.
  11. I used my Exacto-knife to scrape the edges of the tag, wet them with a brush and then applied black dye ink.
Perhaps a word about deli-paper is in order. I use it for all kinds of things and it makes great paper for collages because it is thin and durable. It reminds me a lot of the same type of paper Tim uses for his tissue wrap.

Now that I've used all the Flower Garden stamps individually, I guess it's time to plant a garden but I'll definitely need to use something larger than a tag. I think I see a journal page in my future!

I'm linking to the Wednesday blog challenge at SSS where this week's theme is make your own background.

March 28, 2015

Prototype


This week's Monday blog challenge at SSS is to use a stamp multiple ways on the same project or use the same stamp in different colors or ways on multiple projects.

So I read through Michelle's creative stamping tutorial, then chose a stamp to experiment with that's always been hard to use--it's large, not very deeply etched and yes, a bit unusual. I was hoping this exercise might shed some light on how to get more out of it.

As she suggested, I just starting making impressions on all kinds of scrap papers. Then I got an idea to cut various parts out of the image from the many stampings and collage them back together puzzle-style.


Click to Enlarge
I ended up making a tag which was embellished with a little paint and ink.

If time permits, I like to try another one and will tell you that I like this stamp a whole lot more than I used to.

This was a great exercise and I always appreciate the inspiration I get from the weekly challenges.

Stamp credit: Paper Artsy