/* */ Beulah Bee: book paper
Showing posts with label book paper. Show all posts

May 05, 2018

Moments in Time


Time. Oh what a topic and such a precious commodity! It's the theme at Simon this week and here's what I made.

Crafted from some Idea-ology bits (pocket watch, flowers) and the new Worn Wallpaper, it was assembled with a homemade box and basswood strips. The support for the pocket watch is a small wooden tag turned upside down.


A vintage image was placed under the dome of the watch and I embellished it with a ball chain. The quote is an image transfer.

April 26, 2018

Polyommatus Theo


This moth was clipped from some vintage Tim Holtz kraft paper and it was labeled as a "Polyommatus Theo." Now you know.


It became a decoration for this greeting card made from other Tim papers as well as an old book page. I seldom add sentiments so I can use the card for any occasion.


The flowers (Stampers Anonymous Flower Garden set) had another life before they became a part of this card. When a tag I was working on turned south, I cut them off the tag and reused them.


I used a transparent white paint to fill-in the flowers and the Distress inks underneath bled through. This explains the coloring you see in the final piece.

The text stamp is Stamper's Anonymous Ledger Script and the dots are Perfect Pearls and there's also a bit of machine stitching (something you don't see on a store-bought card).

I'm linking to Simon's Monday Challenge blog for this week's theme which is Flower Power.

March 11, 2018

Cool in the Shade

My favorite teachers? The passing of time, experience, practice, experimentation, mistakes. Case in point this tag (made for Simon's Monday theme "Whatever the Weather"):


  1. Learning how to use Photoshop's recompose tool to crop this photo without losing the photograph's border frame.
  2. Experimenting with Tim Holtz Distress Oxide Ink technique on glossy paper with mixed results (too much water, not enough ink?).
  3. Applying crackle medium to paper, the product I use has to be applied really thick--it was too thin this time to show up.
  4. The benefit of delaminating some Idea-ology paper stash to reduce bulk when collaging (text piece is full thickness, report card area was made thinner). Each time I try this, I get better at it. The trick is to gently rub off the back with a little water after peeling away as much as you can.
  5. The flowers (Idea-ology ephemera) were also delaminated because they are easier to refine with cutting when the paper's not so thick.
  6. Proved again that for me, the best way to tint a photo is still using a dab of ink from a gel pen with a little water (the turquoise in the wallpaper behind the teacher, for example).
  7. Appreciating that without adding a little whimsy to the piece an observer might think it too serious and wonder about my mental state. (Perhaps you should anyway.)
The weather connection is in the Idea-ology text from the Memorandum paper stash. I do believe this teacher is cool in her shades. Also note the Red Precipitate Ointment which is a nice touch--don't you think?


By the way, my favorite human teacher was Mrs. Jennings who had the patience to work with me in the 5th grade when I refused to learn multiplication tables and provided comfort from bullies.

February 07, 2018

Feeling Noteworthy


The bird's crown is a Remnant Rub. Many of the older rubs have been discontinued. I am unhappy about that because I find them so useful. So I have no other choice but to hoard them.

Anyway, today my intention was to make a valentine-themed tag but I veered off-course (a good excuse to try again later) and made this tag instead.


The botanical bits came from an older 7 Gypsies paper collection called Conservatory. A vintage Germania postage stamp, scraps from a book page and yes, more Remnant Rubs (don't get me started) were also used.

I thought I'd speak a bit about my dotted border. As I use this decorative element quite often, I have a few tips in case you want to give it a go. I prefer Scribbles which is a dimensional fabric paint but also use Liquid Pearls.

When applying, don't touch the applicator tip to the paper as you will get a splotch instead of a dot. Rather, gently squeeze some out from the tip and delicately touch only the drop/paint to the paper then pull it away. Don't worry if it peaks a little, it will settle as it dries.

If you goof-up (and you will, it's inevitable)--fear not. Just keep a toothpick handy and scrap off the mistake as best you can. Then move on. Keep dotting ahead. Afterwards, you can go back to the boo-boo and use a knife to scrape away the dried bits that might still be there. Then put your new dots back in. I had two areas on this tag that I had to re-do and no one (except you) will ever know.

January 21, 2018

Never Change


I used the back page from some vintage sheet music for this tag's background--MCMXIX (or 1919) means the song is 99 years old and I suspect that the paper is nearly the same age.

I didn't encase it (coat with clear medium to protect) so I had to be really careful as I worked with it but I wanted to preserve the softness of the paper and it's natural vintage tone. I didn't have to rub very hard to apply the Distress inks I used to tint it which was a good thing!

The birds were stamped then cut from more vintage paper (a book page) and that's some Small Talk (Idea-ology) text.

I'm linking to the Birds of a Feather theme at Simon's Monday Challenge Blog. I won the $50 gift card last week which proves the old saying, if you don't play you can't win. Thanks Simon!!

Now I'm off to buy a lottery ticket.

December 11, 2017

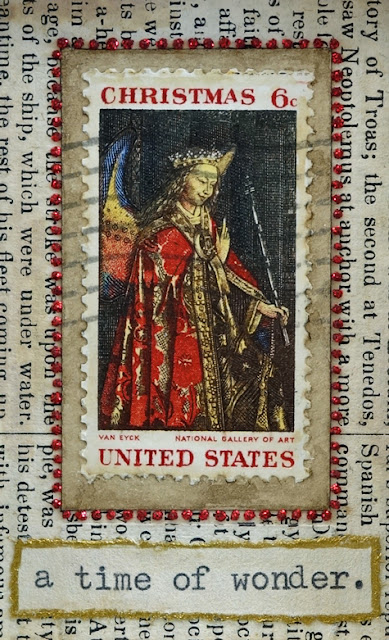
12 Tags for Christmas 2017 - Time of Wonder


Back in the day, Christmas postage stamps were printed using an elaborate process without benefit of the digital equipment we take for granted today.

And, sadly, a beautiful series of stamps commemorating great religious works of art is not something I'd expect the post office to take on in this day and age.

Thankfully, we have postage stamp collectors (philatelists) who preserve this vintage art form like my Great Aunt Esther who saved the one I've used for the tag I share with you today.


It was mounted in a little box I made that was lined with old book paper and sits on top of Tim Holtz Ephemera and a page from his Tidings paper stash.

The holly, pine branches and calendar page were cut out of that same Ephemera collection. It's mounted on a red satin ribbon and embellished with Rock Candy Stickles and Glossy Accents.


I used Folk Art gold metallic paint (good stuff) to trim the tag, box and text edges. For the text, I originally chose a Clippings Sticker but botched it up so I made a new one using another relic from the past, a typewriter.

Well, as this is tag number eleven (and also my favorite), I've only got one more to go to complete the set. It will be an homage to Tim Holtz if there ever was one and I hope you'll tune in!

December 10, 2017

12 Tags for Christmas 2017 - Special Delivery


I have a Christmas-themed playing card stamp by Inkadinkado that is useful for creating frames, ovals, etc., and was used to embellish my tenth tag. The photo was cut from Tim Holtz Ephemera.


The florals were cut from Graphics 45 paper (Winter Wonderland). To adhere large, intricate cuts like this one, I use an aerosol adhesive that works well but you must go outdoors to spray it.

December 07, 2017

12 Tags for Christmas 2017 - Dashing


Okay, I know, dashing through the snow is about a sleigh and a horse (and bells I think), but birds do some dashing, too, as evidenced by my cat's favorite entertainment (a live video cam of a bird feeder in Canada).

So perhaps that explains my combination of birds and text for this, my 7th Christmas tag of the season.


I was drawn to the combination of the golden yellows with the black and white. The birds were cut from a Graphic 45 paper called Winter Wonderland, the vertical strip is the edge of an old book page, and the snowflakes and text are from a paper pad called Deck the Halls with Chalk (Hobby Lobby/Paper Studio, 2013). The tiny white dots are Scribbles (3D fabric paint).

December 03, 2017

12 Tags for Christmas 2017 - Season's Greetings


Tag three of my 12 for this year's Christmas was an experiment using a hand-made stencil patterned after the original rubber stamp. I like to use Yupo for my stencil material because it is strong, waterproof and cuts like butter.


After pasting on a background of old book paper, I used thin white acrylic paint and the stencil to make a random pattern then stamped over the stenciled areas once the paint was dry.

I didn't worry too much about accuracy and you'll see places where the two (stencil and stamp) don't meet. But that's okay because the variations added interest in color and line.

My tints mainly came from Distress Oxides (lipstick and pistachio). I also used a light wash of white acrylic and a few watercolors, where needed, to adjust some values.

Platinum Stickles and Tim's Tissue Tape created a border that was darkened next to the inside edges with a bit of charcoal pencil.


Stamp credits: Penny Black Christmas Star, Echo Park Christmas Sentiments

December 01, 2017

12 Tags for Christmas 2017 - Joy to the World


♪♫ ♪ "On the first day of Christmas, my true love sent to me ..." ♪♫♫♪

Ten years ago today, Tim Holtz began the tradition of blogging about techniques for creating 12 Tags for Christmas and I've continued to make them every year since then to decorate my presents.

This year, I decided to post them in 12 consecutive days beginning December 1st just like he used to do and my first tag features a simple, understated design with an early American or Georgian vibe.

The background is pearly paper with clear-embossed snowflakes (Kaisercraft Frosted) that was tinted with Faded Jeans Distress Oxide.

I coated the book paper die-cuts (Carta Bella Joy Wreath) with Glossy Accents and created additional contrast by using a blue gel pen and a water brush (which soaked in underneath).

I gave the entire surface a wash of dilute white acrylic paint and took advantage of the resist properties of the Glossy Accents by wiping the paint away from the die-cuts where there was overage.


I used a Remnant Rub to complete the phrase and made a frame border with 1/8" silver metallic ribbon (Offray) tinted with off-white acrylic paint.

To age the appearance a bit more, I rubbed on Frayed Burlap Distress Ink here and there and added some Liquid Pearls along the bottom for a touch of Christmas bling.

November 21, 2017

Christmas Snow


I love this tag. And it was EASY to make. Perhaps this post will inspire you to give the technique a try?

Prompted by Simon's Monday Challenge Blog, where this week's theme is torn paper, I began to search for inspiration on the web and kept seeing cupcakes like this one by artist Nancy Standlee.

Her post made me realize that an easy way to start a torn collage is by using an underpainting as a pattern you can follow for matching shapes and colors.

So, using this image as my guide, I tinted several pieces of vintage book paper with red, dark blue-greens, and brownish grays and set out tearing and pasting my pieces down.


The paper on the snowman's face and body is untinted--it is the actual color of this really old paper and the darker areas are the page edges where most of the discoloration occurs.

His hat accoutrements were cut from Tim Holtz ephemera and of course there's lots of Stickles. I also covered the eyes, nose and buttons with Glossy Accents and I'm glad I did.

Making this tag put me in the spirit and now I'm now ready to tackle the job of setting up the Christmas tree!

October 21, 2017

Abbreviations.


Abbreviations: Paper Dolls, backing paper from a Found Relative, Clippings Sticker, and text from a book pasted onto one manila tag.

September 04, 2017

Deacon Blues


A two-page (large Dylusions) journal page to share with you today, made on a badly needed day off appropriately called Labor Day (a national holiday here in the States).

While working, I listened to a band I haven't tuned into for many years, these songs of my youth, my oldies but goodies; they are called Steely Dan.

Click on Photo for Larger, Lightbox View

The page was made with paper scraps and stamped tissue paper, some Paper Dolls, and a cut-out from the Wallflower paper stash.


This is the day of the expanding man
That shape is my shade
There where I used to stand
It seems like only yesterday
I gazed through the glass
At ramblers, wild gamblers
That's all in the past

Rest in peace, Walter Becker, this journal page is for you.

April 17, 2017

She Meant It


I'm sharing an art journal page with you today, made by transferring an advertisement from a magazine with gel medium then highlighting it with black and white gel pens, a Found Relative, some butterflies (from the Snippets ephemera pack) and text (from Clippings stickers). I also transferred book text to fill in some empty spots.


I was really drawn to the advertisement--a room with wonderful plaster and wood forms, a large framed mirror over such a decorative fireplace and one fabulous chandelier. How clever to furnish it with a modern style sofa and rug.

And so I began this art journal journey celebrating the page and becoming more intimate with all of it's interesting embellishments.


Update: After posting, I went to the ad's website (The Rug Company) and found the original photo so I thought I'd include it for another perspective. BTW, the rug comes in several sizes and prices range from $3,500 to $51,000! It's hand-knotted silk.

February 18, 2017

Sweet Love


I used an image transfer on a page from the Memoranda paper stash (Tim Holtz), a torn strip of vintage book paper (that included the margin), polka dot scrapbook paper and some paper trimmings to complete this tag (including text from Idea-ology Clipping Stickers).

To keep the background from showing through the transfer, I used white paint behind it (like I did here). A little Tumbled Glass distress stain along with a charcoal pencil and distress markers added more definition to the image.

I'm linking up with Simon's Monday challenge blog--the theme this week is "Use Your Favorite Tool."

I gave this some real consideration while working on my tag, reflecting about each tool as I used it. There are many gadgets I just couldn't do without (like my tweezers, water brush, or glue stick) but in the end, my favorite is:
(drum roll, please)

the X-acto Knife! My scissors are dusty--I always reach for my knife to make straight cuts and most particularly, for fussy-cutting (a favorite past-time). The flowers on this tag are an example of that.

▬ ♦ ▬ ♦ ▬ ♦ ▬ ♦ ▬ ♦ ▬

My schedule for crafting has been really limited lately and I've haven't posted as often as I usually do. But I want to extend a welcome to the new followers I received by way of Tim's post on the Creativation show this year and also thank those of you who've been with me for awhile.

I'll be back as soon as I can, I've got some new ideas up my sleeve and can't wait to get them down on paper and share them with you!

December 16, 2016

12 Tags for Christmas - October

A patchwork collage and Sizzix monster, the remix for Tim's October tag, was too big a reach for duplicating in a Christmas theme, so I went for good old-fashioned vintage.

I pasted a book page on my tag (the right hand side is the original patina), added strips and text from Tim's Tidings paper stash, cut a piece of Festive ephemera into an oval, added a tree cut from some Kaisercraft Frosted paper, and cut and tinted a stamped reindeer (Inkadinkado Christmas Silhouettes).

The oval was enshrined with lots of tiny dots of red glitter.

December 06, 2016

12 Tags for Christmas - July


Last year, I was able to stick with the same techniques Tim used for my Christmas versions of his monthly tags. This year, not so much. For many of them, he favored using word die-cuts quite a bit and it's difficult to find an appropriate substitute.

So here's what I did instead for this year's July tag (a remix of watercolor resist and layered words).


A book page, Tissue Tape and an oval cut from tissue paper (which was sealed with acrylic medium) were pasted on a tag. The edges were brushed with white paint then I stained the surface with Distress inks and the previous elements resisted the tint.

My angel is a stamp from Inkadinkado (Christmas Silhouettes) which I cut out and embellished with a white Gelly Roll pen, Liquid Pearls and Stickles. A Christmastime Remnant Rub provided the sentiment.

My little angel still seemed a bit plain (especially for Christmas) so I covered her with lots of Clear Rock Candy Distress Stickles. You just can't beat this old favorite for adding the perfect amount of vintage sparkle!

September 29, 2016

Wicked Dare.


The older I get, the less enthusiastic I am about celebrating Halloween but I've made an exception this year because of the purchase of a seasonal stamp set I just couldn't resist.

He had me at the house (used here).

I'm referring to the Tim Holtz Mini Halloween Set #5 used on this tag to create the background, skull, bottle label, and typewritten text.


I have to admit making spooky tags is pretty fun--it's a chance to use unusual color combos and the more distressed the better, right?

I like the effect I achieved on the bottles which might be due to the clean, crisp, blue-ish white colors contrasting with the muddy oranges and browns.

Click to Enlarge

If you're curious regarding technique, here's what I did:

A piece of scrapbook paper with various shades of orange, reds and yellows was cut and pasted to a manila tag then covered with stamped Plain Tissue Wrap.

An anchor for the bottles was made with a torn piece of Postale Tissue Wrap.

The bottles were stamped on old book paper, then embossed, cut-out, tinted and pasted to the tag.

There's only one way to use the skull stamp (IMHO)--black ink on white paper. It was also embossed and cut-out.

I used a Vial Label that was stamped with text from the set and cut out parts of the apothecary label stamp (also on Tissue Wrap) and pasted them to the large bottle.

The 45-cent piece Vellum Thift Shop Ephemera was distressed with some sanding and scoring and attached with tiny staples.


You may have noticed the crackle edges. This was done with Distress Clear Rock Candy Crackle Paint and I rubbed in some white creamy eye shadow (yes, it's true) to bring out the crackling.

I accidentally overheated the black embossing on the smaller bottles and they turned a lighter shade of gray so I used it to my advantage and tinted them further with a bit of blue.

To create an illusion of depth, I glazed the top portion of the tag with blue, brought out warmth at the bottom with some Wild Honey Distress and brushed in some inky shadows.

I am linking to Simon's Monday Challenge Blog where this week's theme is Powder Power.

Other Stamp Credits: Big Bottle-Inkadinkado, Small Bottles-PaperArtsy

September 24, 2016

Not Alcibiades


Dotty is making an appearance once again--this time, she's a bit smaller and the setting a bit more somber. The dark (perhaps dastardly) mansion is courtesy of Tim's new Mini Halloween #5 set made larger by multiple stampings on tissue paper.


The autumnal leaves were cut from a G45 paper collection called Botanicabella and the distinguished gentleman (José de San Martin) graces an Argentinian postage stamp circa 1935.

Perhaps the most interesting part of this tag is the background made with torn squares of tiny book text pasted in random fashion. It was a tad time-consuming to prepare but I love the look and plan to set some time aside to make more of it to use in the future.

August 12, 2016

Firm Heart

My local library has an on-going used book sale and periodically (no pun intended), I rescue a few "picture books" to use in my collages and also seek text for phrases that might add interest to my work.


The essence of this tag is composed of those very same elements: The background is a hand-drawn map of an old city and there is text. A Found Relative was framed inside a vintage cardboard box (the sides were trimmed down to keep it in proportion with the tag) and the owl is one of my own hand-carved stamps. It was embellished with black Scribbles, a paper heart covered with dimensional medium and some Remnant Rubs.


I'm linking it to Simon's Monday challenge blog. The theme this week is Try to Contain Yourself (so funny) and participants have been asked to use some sort of container. I know, putting a container on a tag is kind of goofy but I just can't help myself--I like making tags!