/* */ Beulah Bee: hand-cut
Showing posts with label hand-cut. Show all posts

April 23, 2018

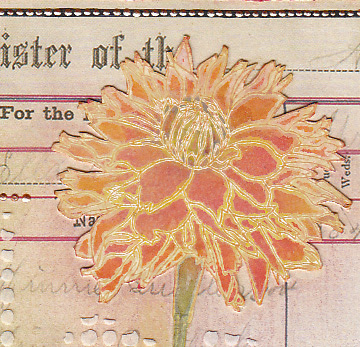
Marigold


I've made a greeting card to thank the hostess for a party my husband and I were invited to over the weekend.

It's nothing out of the ordinary but I used a few less common techniques that I thought would be fun to share.

The main ingredients are the Flower Garden stamp set, a page from the Etcetera paper stash, some Tissue Tape, and a Dot Fade stencil (Tim Holtz).


I stamped then embossed the flower, tinted it with Distress inks then used super-cheap kid's construction paper as blotting paper and a hot craft iron to remove the embossing. Newsprint also works great for this technique. To learn more about this process, see this post.


I know there are a set of die-cuts available for this stamp set but mine was cut-out by hand using an Exacto knife and self-healing cutting mat.


Here's a tip you might find useful: Cut as close to the image as you can but don't worry about the irregular edges. Then go back and make the tiny cuts later and you'll find it a lot less intimidating.


And finally I'll share a tip I've blogged about in the past (see this post) that helps you decide where to crop your scrapbook paper when designing a layout.

This template is nothing more than a sheet of transparency that I made lines on with a permanent marker. I put masking tape around the edges to mask the background. I lay this template over my paper and move it around until I find a spot that I like and mark the corners with a pencil dot to guide my cutting lines.

This week's theme at Simon's Monday Challenge Blog is "Flower Power" so I'm linking up. I haven't made a card in ever so long and it was such a pleasure that I plan to make some more for this week's challenge (I have lots of flower stamps 😉).

March 14, 2018

Limited Edition


Inspired by a mood board for Simon's Monday challenge this week, I have created a tag that is a very literal translation. But I just couldn't help myself as something about a cracked egg as a vase for flowers resting inside a tea cup really spoke to me.

I didn't have a tea cup stamp so I printed an image of one and the flowers were cut from the Wallflower paper stash. The background stamp is by Heidi Swapp, the tinting is Walnut Stain Distress Oxide and regular Distress Bundled Sage (on watercolor paper) and the text is a Remnant Rub.

February 13, 2018

Heartfelt Friendship


A Valentine's Day tag? Sure! Why not? I'll be sending this to my dear friend, Thelma, who got me started in paper crafting and always makes her Valentine's Day cards special with a commemorative postmark from Loveland.


I'm linking this to a special Simon Says Stamp blog post, Send a Card to a Friend Day (for a chance to win a $100 gift card--whoo-hoo!).

Supplies used: Authentique Classique "Pretty" paper, tinted paper doilies, washi tape, Scribbles, a white Gelly Roll pen and Idea-ology design tape (Chatter).

February 07, 2018

Feeling Noteworthy


The bird's crown is a Remnant Rub. Many of the older rubs have been discontinued. I am unhappy about that because I find them so useful. So I have no other choice but to hoard them.

Anyway, today my intention was to make a valentine-themed tag but I veered off-course (a good excuse to try again later) and made this tag instead.


The botanical bits came from an older 7 Gypsies paper collection called Conservatory. A vintage Germania postage stamp, scraps from a book page and yes, more Remnant Rubs (don't get me started) were also used.

I thought I'd speak a bit about my dotted border. As I use this decorative element quite often, I have a few tips in case you want to give it a go. I prefer Scribbles which is a dimensional fabric paint but also use Liquid Pearls.

When applying, don't touch the applicator tip to the paper as you will get a splotch instead of a dot. Rather, gently squeeze some out from the tip and delicately touch only the drop/paint to the paper then pull it away. Don't worry if it peaks a little, it will settle as it dries.

If you goof-up (and you will, it's inevitable)--fear not. Just keep a toothpick handy and scrap off the mistake as best you can. Then move on. Keep dotting ahead. Afterwards, you can go back to the boo-boo and use a knife to scrape away the dried bits that might still be there. Then put your new dots back in. I had two areas on this tag that I had to re-do and no one (except you) will ever know.

December 10, 2017

12 Tags for Christmas 2017 - Special Delivery


I have a Christmas-themed playing card stamp by Inkadinkado that is useful for creating frames, ovals, etc., and was used to embellish my tenth tag. The photo was cut from Tim Holtz Ephemera.


The florals were cut from Graphics 45 paper (Winter Wonderland). To adhere large, intricate cuts like this one, I use an aerosol adhesive that works well but you must go outdoors to spray it.

December 09, 2017

12 Tags for Christmas 2017 - Noel


I drifted away from the conventional with tag number nine and I kinda like where I ended up.

The ingredients are Tim Holtz Tidings paper stash, a Christmas Collage stamp (on tissue paper), Ephemera, Distress Inks, black Stickles and a white gel pen.

The tree was made from a stencil (Clear Scraps). I traced the outline onto paper and then cut it out by hand. Some might think that's a lot of work but for me, it's relaxing and therapeutic.

December 07, 2017

12 Tags for Christmas 2017 - Dashing


Okay, I know, dashing through the snow is about a sleigh and a horse (and bells I think), but birds do some dashing, too, as evidenced by my cat's favorite entertainment (a live video cam of a bird feeder in Canada).

So perhaps that explains my combination of birds and text for this, my 7th Christmas tag of the season.


I was drawn to the combination of the golden yellows with the black and white. The birds were cut from a Graphic 45 paper called Winter Wonderland, the vertical strip is the edge of an old book page, and the snowflakes and text are from a paper pad called Deck the Halls with Chalk (Hobby Lobby/Paper Studio, 2013). The tiny white dots are Scribbles (3D fabric paint).

December 06, 2017

12 Tags for Christmas 2017 - Merry & Bright


I've reached the half-way mark, here's Tag 6 of 12 for Christmas 2017, and I am having a blast! This one was easy as pie using a Christmas Collage stamp tinted with Distress Ink and mounted on a page from the Tidings paper stash.

I machine-stitched around the edges with two colors of thread, went crazy with glitter glue (Stickles), added the holly and berries (hand-cut from some Tim Holtz Ephemera) and then a strip of Lace Trimmings.

October 19, 2017

Best in Show


Most collage artists have a habit of collecting images that might be useful for a future project. I like to collect people and the image I used here was found and saved to my stash six years ago.

I thought the spotted theme clever but had no way of knowing when I'd use it--until now.

This week's theme at Simon's Monday Challenge Blog is "Man's Best Friend" and became the perfect opportunity to use it.

The background is a page from the Tim Holtz Etcetera paper stash, an 8" x 8" collection of papers that are sized just right for tags.

I added polka dots using Tim's Dots & Floral stamp set, the label is from one of his Ephemera collections and most of the tinting was done with colored pencils.

October 07, 2017

One of Many


A walk on the dark side (Simon's Monday challenge for this week) prompted a tag made from Tim Holtz ephemera and a Clippings Sticker.


Why one of many? Well, let's see:

  1. One of many tags that I make.
  2. One of many from the popular technique of attaching butterfly wings to something.
  3. One of many bones in our bodies.
  4. One of many letters in the alphabet.
  5. One of many flowers in our garden.
  6. One of many elements in the periodic tables.
  7. One of many who perished this week by the hands of a mad man.
  8. One of many prayers said for an end to this insanity.

September 18, 2017

Sunday Night at the Goodspeed


I went to the theater last night. Or rather, I printed, cut-out and pasted together a theater last night. It took a few hours, it was something I always wanted to try and I was thoroughly entertained.

Perhaps you have also been intrigued by the vintage paper theaters posted on Pinterest and elsewhere? I came across a page for one section, then scrambled around to find the rest (a total of six pages) and I've put the links below if you'd also like to give it a go.


I printed the images on white lightweight cardstock but if I had to do it over again, I would use ivory to give it a more aged appearance. The instructions are printed on the pages and it was a bit like working a puzzle.  The only hard part was the fussy-cutting but that has never stopped me before.

I admire the person who designed this, the artwork is nice and I learned a few theater terms in the process. Do you know what a proscenium is?

September 04, 2017

Deacon Blues


A two-page (large Dylusions) journal page to share with you today, made on a badly needed day off appropriately called Labor Day (a national holiday here in the States).

While working, I listened to a band I haven't tuned into for many years, these songs of my youth, my oldies but goodies; they are called Steely Dan.

Click on Photo for Larger, Lightbox View

The page was made with paper scraps and stamped tissue paper, some Paper Dolls, and a cut-out from the Wallflower paper stash.


This is the day of the expanding man
That shape is my shade
There where I used to stand
It seems like only yesterday
I gazed through the glass
At ramblers, wild gamblers
That's all in the past

Rest in peace, Walter Becker, this journal page is for you.

August 25, 2017

Labels


This is an artist trading card (ATC) and it's the size of a standard playing card. It was made (along with three others) for this week's theme at Simon's Monday Challenge Blog.

I'd never made an ATC before but it's not much different than a tag size-wise and I like working small. Mine became a series rather naturally as a result of using a group photo fussy-cut from a book.

Below is a view of the four of them together but you'll have to open the light-box view (just click on the photo) to get the full effect.


Here's what the original photo looked like before I began to assemble the collages. The children (students) were all lined up in front of their rather impressive school building.


It was my intention to use materials/design elements that best reflect my current style: The fussy-cut figures, Distress Ink stains, stamped tissue paper, Remnant Rubs (Gilded Accents), postage stamps, polka dots (washi tape) and machine stitching.

The children's manner of dress (some without shoes), the mix of age groups and their expressions (perhaps being photographed for the very first time?) are all very endearing and illustrate perfectly why I like working with vintage photos so very much.


March 30, 2017

No Reminders


Good to be back posting and SO grateful that more time is trickling in to spend crafting. Being away for awhile, it felt curiously awkward to start in again (some of my paints had even begun to dry).

I used this week's theme (Things With Wings) from the Monday challenge blog at Simon Says Stamp as inspiration for my tag.

I collaged two photos (a butterfly and a ballerina) on a background made with paper from the Idea-ology Etcetera stash.


I've used the butterfly before (see here), it's called a Luna Moth and I just love it's long, drippy wing span. I added a phrase from the Idea-ology Clippings Stickers which describes perfectly how I've been feeling lately.


I enhanced the values with colored pencils and Distress ink.

I'm also sending a Happy Birthday (No. 3) wish to A Vintage Journey where they are celebrating "Tag Friday" with a special gift and link-up.

February 18, 2017

Sweet Love


I used an image transfer on a page from the Memoranda paper stash (Tim Holtz), a torn strip of vintage book paper (that included the margin), polka dot scrapbook paper and some paper trimmings to complete this tag (including text from Idea-ology Clipping Stickers).

To keep the background from showing through the transfer, I used white paint behind it (like I did here). A little Tumbled Glass distress stain along with a charcoal pencil and distress markers added more definition to the image.

I'm linking up with Simon's Monday challenge blog--the theme this week is "Use Your Favorite Tool."

I gave this some real consideration while working on my tag, reflecting about each tool as I used it. There are many gadgets I just couldn't do without (like my tweezers, water brush, or glue stick) but in the end, my favorite is:
(drum roll, please)

the X-acto Knife! My scissors are dusty--I always reach for my knife to make straight cuts and most particularly, for fussy-cutting (a favorite past-time). The flowers on this tag are an example of that.

▬ ♦ ▬ ♦ ▬ ♦ ▬ ♦ ▬ ♦ ▬

My schedule for crafting has been really limited lately and I've haven't posted as often as I usually do. But I want to extend a welcome to the new followers I received by way of Tim's post on the Creativation show this year and also thank those of you who've been with me for awhile.

I'll be back as soon as I can, I've got some new ideas up my sleeve and can't wait to get them down on paper and share them with you!

January 21, 2017

Not Guilty


Yes, I'm guilty of not posting for a very long time but not guilty of wanting to--just so darn busy with all the stuff that gets in the way of having time in my studio to create.

Then, when I did find some time, I spent way to long on a project that never seemed to come together and I should have given up on it but I just wouldn't accept defeat. Thank goodness it finally made it to the trash can.

So it feels really good to get back to basics, take a few images found on the net that had caught my eye and put a tag together. No pressure, no struggles--just plain fun.

I call this one "Not Guilty" because the gent is actually a French criminal and this photo is what you might call a vintage mugshot. Well, he looks like a good guy to me so his crime must not be serious.

The background is a coloring page courtesy of a free download from Alisa Burke and the insect was found on Pinterest.


December 31, 2016

12 Tags for Christmas - December


I didn't mean to wait so long to complete my final tag of this series and link it to Tim's December post but it's been a busy month.

Each day I would pass by the bulletin board in my bedroom/studio and see the blank spot meant for this month's tag. I considered skipping it but that just wouldn't sit right with me--my track record for completing the monthly tags will not be broken!

So on the last day of the month, last day of the year and at the very last minute, here's number 12.


Happy New Year!

December 16, 2016

12 Tags for Christmas - October

A patchwork collage and Sizzix monster, the remix for Tim's October tag, was too big a reach for duplicating in a Christmas theme, so I went for good old-fashioned vintage.

I pasted a book page on my tag (the right hand side is the original patina), added strips and text from Tim's Tidings paper stash, cut a piece of Festive ephemera into an oval, added a tree cut from some Kaisercraft Frosted paper, and cut and tinted a stamped reindeer (Inkadinkado Christmas Silhouettes).

The oval was enshrined with lots of tiny dots of red glitter.

December 06, 2016

12 Tags for Christmas - July


Last year, I was able to stick with the same techniques Tim used for my Christmas versions of his monthly tags. This year, not so much. For many of them, he favored using word die-cuts quite a bit and it's difficult to find an appropriate substitute.

So here's what I did instead for this year's July tag (a remix of watercolor resist and layered words).


A book page, Tissue Tape and an oval cut from tissue paper (which was sealed with acrylic medium) were pasted on a tag. The edges were brushed with white paint then I stained the surface with Distress inks and the previous elements resisted the tint.

My angel is a stamp from Inkadinkado (Christmas Silhouettes) which I cut out and embellished with a white Gelly Roll pen, Liquid Pearls and Stickles. A Christmastime Remnant Rub provided the sentiment.

My little angel still seemed a bit plain (especially for Christmas) so I covered her with lots of Clear Rock Candy Distress Stickles. You just can't beat this old favorite for adding the perfect amount of vintage sparkle!