/* */ Beulah Bee: tissue paper
Showing posts with label tissue paper. Show all posts

October 15, 2019

This Happy Life


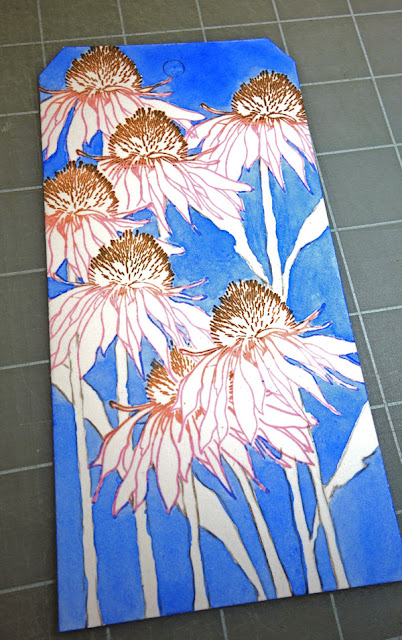
Thanks to Columbus, I had the day off yesterday and an opportunity to make something for Simon's Monday challenge (this week's theme is "Pink").

Nothing says pink like a coneflower so I made this tag by stamping on watercolor paper (Tim Holtz Flower Garden), the text is an old Remnant Rub, and the border was machine-stitched and dotted with Nuvo Crystal Drops.

Just a few things, technique-wise, that you might appreciate:


I'm sure you've seen the "no-line" technique when it comes to stamping an image that you plan to watercolor using a light shade of dye (water-based) ink so the lines disappear. But I like the lines! So for this tag, I stamped with archival inks using a pink, a tea stain, and a dark brown shade. The lines darkened somewhat after the watercoloring was applied.


Obviously, I had to do some masking to stamp this arrangement. But I didn't use the stems that come with the set and drew them on instead.

The photo above shows how I painted the background first using a juicy puddle of cobalt blue.


The bee was an after-thought. It was stamped onto a piece of tissue paper, cut-out, pasted on and then I dabbed a tiny bit of yellow paint on to its body.

It's also worth mentioning that I prefer to use a "hot-press" version of watercolor paper when I plan to stamp on it. Cold-press has bumps that I think make it harder to get a crisp image.

If you haven't tried watercoloring with rubber stamps, I can tell you it really is a lot of fun and very rewarding. Go for it!

August 19, 2019

Most Noble


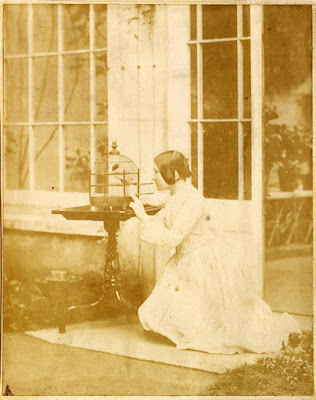
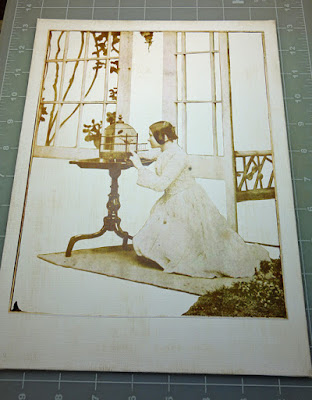
I discovered some wonderful paper over the weekend made by Stamperia called Oriental Garden. I found an image of a woman to transfer with gel medium (thanks, British Library), then stamped postal and architectural images onto tissue paper and pasted together a collage tag.

I'm excited to see what other things I can make using this paper!

July 13, 2019

Ghost Crab


Remember me? I've never gone this long before without posting to my blog. I created multiple journal pages and tags during this absence but couldn't pull anything together that seemed "blog-worthy." I guess my heart just wasn't in it.

But now I have a journal page to share, inspired by:
  • a lifelong desire to live by the sea in spite of my land-locked status
  • a birthday month, my astrological sign is Cancer the Crab
  • a prompt from Simon's Monday challenge called "Life on the Ocean Waves"
  • a beautiful photo by Sican123 of a crab with a name that describes my absence
  • and, last but not least, Sara and Patti Dee who recently reminded me of why I blog in the first place. Thank you, ladies ♥.
I worked on one side of a page in a large Ranger Dylusions journal with a plan to experiment with stamped tissue paper.

I rubbed graphite on the back of my printed photo to trace an outline, used acrylic paint to lay down some color and establish values, stamped on tissue paper (packing material from a shoe box) then pasted it over the painting.

The title was made with text stickers (they appear curved because my page wasn't flat when photographed) and some stamp embossed letters on more tissue paper.


So here's what I know now:
  • The tissue paper that new shoes come wrapped in works just fine for stamping and pasting. But even with plenty of glue it will be somewhat opaque and doesn't disappear completely though not as bad on a lighter background. This is true of every tissue paper I've ever used so I'm not surprised or disappointed.
  • Painting tumbling waves is seriously scary and a realistic portrayal would require a ton of patience!! I have new respect for this skill and the artists who can do this.
It's good to be back--I do hope my next post will come more quickly than the last and, as always, I thank you very much for stopping by!

April 12, 2019

Maurice Crooks


My Great Aunt Esther took a photo of a neighbor whose family was homesteading in Newcastle, Wyoming. She wrote his name and the date on the back--Maurice Crooks, August, 1921.

I made a copy of that photo and used gel medium to transfer the image onto a manila tag.


Then I used gesso to white-out some areas, blending the edges of the photo into the background.


Then I went about stamping and tinting and embellishing and came up with what you see here.


I know it's best not to put the focal point of a composition directly in the middle, but in this case, I threw caution to the wind since Maurice seemed to stand so proudly right in the middle of his family's meager garden.

I'm linking to Simon, the Monday challenge is "Down on the Farm."

March 30, 2019

Automatic

Lyrics from a song by Miranda Lambert is the text typed on this tag that features wildflowers in canning jars.


It's my first time working with a stamp set (Tim Holtz Flower Jar) that has matching dies and I cut the images out of tissue paper so I could layer the arrangement without adding bulk.

The background is a page from the Tim Holtz Etcetera paper stash.

I used sepia archival ink on the flowers but in hindsight, I probably should have used black.

I tinted the flowers with dilute acrylic paint so it would be waterproof during the pasting process.

I like the scale of this set (it's tiny) but that does make it more tedious to use. And there are also some design challenges like a solution for the flower stems that appear inside the jar.

I penciled-in the lower stems but they would have looked better with more defined edges (less blurry). I'll work on my technique for the next time!

I think it would be very hard to arrange the flowers just by stamping so it's good that the coordinating die-cut set is available.

But I plan to give it a try--a clean white background with a delicate stamping would be nice on a greeting card. (I'll keep you posted.)

I'm linking to Simon's Monday challenge, this week's theme is Play with Paint.

March 07, 2019

Tell Your Story


. . . even if no one is listening.

Made for Simon's Monday Challenge - Whatever the Weather

Stamp credit: Stampers Anonymous "Chemistry Notes"

March 03, 2019

Absolutely Unique


A collection of Photobooth pics (Tim Holtz) pasted on hardboard, embellished with colored and printed/stamped tissue paper and typewriter text becomes an homage for a quirky quote.

There is confusion over the attribution but some would say Margaret Mead.

It's my entry for this week's Monday challenge at Simon--the theme is vintage/past times.

February 23, 2019

Explore Life


It's "Things with Wheels" this week at Simon's Monday Challenge so I rubbed Distress Ink (Cracked Pistachio, Faded Jeans, and Dusty Concord) on a manila tag, covered it with Tissue Wrap, pasted on a fussy-cut image (thank you, Vintage Everyday), used a Distress Marker (Old Paper) to tint the dress, and added a Remnant Rub.

My go-to glue these days may surprise you: Elmer's Re-Stick.

I've always used glue sticks for convenience (and you can't beat the price) and even though these are smaller than the kind I was using, the glue dries slowly so you have plenty of time to spread it. And this property allows you to reposition whatever you are pasting which is a big plus too.

January 15, 2019

The First Dream

I am so grateful to be in the studio again and to have something to share with you today. Other responsibilities can rob me of the time I'd like to spend creating and then sometimes I just can't muster-up the motivation.

But whatever keeps me away makes the return that much sweeter!

I used this week's prompt at Simon's Monday Challenge Blog--Recycle Something--to create a tag and nothing emphasizes recycling more than collage.

We save our bits of scraps because they might be perfect in a future project and just shuffling through them can be cause for inspiration. The happenstance is perhaps what I like best about working in this medium.


Using layers of thin papers to build this tag, I embellished it with a Japanese Haiku poem that is fitting for my first tag of the new year.

The Japanese attach special significance to the first of many things they do in a new year. Some traditional firsts that are notable are kakizome (first writing), hatsuyume (first dream), hatsumōde (first shrine visit), hakizome (first house cleaning), and hatsuburo (first bath).

the first dream of the year —
I keep it a secret
and smile to myself

–  Sho-u

from The British Museum Haiku, translation by R. H. Blyth

Regarding technique, I have once again reinforced the fact that I am clearly "embossing impaired" especially when it comes to white on collage mediums. I need to figure out what the problem is by spending time experimenting. I just gave up here and used a gelly roll pen as a substitute.

UPDATE (1/19/2019):

I am happy to report that the error of my ways regarding white embossing has been resolved. After some experimenting, I discovered that I must use white powder instead of clear powder (ink color doesn't matter). I always reached for clear powder (using white ink) so I didn't have to worry about stray bits but now I know I can't have it both ways. Lesson learned.

August 11, 2018

It's Tape


This is made with tape--washi/design tape, whatever you want to call it, placed in strips or torn into pieces and, where there were windows, covered over with tissue paper.

What could possibly have inspired me to do this?! It started with a photo found on the net (thanks, Vintage Everyday).


After printing, I began to cut away sections and then set it away for awhile, not sure where to go with it but I knew collage would be a part of it.


Then along came a prompt from Simon's Monday Challenge Blog where this week's theme was to add some tape to whatever you make.

Okay, so I went a bit overboard but it was an interesting personal challenge and if I ever use this technique again in a more serious way, I did learn how to best manage the properties of the tape (slick surfaces, sealing, etc.).

I won't share them with you as I doubt anyone would ever do something as crazy as this.

July 16, 2018

Tell Your Story


Hours have gone by with no end in sight. A work in progress just won't come together and I needed a break. So, I made a tag with random bits from previous pieces and I feel better now.

It's a lesson in remembering to let go of control, to trust your instincts and to embrace the process instead of the end result.

June 22, 2018

Lina Cavalieri

Click on photo for larger, lightbox view

Someday I should start saving all my tag experiments gone bad so that you can see how this format is really meant to be my chance to try new things and to learn from my mistakes.

Occasionally, I get it right (in my mind, anyway) and those are the tags I blog about. This one, in particular, is a good example of what I'm talking about.


I wanted to try a variation of this Tim Holtz technique using a new stamp called Beautiful Flowers by Simon Says Stamp. It's a process of embossing, painting in the areas with acrylics, and then wiping the lines clean.

The paint I used was initially transparent so variations in flower color are due to the background (an image transfer over a book page) showing through. I applied another layer of a more opaque color on the flowers near the top to achieve more uniformity.

It was easy to lift paint off the embossed areas even after the paint was dry and I'll definitely try this technique again.


I thought the play of text and page margin under the face would be interesting but it was too severe so I applied a strip of Tim Holtz Tissue Wrap along the edge to soften the contrast.

To balance out the bottom I added text with texture paste and a homemade stencil. The paste was white. I've learned from experience that it's almost impossible to tint the paste black before you apply it because the best you can expect is maybe a dark gray.


So I took a teeny-tiny paintbrush dipped in black ink and painted the texture paste after it had dried. I've never tried tinting the paste with ink instead of paint so maybe I'll give that a go on a future tag. I also wonder if there's a black texture medium that you can buy?

April 11, 2018

Ada Again


I have modified a recent collage (see previous post, Ada 1916) by scraping off the photo of my great Aunt Ada and replacing the image with one I like better.

Because the original photograph was a bit thicker than the other collage papers I used, it was pretty easy to get underneath it and carefully peel/scrape it off.


Then I used this image as a transfer and created a mask of the hands and face. I used the mask to apply off-white paint on the background where the image was placed. Since image transfers are inherently transparent, this technique keeps the background from showing through.


The image transfer's darker undertones made it necessary to adjust values throughout the collage using transparent paint (glazing) and I also colored the collage paper flowers.

And finally, I felt the need to contain the composition by adding a border which was made using dots of Scribbles. I think the addition of the black accents helped to emphasize the other black elements in the collage.

April 08, 2018

Ada 1916


My great Aunt Esther wrote on the back of this photo, "Ada, June 1916." I suspect it is a photograph to commemorate her sister's graduation from high school as I have several copies and the year would be appropriate.

I used a wooden panel (10" x 10"), the new Idea-ology collage paper (Botanical), some Memoranda paper stash and an Idea-ology Collector Layer. All the paper bits were made thinner by rubbing the back side with water and I also used damask patterned tissue paper along with some light pink. The circle scroll design was an image transfer.

(Click on the photos to see a larger, lightbox view.)


The wooden support was gessoed, I pasted on a crinkled sheet of light pink tissue paper, added crackle medium, then rubbed on brown wax to bring out the cracks.


At this stage I was thinking I should have waited to crackle the board AFTER I arranged the collage but in the end it may have been the right approach even though most of the surface was covered up.

Here are some close-ups that show how I layered the collage paper.


Working with the collage paper I learned that, if you don't want the white of the tissue to show, it's important that the glue underneath covers the entire surface. In the photo above, the hand-written name has fewer missed areas of glue underneath than the section of tissue just above it.

My glue of choice for this piece was fluid matt medium. I like that you have a longer working time than a gel medium and that it moistens the paper slightly so it lays down easier. You can get all the bubbles out without using much pressure (which might tear a delicate paper).

January 25, 2018

Find Away

I like challenge blogs and my favorite is the Simon Says Stamp's Monday Challenge Blog. And I really, really like challenge blogs when the theme is to create a tag or something with a tag attached.

As I am rather fond of the format :) for this week's Tag It challenge, I used both suggestions and made a tag with tags.


Tim's tiny stamps, washi, tissue wrap, remnant rubs, found relatives and fabric bits were used to create my, dare I say? unconventional masterpiece. No matter what you might think of this tag--you gotta love that faucet (so much detail in such a tiny stamp)!

January 14, 2018

According to Value


Value is defined as the relative lightness or darkness of a color. It is an important tool for the designer/artist, in the way that it defines form and creates spatial illusions. Contrast of value separates objects in space, while gradation of value suggests mass and contour of a contiguous surface. (Read more, here.)

Of all the things I learned in art classes, the concept of value has been the most significant and perhaps the most challenging to fully understand and implement. I work at it constantly and it can make a big difference when you get it right.

I thought I'd use this tag (my first for 2018), to explain some steps I took to adjust the values which you might find interesting or useful.
  1. The lady's dress was bright orange and this warm, strong color was too dominant. To adjust the value, I tinted it with transparent blue (Tumbled Glass Distress Marker). Blue is the complimentary color to orange and when you mix compliments, they cancel each other out. So the bright orange now has a more muted value and settles better into the background.
  2. The flowers were very neutral. I wanted them to stand-out more and appear closer (plus they needed some detail) so I tinted them with lines of pink, orange and turquoise gel pens (Gelly Roll Soufflé). Warm colors appear closer, cool colors recede.
  3. The lady was grounded by using a dark tint under her feet (otherwise, she would appear to be floating). It's subtle, but you may also notice that the grey background is lighter near her feet than higher up. This is a way to create a sense of depth. Distance (like on the horizon of a landscape) is imitated with lighter, cooler colors.
  4. And finally, most compositions are best when there is a mix of bright, dark and medium values. Here, it's the dark greys and black text combined with the bright white dots (extra-fine DecoColor paint pen). The remaining elements fall into the medium range.
If this information was helpful or interesting and you'd like to see similar posts in the future, let me know by leaving a comment.

January 11, 2018

Raised by Wolves

Photo is by Bernd Heyden

Collage is an interesting art form. Disparate images pieced together that hopefully, speak to the viewer in some way. Sometimes, the hardest part for me is knowing when to quit so I just go with my gut. I guess that's what everyone does.

A lot of my collages are dependent on what I have lying around at the moment that I grab and decide to include. It is a game of sorts and play has a lot to do with it. "I wonder what this will look like if I put it here?" is the ongoing conversation I have with myself.

So today, may I share another journal page/collage that started from a photo by Bernd Heyden that I was compelled to use. Raised by wolves? You may guess what band I was listening to while making it.

I'm linking to Simon's Monday Challenge Blog, this week's theme is "Winter Blues."

January 06, 2018

Oddly Aggressive


Hello friends and welcome to my first post of the new year--I hope everyone had a good holiday!

At the beginning of the year, I can't help thinking about what I'd like to do different, in my personal life and in my creative life, and that was on my mind as I created this journal page today.

I have a large Dyan Reaveley Dylusions Journal (the pages are 8.25" x 11.5") and instead of filling up the page or doing a two-page spread as per my usual, I tried something new.  I drew a smaller rectangle on just one page to make the format more manageable.


A page of Tim Holtz paper (Memoranda) and some of his tissue wrap (Melange) were used along with a print-out of a vintage photo. The flower garland was made with a stencil and paste medium and tinted with a bit of Black Soot Distress ink.

It was a frivolous and fun way to spend a Saturday afternoon and I'm linking it to Simon's Monday Challenge Blog, this week's theme is Something New.

December 09, 2017

12 Tags for Christmas 2017 - Noel


I drifted away from the conventional with tag number nine and I kinda like where I ended up.

The ingredients are Tim Holtz Tidings paper stash, a Christmas Collage stamp (on tissue paper), Ephemera, Distress Inks, black Stickles and a white gel pen.

The tree was made from a stencil (Clear Scraps). I traced the outline onto paper and then cut it out by hand. Some might think that's a lot of work but for me, it's relaxing and therapeutic.

December 05, 2017

12 Tags for Christmas 2017 - Wonderful Time


We had a toboggan when I was a kid. Not the safest kind of sled but ours could handle about six passengers at a time which made it easy to steer as long as everyone leaned the right way in unison.

This little miss was certainly safe when this vintage photo (Graphic 45 Frosted) was taken. It was nicely staged with a painted background and fashionable clothing (I wonder if it may have been done for an advertisement or greeting card).


She is the focal point for tag five of my 12 for Christmas and was placed on top of a background of embossed snowflakes tinted with Distress Oxide (Faded Jeans) and framed with tissue paper and a cut-out stamp border.

Embellishments include scraps from a Tim Holtz Mixed Media die and lots of Stickles. The ribbon is a scrap of Tim Holtz Eclectic Elements fabric