/* */ Beulah Bee: Scribbles
Showing posts with label Scribbles. Show all posts

February 13, 2019

Happy Valentine's Day


My good friend Thelma (I'm Louise) introduced me to card-making and it's understood that the cards we exchange between ourselves can be an outside-the-box/anything goes kind of flavor. Because there are no rules it makes our tradition that much more fun.

This is the card she will receive tomorrow, made from an assortment of papers (mostly Authentique) including one called "Stitches Two" which is the band running through the center.

The card also includes a hand-colored printable (background heart border) that I distressed and embellished with dots of Scribbles (3D fabric paint). I used an assortment of gel pens for the coloring.


I have a very limited stash of sentiment stamps so this one was taken from an example found on the net. My technique is to print the example, rub a thick coating of graphite (pencil lead) on the back, tape it down with washi and trace over the top of it. This transfers most of the outline of the lettering and then I go back over it with a fine-tipped marker. The heart trio was stamped.

January 24, 2019

Creativation Idea-ology 2019


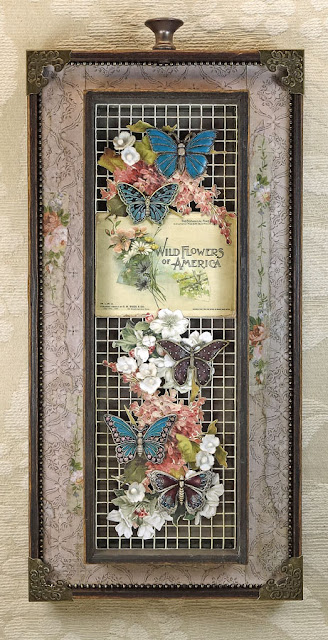
For details on this project (Wildflowers)--here's the link.


For more details on Vintage Clip Book #15 (now #13) see this post.


These are my contributions to the Tim Holtz Idea-ology booth at Creativation 2019.*

There are some terrific new products this year and some of my favorites include the new Ephemera Pack (Keepsakes), the new Layers (Remnants) and of course the Vintage Clips (which I used on small antique books).

There's not much to say that isn't already obvious technique-wise--it's just some fussy-cutting, painting, and pasting. To see the details, click on the photo for a larger view. Be sure to contact me if you have any questions, there's a link to my email address in the sidebar or you can leave me a comment.

Perhaps there will be a blog hop like last year. If that's the case, I'll pick a project and include all the specifics. Do you have a favorite you'd like to know more about? Update 1/29/2019 - There will be a blog hop (with giveaways) scheduled for February 5 hosted again this year by Richele Christensen (californiaARTgirl.blogspot.com) and will include the designers for all of Tim's new products (Idea-ology, Stampers Anonymous, Sizzix, etc.).

Thanks for stopping by and a big thank-you to Paula and Tim for asking me to contribute again this year. If you are interested in seeing my work for the Idea-ology booths from 2015-2018, here's the link.

*The last two pieces did not appear in Tim's video.

November 11, 2018

12 Tags for Christmas 2018 - No. 1


I've started my tags for Christmas and, with any luck, I'll have twelve completed before December 24 (fingers crossed).

I've had a little trouble with my mojo (or muse as some would call it) so I'm going back to basics to embrace some of the original techniques that influenced my paper crafting journey.

I'm sharing my step-outs for this one, with minimal explanation, so don't hesitate to comment if you have a question about my technique.

And if you'd like to see any of my tags from Christmas past I've put a link to them in the sidebar.

Oval drawn on Speciality Stamping Paper, matt finish (Ranger)

Stamp (Penny Black) with Distress (Fired Brick)

Spread ink with water brush

Stamp greeting (Penny Black) then mask it along with flower

Stamp background with archival ink (Potting Soil)

Rub on Distress inks (Forest Moss, Peacock Feathers) and spritz with water

Cut out oval with X-acto knife.

Re-apply Fired Brick Distress ink to strengthen flower color.
Add a paper background behind flower.

Trim oval with dimensional dots and tag edge with black marker


After I'd cut out the oval, it was fun playing with different papers for the background and I finally settled on a paper that matched the Peacock Feather blues.

I'm linking this to Simon's Monday challenge blog because this week's theme is Make Your Own Background and also to the Penny Black Creative Christmas Challenge.

August 17, 2018

My Blue Shoes


Another digital photo just begging to be altered (thanks again, Vintage Everyday) and, in this case, in a most unconventional fashion. But I truly celebrate these type of creations because they conform to no one and are purely me.

And it's been awhile since I've made a tag and they're very therapeutic!

July 27, 2018

Minnie Nolan's Boarding House


My grandmother had a habit of writing on photographs of family members. While maybe not great for the appearance, I do appreciate the documentation.

This photo was the kind that is printed on a postcard. It was identified as "Minnie Nolan's first boarding house in Kansas City."

I used the actual photo (rather than a copy) with its wrinkles, writing and a missing corner and applied a thin wash of off-white acrylic paint to block out the background.

It was mounted behind an Idea-ology Collage Frame dressed up with various pieces of Tim Holtz paper stash (the vines were cut from Wallflower).


The polka dots (Tim Holtz Dots & Floral) were stamped on his new Plain Collage Paper and layered over the upper left corner. I made dots around the oval with Scribbles (3D fabric paint) and distressed some metallic numbers to blend in with the overall color scheme.


I cut a piece of book board to cover the back and painted the edges. I trimmed the frame's border with lines of black and gold metallic inks.


The butterflies are some digital clipart that I printed on vellum and cut-out. The word "legacy" is a Remnant Rub.

I don't think Grandma Nell would mind what I did with her photo, it's better preserved now and her notes have been transferred to the back of the frame.

May 29, 2018

Extra Ordinary Joy


Embracing the old and the new and some extra-ordinary joy with this tag, made on-the-fly today because I could and I did.

I have a lot of side-projects going on related to reorganizing my crafting space. Like converting some favorite wooden stamps to cling now that I have a stamping platform. I tested one of them today (French Collage) using a Big & Juicy stamp pad (remember these?) on a manila tag. And I just couldn't leave well enough alone. So....

I curated a Found Relative (the latest release has new images) and fussy-cut it like I used to before there were Paper Dolls.

I cut out some images from a newly purchased stamp set called Stamp Collector, then foraged around for more paper bits and found the leaf/vine cutting and the polka dot paper (I save most of my scraps).

Put it all together with a glue stick, add some Remnant Rubs and Scribbles (the dotted border) and there you have it. Extra Ordinary Joy!

May 24, 2018

My Sweetheart


Inspired by a song (this week's Monday challenge at SSS), here's a tag that celebrates the turn of the last century when everyone was waltzing to a popular tune called "Let Me Call You Sweetheart."

The background reminds me of a vintage tin ceiling tile. It was made using bronze metallic cardstock and the new Sizzix 3D texture fade (Tim Holtz) called Botanical.

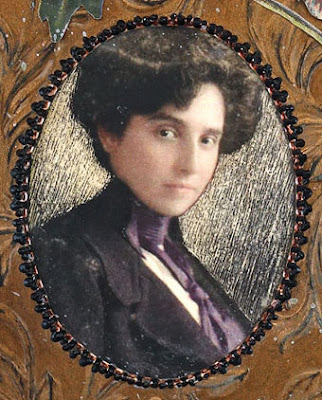
The portrait is an image transfer using this photo. Because the original background was dark, I used the tip of an Exacto knife to scratch in lines to lighten it and create better definition.

The frame border was made with dots of 3D fabric paint called Scribbles.


The flowers and perfume label (Tim Holtz) were thinned-out and then fussy-cut to create a more delicate appearance.


I pasted a ribbon along the right hand side using fabric glue (works great and doesn't soak through) and my strip of text is from the Idea-ology Clippings Stickers collection.


And for anyone out there who's not familiar with the song that inspired me here's a link--take a listen!

April 11, 2018

Ada Again


I have modified a recent collage (see previous post, Ada 1916) by scraping off the photo of my great Aunt Ada and replacing the image with one I like better.

Because the original photograph was a bit thicker than the other collage papers I used, it was pretty easy to get underneath it and carefully peel/scrape it off.


Then I used this image as a transfer and created a mask of the hands and face. I used the mask to apply off-white paint on the background where the image was placed. Since image transfers are inherently transparent, this technique keeps the background from showing through.


The image transfer's darker undertones made it necessary to adjust values throughout the collage using transparent paint (glazing) and I also colored the collage paper flowers.

And finally, I felt the need to contain the composition by adding a border which was made using dots of Scribbles. I think the addition of the black accents helped to emphasize the other black elements in the collage.

March 31, 2018

Erasable Memoranda


The paper used for this tag was cut from a vintage (1916) portrait cover (a graduation photo of my great aunt Ada). It's a light mustard color with an embossed stripe texture and because of its age, it's a bit friable and easy to distress.

I built a collection of boxes filled with various bits and mounted it on top of ephemera from the Tim Holtz Collector Layers. The ruler came from the Dapper paper stash and I embossed the end with metallic powders.


I tinted the metal star and index clip (Tim Holtz) with metallic white and butterscotch alcohol inks and that's a distressed Remnant Rub on top of the clip. 


I made it for this week's Monday Challenge Blog at Simon Says Stamp which prompted crafters to do something "Inside the Box." I enjoy working with the prompts because it gets me creating things I've always wanted to try but might not have otherwise.

My little boxes are not an original idea and I must give credit where credit is do. Rebecca Sower is an artist I've been following since I discovered this magazine article (Somerset Studio) in December, 2009. I didn't realize until just this moment that an altered book I made recently may have been inspired by her too!

March 11, 2018

Cool in the Shade

My favorite teachers? The passing of time, experience, practice, experimentation, mistakes. Case in point this tag (made for Simon's Monday theme "Whatever the Weather"):


  1. Learning how to use Photoshop's recompose tool to crop this photo without losing the photograph's border frame.
  2. Experimenting with Tim Holtz Distress Oxide Ink technique on glossy paper with mixed results (too much water, not enough ink?).
  3. Applying crackle medium to paper, the product I use has to be applied really thick--it was too thin this time to show up.
  4. The benefit of delaminating some Idea-ology paper stash to reduce bulk when collaging (text piece is full thickness, report card area was made thinner). Each time I try this, I get better at it. The trick is to gently rub off the back with a little water after peeling away as much as you can.
  5. The flowers (Idea-ology ephemera) were also delaminated because they are easier to refine with cutting when the paper's not so thick.
  6. Proved again that for me, the best way to tint a photo is still using a dab of ink from a gel pen with a little water (the turquoise in the wallpaper behind the teacher, for example).
  7. Appreciating that without adding a little whimsy to the piece an observer might think it too serious and wonder about my mental state. (Perhaps you should anyway.)
The weather connection is in the Idea-ology text from the Memorandum paper stash. I do believe this teacher is cool in her shades. Also note the Red Precipitate Ointment which is a nice touch--don't you think?


By the way, my favorite human teacher was Mrs. Jennings who had the patience to work with me in the 5th grade when I refused to learn multiplication tables and provided comfort from bullies.

February 26, 2018

I Know


Love this little miss and those doe-eyes--she's included in the latest release of Tim Holtz Paper Dolls. She's sitting inside a Mini Cabinet Card that I fussy-cut and behind it is the backside of the card that I tinted to provide a darker backdrop.

The frame's scrollwork was embellished with a Picket Fence Distress Marker and Glossy Accents along with dots made with Scribbles. The butterfly was stamped, cut-out, tinted and crackled.


My starting point for this tag was trying out the new Idea-ology Worn Wallpaper and an attempt to achieve a peeling effect. That's cardboard as the base filled in with texture paste to simulate the look of wooden laths and plaster.

A Clippings Sticker, more dots of Scribbles and a piece of Lace Trimming were also used.

February 13, 2018

Heartfelt Friendship


A Valentine's Day tag? Sure! Why not? I'll be sending this to my dear friend, Thelma, who got me started in paper crafting and always makes her Valentine's Day cards special with a commemorative postmark from Loveland.


I'm linking this to a special Simon Says Stamp blog post, Send a Card to a Friend Day (for a chance to win a $100 gift card--whoo-hoo!).

Supplies used: Authentique Classique "Pretty" paper, tinted paper doilies, washi tape, Scribbles, a white Gelly Roll pen and Idea-ology design tape (Chatter).

February 07, 2018

Feeling Noteworthy


The bird's crown is a Remnant Rub. Many of the older rubs have been discontinued. I am unhappy about that because I find them so useful. So I have no other choice but to hoard them.

Anyway, today my intention was to make a valentine-themed tag but I veered off-course (a good excuse to try again later) and made this tag instead.


The botanical bits came from an older 7 Gypsies paper collection called Conservatory. A vintage Germania postage stamp, scraps from a book page and yes, more Remnant Rubs (don't get me started) were also used.

I thought I'd speak a bit about my dotted border. As I use this decorative element quite often, I have a few tips in case you want to give it a go. I prefer Scribbles which is a dimensional fabric paint but also use Liquid Pearls.

When applying, don't touch the applicator tip to the paper as you will get a splotch instead of a dot. Rather, gently squeeze some out from the tip and delicately touch only the drop/paint to the paper then pull it away. Don't worry if it peaks a little, it will settle as it dries.

If you goof-up (and you will, it's inevitable)--fear not. Just keep a toothpick handy and scrap off the mistake as best you can. Then move on. Keep dotting ahead. Afterwards, you can go back to the boo-boo and use a knife to scrape away the dried bits that might still be there. Then put your new dots back in. I had two areas on this tag that I had to re-do and no one (except you) will ever know.

January 25, 2018

Find Away

I like challenge blogs and my favorite is the Simon Says Stamp's Monday Challenge Blog. And I really, really like challenge blogs when the theme is to create a tag or something with a tag attached.

As I am rather fond of the format :) for this week's Tag It challenge, I used both suggestions and made a tag with tags.


Tim's tiny stamps, washi, tissue wrap, remnant rubs, found relatives and fabric bits were used to create my, dare I say? unconventional masterpiece. No matter what you might think of this tag--you gotta love that faucet (so much detail in such a tiny stamp)!

December 08, 2017

12 Tags for Christmas 2017- Most Wonderful Time


It's tag number eight and that rhymes with skate!

(Sorry...  if you've ever made 12 Christmas tags in a row, you start to get a little slap-happy.)

The assembly consists of an Occasions found relative (Tim Holtz) which was masked then stamped, a die-cut (Tim Holtz Gothic Gate) made from a magazine page, and pinecones cut from the Frosted paper pad (Kaisercraft). Some Stickles and Scribbles provided the bling and text was cut from the Tim Holtz Tidings paper stash (2016).

December 07, 2017

12 Tags for Christmas 2017 - Dashing


Okay, I know, dashing through the snow is about a sleigh and a horse (and bells I think), but birds do some dashing, too, as evidenced by my cat's favorite entertainment (a live video cam of a bird feeder in Canada).

So perhaps that explains my combination of birds and text for this, my 7th Christmas tag of the season.


I was drawn to the combination of the golden yellows with the black and white. The birds were cut from a Graphic 45 paper called Winter Wonderland, the vertical strip is the edge of an old book page, and the snowflakes and text are from a paper pad called Deck the Halls with Chalk (Hobby Lobby/Paper Studio, 2013). The tiny white dots are Scribbles (3D fabric paint).

September 16, 2017

Praesepe


Back in 2011, Tim Holtz introduced a paper stash called Kraft Resist--it's printed on pure kraft cardstock in black with an accent image printed in a clear raised enamel which resists inks, paints, and sprays.

One of the page designs features a map of the world with a resist design of a star-shaped compass and that's what I used to create this tag for Simon's Monday Challenge Blog. This week's theme is "It's Written in the Stars."

I used Seedless Preserves and Mowed Lawn distress stains for tint and embellished it with dots of three different 3D paints in off-white, rose and copper.

The face is a stamp from Paper Artsy and the text was clipped from an old dictionary.